0
0ARK Survival Ascended Bronto Base Guide: Best All-in-One Mobile Platform Build
- Aisling
- Share
- ARK Survival Ascended
- 05/08/26
- 495
Good Bronto base in ARK: Survival Ascended has one job: carry the tools you actually use without turning the saddle into a laggy mess.
This build gives us a mobile house, greenhouse, crafting area, storage deck, power setup, bed, kitchen, and flyer parking. It works on a vanilla Brontosaurus, but the platform settings must be raised first. Skip that step and the build dies halfway.
- Best Bronto Base Settings Before Building
- Required Platform Saddle Settings
- Materials and Build Options
- Core Building Pieces
- Optional Mods and Cosmetics
- Bronto Platform Layout
- Step 1: Start at the Rear Center
- Step 2: Shape the Upper Platform
- Step 3: Add the Lower Deck
- Step 4: Add Support Frames
- Main Cabin Layout
- Cabin Footprint
- Walls, Door, and Windows
- Rear Greenhouse Setup
- Greenhouse Build
- Crop Plot Performance
- Irrigation
- Roof, Chimney, and Exterior Shape
- Roof Options
- Chimney Build
- Exterior Deck Details That Matter
- Railings and Safety
- Fake Structural Supports
- Rope Ladders
- Utility Deck Setup
- Best Crafting Layout
- Flyer Parking
- Power Setup
- Interior Layout
- Downstairs Plan
- Kitchen Tips
- Living Room
- Loft Bedroom
- Best Loft Setup
- Decoration Without Ruining Function
- Best Low-Cost Details
- Fabric Awning Trick
- Pergola Trick
- Vanilla vs Modded Bronto Base
- Common Problems and Fixes
- Best Build Order
- Final Bronto Base Layout
- FAQ
- Can this ARK: Survival Ascended Bronto base work on a vanilla Brontosaurus?
- What platform saddle settings do we need?
- Can we build this without mods?
- Why does my lower deck collapse?
- Why is my greenhouse effect only 0%?
- Can the Bronto base have running water?
- Can we fit an Argentavis on this Bronto base?
- Why do lights not work inside the Bronto base?
- What is the best roof option?
- What is the biggest mistake to avoid?
- Summary
↖ Best Bronto Base Settings Before Building
Default platform limits are too low. Fix them first.
↖ Required Platform Saddle Settings
| Setting | Recommended Value | Why It Matters |
|---|---|---|
| OverrideStructurePlatformPrevention | True | Allows flexible platform building |
| PlatformSaddleBuildAreaBoundsMultiplier | 15–20 | Expands saddle build area |
| PerPlatformMaxStructuresMultiplier | 20 | Prevents early structure cap |
Use:
OverrideStructurePlatformPrevention=True
PlatformSaddleBuildAreaBoundsMultiplier=20
PerPlatformMaxStructuresMultiplier=20
If you play on a server, change this through your host panel or ask the admin.
If you play single-player, edit GameUserSettings.ini before loading the save.
Tested result: with default limits, a full cabin, rails, greenhouse, and crafting deck will usually hit the cap too early. With multiplier 20, the build has enough room for function and decoration.
↖ Materials and Build Options
You do not need premium cosmetics. They help the look, not the function.
↖ Core Building Pieces
| Category | Best Choice | Backup Option |
|---|---|---|
| Base platform | Wood foundations, ceilings, triangle ceilings | Stone or metal |
| Supports | Scaffolding / pillars / double doorframes | Doorframes are safest vanilla option |
| Cabin | Wood walls, windows, quarter walls | Stone for stronger style |
| Roof | Thatch roof or wood roof | Cosmetic skins |
| Greenhouse | Greenhouse walls, door, ceilings | Small crop room |
| Safety | Railings | Any railing type |
| Utility | Smithy, forge, fabricator, fridge, grill | Prioritize smithy + forge first |
↖ Optional Mods and Cosmetics
| Add-on Type | Use | Required? |
|---|---|---|
| Frontier-style skins | Cleaner roof, windows, pillars | No |
| Free cosmetic skins | Settler/rustic look | No |
| Landscaping plants | Vines, flowers, roof greenery | No |
| Decor mods | Rugs, shelves, food crates | No |
| Visual storage | Better storage presentation | No |
Best rule: build vanilla first, decorate last. ARK platform builds punish early decoration.
↖ Bronto Platform Layout
The platform is the whole build. Get this wrong and every room feels cramped.
↖ Step 1: Start at the Rear Center
Stand on the Bronto platform saddle.
Place:
1. 1 wood foundation at the rear center.
2. 1 wood foundation left.
3. 1 wood foundation right.
You want a clean row of 3 foundations across the back.
↖ Step 2: Shape the Upper Platform
From the rear center, extend with:
| Placement | Piece |
|---|---|
| Rear curve | Triangle ceiling |
| Center extension | Wood ceiling |
| Forward curve | 3 triangle ceilings |
| Opposite side | Mirror the same shape |
If a foundation refuses to snap, use a ceiling. Do not fight the saddle collision. That is how you waste materials.
↖ Step 3: Add the Lower Deck
Use a wall or support piece to snap ceilings below the main platform.
This lower deck holds:
- Smithy
- Forge
- Fabricator
- Fridge
- Storage
- Flyer parking
- Rope ladders
Critical rule: do not delete the support wall or support chain too early. On vanilla Brontos, removing the wrong piece can collapse the lower deck.
↖ Step 4: Add Support Frames
Use one of these:
| Support Type | Best For | Verdict |
|---|---|---|
| Wood scaffolding | Clean look | Best if available |
| Double doorframes | Vanilla support | Most reliable |
| Pillars | Open design | Good for visual support |
For a strict vanilla build, use double doorframes under the platform. They hold ceilings well and look like real framing.
↖ Main Cabin Layout
The cabin sits on the upper deck. Keep it compact.
↖ Cabin Footprint
Use the center platform shape:
- Triangles on both sides
- Squares in the middle
- Rear area reserved for greenhouse
- Front center reserved for double door
Place quarter walls first to mark the outline.
↖ Walls, Door, and Windows
Recommended layout:
| Area | Pieces |
|---|---|
| Front | Double doorway + double door |
| Sides | Wood windows + walls |
| Rear | Greenhouse entrance |
| Top trim | Quarter walls |
| Corners | Pillars |
Use windows generously. A Bronto cabin is small. No windows makes it feel like a storage crate.
↖ Rear Greenhouse Setup
The greenhouse is small, but it is useful. It gives you mobile access to crops for food, dyes, kibble prep, and recipes.
↖ Greenhouse Build
Place at the rear of the cabin:
| Piece | Placement |
|---|---|
| Greenhouse walls | Around rear square section |
| Greenhouse door | Center access |
| Greenhouse ceilings | Roof |
| Small crop plots | Along edges |
| Water tank | Outside platform |
↖ Crop Plot Performance
| Crop Plot | Reliability | Use It? |
|---|---|---|
| Small crop plot | High | Yes |
| Medium crop plot | Inconsistent | Only if greenhouse effect works |
| Large crop plot | Poor fit | No |
Real build note: small crop plots are the safest choice. Medium plots may show greenhouse effect in one spot and lose it after a tiny move.
If a plot shows 0% greenhouse effect, pick it up and shift it. If it still fails, switch to small plots.
↖ Irrigation
Use water tanks on the platform.
- Rain fills the tanks.
- Tanks irrigate the crop plots.
- More tanks mean fewer dry periods.
This is not perfect desert farming. It is a mobile crop backup.
↖ Roof, Chimney, and Exterior Shape
The roof decides the style. Thatch looks cozy. Wood looks tougher. Cosmetic skins look cleaner.
↖ Roof Options
| Roof Type | Best For |
|---|---|
| Thatch roof | Rustic cottage style |
| Wood roof | Vanilla survival look |
| Greenhouse ceiling insert | Skylight |
| Hatch / cellar door | Roof access |
| Cosmetic slate roof | Polished mobile home |
Add a small overhang with quarter ramps around the roof edge. It makes the cabin look finished instead of boxed in.
↖ Chimney Build
Use:
- Stone quarter walls
- Quarter ceiling
- Side walls into the roof
- Pot or vessel on top
The chimney hides roof clutter and gives the build a proper cabin silhouette.
↖ Exterior Deck Details That Matter
Do not overdecorate the walking paths. Platform movement can shove your character around.
↖ Railings and Safety
| Area | Railings? | Reason |
|---|---|---|
| Upper walkway | Yes | Stops platform sliding accidents |
| Lower crafting deck | Yes | Protects work area |
| Rear greenhouse deck | Yes | Frames utility space |
| Neck area | No | Leave Bronto movement room |
| Ladder points | Gap needed | Allows climbing |
Railings are not cosmetic here. They prevent stupid deaths.
↖ Fake Structural Supports
Add angled supports from the platform down toward the Bronto body.
For vanilla Bronto:
- Keep supports short.
- Place them close to the body.
- Do not extend past build bounds.
For larger modded Brontos:
- Longer supports look better.
- You can run them toward the belly or legs.
Result: the base looks heavy, supported, and believable.
↖ Rope Ladders
Good spots:
| Location | Use |
|---|---|
| Side deck | Fast entry |
| Rear deck | Backup access |
| Lower platform | Utility movement |
| Decorative beam | Looks like cargo rigging |
If the ladder is blocked, remove one railing section.
↖ Utility Deck Setup
Put loud, bulky, ugly tools outside. Keep the cabin livable.
↖ Best Crafting Layout
| Station | Best Location | Reason |
|---|---|---|
| Smithy | Lower side deck | Fast repairs and crafting |
| Forge | Near smithy | Metal workflow |
| Fabricator | Powered lower deck | Keeps noise outside |
| Fridge | Near power source | Food storage |
| Storage boxes | Along walls | Saves floor space |
| Cooking pot | Rear corner | Optional utility |
↖ Flyer Parking
| Flyer | Fits? | Notes |
|---|---|---|
| Pteranodon | Yes | Easy |
| Argentavis | Yes | Park carefully |
| Tapejara | Yes | Works well |
| Quetzal | No | Too large |
Keep the flyer away from ladders and doors. An Argentavis blocking a doorway gets old fast.
↖ Power Setup
Use a wind turbine or generator on an outside platform.
Best powered items:
- Fabricator
- Fridge
- Industrial grill
- Optional lights
Known issue: lights may show the flame or bulb effect but fail to cast proper light on Bronto platforms. If that happens, use:
- Skylights
- Greenhouse roof pieces
- Bright wall skins
- Open windows
The power still works for stations. The lighting bug is visual.
↖ Interior Layout
Small base. High discipline. Every item earns its spot.
↖ Downstairs Plan
| Zone | Items | Purpose |
|---|---|---|
| Kitchen | Grill, storage, taps | Cooking |
| Center | Table + chairs | Dining |
| Living area | Fireplace, couch, rug, shelves | Comfort |
| Rear | Greenhouse door | Crop access |
| Loft access | Rope ladder | Saves space |
↖ Kitchen Tips
Place the grill on one wall. Put storage boxes on both sides.
For a fake sink:
1. Place two small crates or boxes.
2. Add taps above them.
3. Paint or skin them to match.
It looks good and costs little space.
↖ Living Room
Use:
- Fireplace
- One couch
- One chair
- One rug
- Two shelves or bookcases
Do not pack the room too hard. You still need to move during raids, storms, and panic crafting.
↖ Loft Bedroom
Use a rope ladder, not stairs. Stairs eat too much room.
↖ Best Loft Setup
| Item | Placement |
|---|---|
| Bed | Widest wall |
| Chair | Near chimney |
| Shelf | Side wall |
| Skylight | Roof center |
| Railing | Around ladder hole |
If the chimney passes through the loft, box it with quarter walls. Turn the problem into a fireplace column.
The loft gives you a clean respawn point without wasting the main floor.
↖ Decoration Without Ruining Function
Decoration should support readability and movement.
↖ Best Low-Cost Details
| Detail | How to Make It |
|---|---|
| Flower boxes | Feeding troughs + plants |
| Vines | Under roof edges |
| Fabric awning | Painted wood quarter ramps |
| Pergola | Half beams + skinny pillars |
| Cargo look | Rope ladders + crates |
| Cozy cabin | Rugs + shelves |
↖ Fabric Awning Trick
Use:
- Wood quarter roof
- Wood quarter ramp
- Wood quarter ceiling
- Skinny pillars
- Dark red dye
Paint all regions. From a distance, it reads like cloth.
↖ Pergola Trick
Use half beams in a small grid. Leave beam ends exposed. Add skinny pillars down to the deck.
It gives the platform depth without blocking movement.
↖ Vanilla vs Modded Bronto Base
| Version | Pros | Cons |
|---|---|---|
| Full vanilla | Works anywhere | Less visual variety |
| Vanilla + cosmetics | Best balance | Some skins may cost money |
| Free cosmetic mods | Strong style options | Server must allow mods |
| Heavy decor mods | Showcase quality | Higher structure count |
For real survival play, use vanilla structure first. Add cosmetics only after the saddle is stable.
↖ Common Problems and Fixes
| Problem | Cause | Fix |
|---|---|---|
| Structure cap reached | Default saddle limit | Raise multiplier to 20 |
| Ceiling will not snap | Saddle/body collision | Use ceiling instead of foundation |
| Deck collapses | Support chain deleted | Keep walls/scaffolds |
| Crop plot has 0% effect | Bad placement | Move it or use small plots |
| Lights do not illuminate | Platform lighting bug | Use skylights |
| Ladder blocked | Railing/flyer in way | Remove railing gap |
| Character slides | Platform movement | Add railings |
| Flyer blocks path | Bad parking | Move it to lower side deck |
↖ Best Build Order
Follow this order. It prevents rebuilds.
| Step | Task |
|---|---|
| 1 | Change platform saddle settings |
| 2 | Build upper platform |
| 3 | Add lower deck and supports |
| 4 | Build cabin walls |
| 5 | Add greenhouse |
| 6 | Add roof and chimney |
| 7 | Add railings and support beams |
| 8 | Place crafting stations |
| 9 | Build interior |
| 10 | Add cosmetics and plants |
Do not decorate before testing the platform. That is the fastest way to pick up half your base twice.
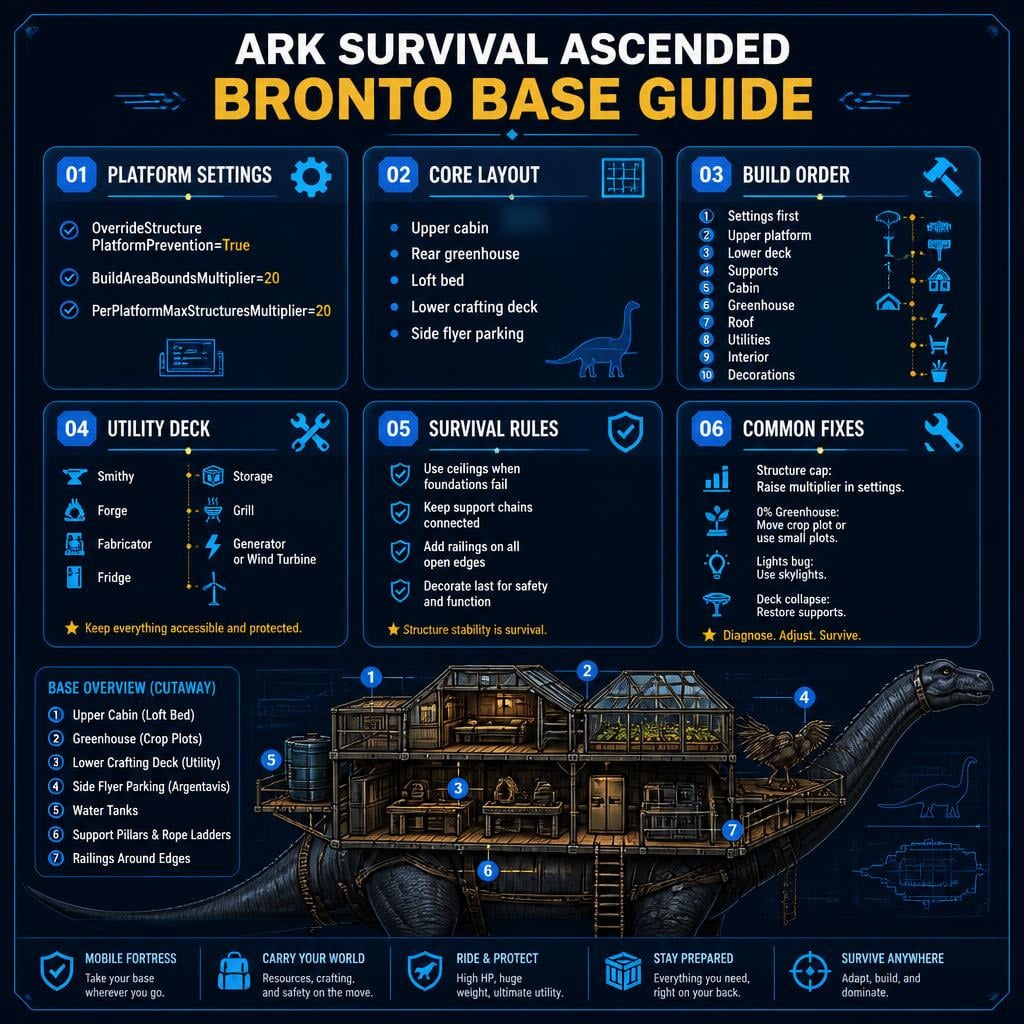
↖ Final Bronto Base Layout
| Area | Contents |
|---|---|
| Front upper deck | Riding access, benches, railings |
| Main cabin | Kitchen, dining, living room |
| Rear cabin | Greenhouse |
| Loft | Bed, shelves, skylight |
| Lower deck | Forge, smithy, storage |
| Powered deck | Fabricator, fridge, grill support |
| Side platform | Flyer parking |
| Exterior | Rope ladders, beams, plants, awnings |
This gives us a real mobile base, not just a decorative saddle.
↖ FAQ
↖ Can this ARK: Survival Ascended Bronto base work on a vanilla Brontosaurus?
Yes. Use ceilings when foundations refuse to snap. Keep supports shorter and closer to the body because vanilla Bronto build bounds are tighter.
↖ What platform saddle settings do we need?
Use OverrideStructurePlatformPrevention=True, BuildAreaBoundsMultiplier 15–20, and PerPlatformMaxStructuresMultiplier 20.
↖ Can we build this without mods?
Yes. The core base uses standard structures: wood, thatch, greenhouse pieces, railings, pillars, crop plots, and crafting stations. Mods only improve visuals.
↖ Why does my lower deck collapse?
You deleted a key support piece. Keep the support wall, scaffolding, pillar, or doorframe chain until the full deck is stable.
↖ Why is my greenhouse effect only 0%?
The crop plot is in a bad detection spot. Move it slightly. If it still fails, use small crop plots, which are more reliable on this build.
↖ Can the Bronto base have running water?
Yes, with water tanks. Rain fills them, and they irrigate crop plots. Add more tanks for longer dry periods.
↖ Can we fit an Argentavis on this Bronto base?
Yes. An Argentavis fits on the lower side deck, but keep it clear of doors, ladders, and crafting stations.
↖ Why do lights not work inside the Bronto base?
Some ASA platform saddles have a lighting issue where lamps show effects but do not cast proper light. Use skylights, greenhouse roof pieces, and bright interiors.
↖ What is the best roof option?
For vanilla style, use thatch. For a cleaner mobile-home look, use wood or cosmetic slate-style skins. Add a skylight if the interior feels dark.
↖ What is the biggest mistake to avoid?
Do not decorate early. Build the platform, supports, cabin, and utility layout first. Decorate only after the structure is stable and walkable.
↖ Summary
The best ARK: Survival Ascended Bronto base is compact, stable, and useful.
Core setup:
- Raised platform settings
- Upper cabin
- Lower crafting deck
- Small greenhouse
- Bed in loft
- Water tanks
- Generator or turbine
- Smithy, forge, fabricator, fridge
- Railings on every walking edge
Build for function first. Add style after. That is how this Bronto becomes a real all-in-one mobile base instead of a pretty saddle that fights you every time you move.

Most Popular Posts
- ARK Survival Ascended Genesis 1 Best Loot and Hexagon Farm Guide
- ARK Survival Ascended 2026 Update Guide: Lost Colony Fixes, Trait Upgrades, Creature Changes
- ARK Survival Ascended Umbra Guide: Spawn Location, Taming Steps, Abilities, Skill Tree & Worth
- ASA Best Boss Fighting Creatures: Ranked for Boss Arenas, Titans, and Mini Bosses
- ARK Survival Ascended Ship Guide: Best Ships, Sailing Controls, Cannons, Skills, Farming & PvP Uses
- ASA Evo Brontosaurus Guide: Taming, Abilities, Saddles, Spawn Locations & Best Uses
Popular Category Lists
- Grow a Garden / (286)
- ARC Raiders / (262)
- CoD: Black Ops 7 / (166)
- Monopoly Go / (146)
- MLB 26 / (144)
- Star Citizen / (112)
- Steal a Brainrot / (89)
- Sailor Piece / (68)
- ARK Survival Ascended / (67)
- Diablo IV / (61)
- Forza Horizon 6 / (60)
- Blox Fruits / (60)
- CoD: BLACK OPS 6 / (55)
- Adopt Me / (53)
- Path of Exile 2 / (48)
- Monster Hunter Wilds / (46)
- Windrose / (44)
- Path of Exile / (40)
- Grow a Garden 2 / (40)
- Bee Swarm Simulator / (36)