0
0How to Quickly Get ARC Raiders Tempest Blueprint?
- KIVRI
- Share
- ARC Raiders
- 02/09/26
- 1490
The Tempest blueprint is the hardest thing to get in ARC Raiders. It's no surprise that players engaged in long grinding runs are coming up empty. We've done multiple raids with no success and through multiple strategies, we have found a method that (somewhat) works.
The ARC Raiders Tempest blueprint (with Wolfpack blueprints) is NOT a matter of where you search. It is a matter of what strategy you use to arrange your lobby. Here we will tell you how to get the Tempest blueprint the fastest.
- Primary Strategy: Solo vs. Squads
- Prerequisites
- Stella Montis (The Speed Run)
- The Loot Loop
- Route 2: Buried City (The Deep Dive)
- Where to Go
- The Probability Game
- FAQ
- Summary
↖ Primary Strategy: Solo vs. Squads
Before we get on the map, we need to change how we think about the process. Opening the most chests in the shortest time is the most efficient way to farm blueprints.
Why do we switch to Solo vs Squads?
It may seem odd to put yourself at a disadvantage, but it makes sense. In a Solo vs Squads lobby, the other players seem to be more focused on PvP. They are actively seeking out other squads, not just looting trash cans or suitcases.
So, this means if we go to a spot with a lot of players, such as Plaza Rosa, there is a very good chance the area is still unlooted. If you just go to a standard solo lobby with a lot of PvE, the looters will get to the good spots, and then the map gets emptied out in just a few.
By fighting the other players, we take advantage of their aggression to get the good loot.
↖ Prerequisites
1. Night Raids Only: In our experiences, the Tempest and Wolfpack blueprints spawn exclusively during a night raid. If it's daytime, we simply don't go for these specific items.
2. Zero Loadout: We are all going in empty, which means we can run faster, dying doesn't matter as much, and we can reset very quickly.
3. Target Containers We want our focus to be on Spatial Containers for Odessa, Suitcases, Trash Cans, and Gym Bags. This is where we are going to get our blueprints from.
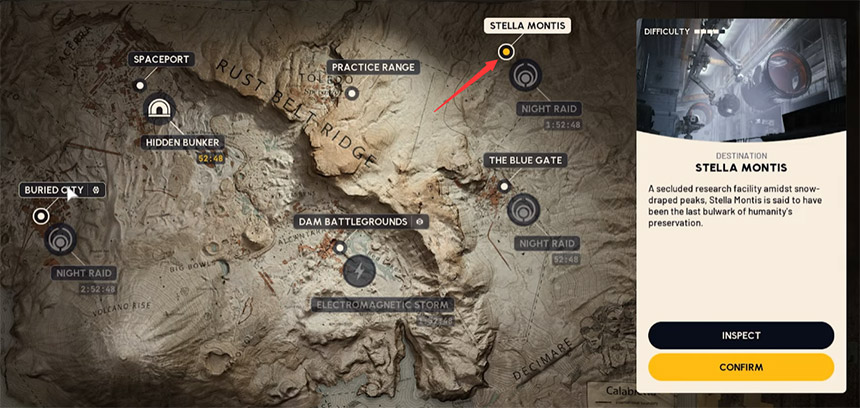
↖ Stella Montis (The Speed Run)
Stella Montis has become one of the more useful maps for this strategy. The greater part of this reason is due to the extremely elevated density of residential containers in the lobby and atrium areas and the very quick extraction or resetting that can be performed.
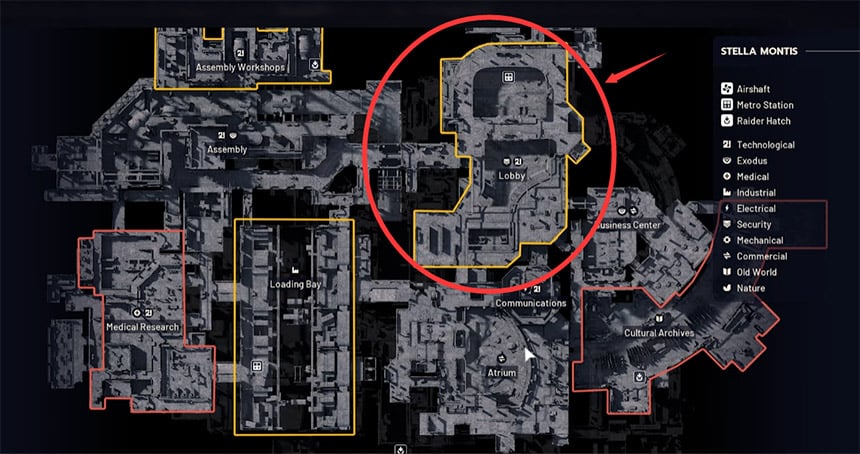
↖ The Loot Loop
As soon as we spawn in, we are looking to access the Lobby and Atrium.
1. Suitcases & Trash Cans: For the time being, please disregard the weapon crates.
2. Verticality: Make use of the stairs. If you aggro to the Shredders (the rolling enemies), lead them to the top of the stairs. They tend to get stuck, or have issues with vertical pathing and will get confused, allowing you to vault down to the lower floor and loot while they are trying to figure out what to do.
3. Repeat: Stella is very compact, so if you don't loot what you are looking for, you can easily leave, die, and restart the process much faster than you can in Buried City.
| Feature | Stella Montis | Buried City |
|---|---|---|
| Container Density | Very High (Clustered) | High (Spread out) |
| Run Duration | Short (3-5 mins) | Long (10+ mins) |
| Risk Level | Moderate (Close quarters) | High (Snipers/Open areas) |
| Best For | Rapid cycling of raids | Deep exploration runs |
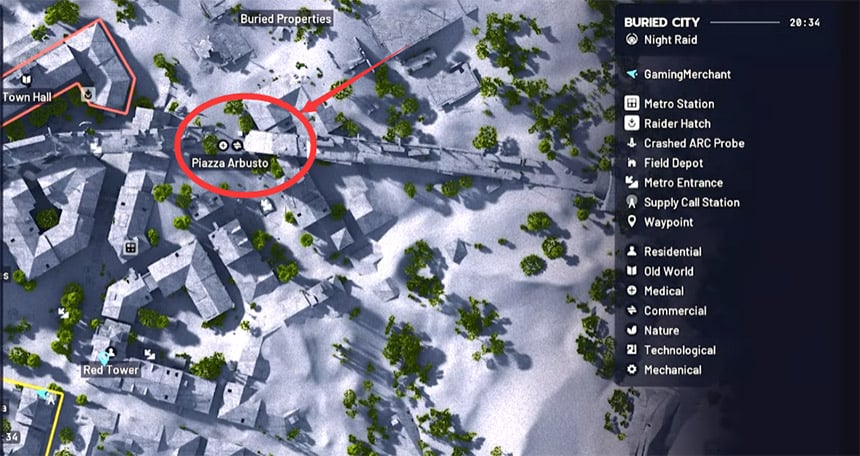
↖ Route 2: Buried City (The Deep Dive)
Buried City is also a good option for raids if Stella is not available or if you want a different environment. Buried City is a good option for long runs, and this is only if you know which buildings to loot. In a Solo vs. Squads, we have found these locations unlooted even 7–9 minutes into a raid.
↖ Where to Go
Plaza Rosa: Typically a hot zone, but in squad lobbies, teams are often fighting outside.
Abusto Tower: Check the residential floors.
Red Tower: Watch out when you approach this place as it has a strange spawn mechanic. Some meditrank, meditrays, and even medi\tbar containers seem to spawn Scrappy trinkets instead of medical items. While these containers do show an item, it's just an example of the kind of loot table specific to this place.
Main Street: There is a breachable building over here. We are running zero loadout, and this building is a gold mine with tools. While we can't breach it, the trash cans around it are almost guaranteed to spawn a Tempest.
Survival Tip: Defensively, you want to keep loot as we do not have guns. The ideal loot is from exploding ticks, called Poppers. They will drop Crude Explosives. If a Fireball enemy aggros you, crude will explode and take it out in one shot.
↖ The Probability Game
You could find it on the first run, or it might take twenty. Of runs we recorded for this guide, we managed to pull a Wolfpack and a Tempest blueprint.
The for Tempest the reality is that it is rare, and with Solo vs. Squads we are just increasing the number of dice rolls.
Normal Solo Run: You may hit an empty map in 5—10 unpicked containers.
Solo vs. Squads Run: While single players may hit an empty map at 5—10 unpicked containers, squads could see 30—50 unpicked containers, as they tend to bypass weaker loot.
↖ FAQ
Q: Can the Tempest blueprint spawn on any map?
A: The Tempest blueprint can spawn on any map, as long as it is a Night Raid. Nevertheless, the drop rate appears significantly more tied to residential-style containers (suitcases/trash), making Stella Montis and Buried City the most preferable maps due to more containers.
Q: Is it worth bringing a gun just in case?
A: For this specific farming method, we recommend against it. Once you bring gear, you tend to play more slowly, and this is not the aim. The objective is to maximum loot and minimum time, rotating as fast as possible and losing the blueprint to avoid combat. The goal is to find the blueprint and immediately extract.
Q: I keep finding the Wolfpack blueprint, but not the Tempest. Why?
A: The Wolfpack blueprint appears to be far more common in the same loot pool. If you are seeing Wolfpacks, you are in the right places (night residential containers). The Tempest blueprint is in the same loot table. You just have to keep searching as it has a far lower probability.
↖ Summary
If you want to acquire the Tempest blueprint as quickly as you can, you need to adjust your playstyle. You can do this by prioritizing statistics instead of survival. Next, make sure to change your matchmaking to Solo vs. Squads and stand by for a Night Raid. Finally, your loadout should be stripped to zero.
Once you do this, you can rotate to either Stella Montis for rapid rotations or Buried City for high-value buildings, and just aim to open as many trash cans and suitcases as possible. PvP can be ignored and the AI can be outsmarted to score a movement, and the Tempest blueprint will be to you. Good luck out there, Raiders.

Most Popular Posts
- ARC Raiders Riven Tides Key Room Guide: Best Hotel Keys, Loot Routes, Secure & Crane Storage
- ARC Raiders Bettina Guide: Best Build, Buffs, and How to Use It Against ARC
- Best ARC Raiders Attachments for Every Weapon: Complete Weapon Mod Guide
- ARC Raiders Turbine Boss Guide: Spawn Time, Weak Points, Best Weapons, and Loot
- Arc Raiders Patch 1.27: Regional Pricing, Augment Rework, and Expedition Catch-Up
- ARC Raiders Update Guide: Best Nomadic Envoy Trades, Rascal Grenade Launcher, Durability Buffs
Popular Category Lists
- ARC Raiders / (291)
- Grow a Garden / (286)
- CoD: Black Ops 7 / (166)
- MLB 26 / (150)
- Monopoly Go / (148)
- Star Citizen / (129)
- ARK Survival Ascended / (91)
- Steal a Brainrot / (90)
- Sailor Piece / (68)
- Forza Horizon 6 / (67)
- Diablo IV / (62)
- Blox Fruits / (62)
- Adopt Me / (58)
- Grow a Garden 2 / (57)
- CoD: BLACK OPS 6 / (55)
- Path of Exile 2 / (48)
- Monster Hunter Wilds / (46)
- Windrose / (44)
- Path of Exile / (40)
- Bee Swarm Simulator / (37)