0
0ARC Raiders Blueprints Farming: Buried City Loots Run Guides
- KIVRI
- Share
- ARC Raiders
- 02/02/26
- 1358
It can be said that the most important activity in ARC Raiders is farming blueprints. Once you obtain a few, you can craft almost anything, as long as the materials are there. The truth is that Buried City is the best map for farming blueprints and Coins.
During our most recent testing, we not only survived, but we also extracted 4 blueprints (including the new TAC MK3 Revival) and over 180K Coins value. If you want to quickly fill your stash, this guide will go over how we accomplished this.---
- The Loadout: Built for Speed and Greed
- The Route: From Piazza Arbusto to Hospital
- Phase 1: The Sprint (Piazza Arbusto & Red Tower)
- Phase 2: Stacking Value (Santa Maria & Grandioso)
- Phase 3: The Hazard (Space Travel)
- Phase 4: The Jackpot (Buried City Hospital)
- Inventory Management
- FAQ: Frequently Asked Questions
- Summary
↖ The Loadout: Built for Speed and Greed
To replicate this success, you cannot just go in blind. We optimized our load out for maximum carry capacity and mobility. Here is what you need and why:
| Gear Slot | Recommended Item | Strategic Reasoning |
|---|---|---|
| Backpack | Looting MK2 | Extra slots are essential. You're going to be looting a lot, and a smaller bag means you'll be leaving money on the ground. |
| Weapon | Renegade (Fully Kitted) | A reliable workhorse. You need something to handle rival players and the annoying ARC drones (pops) that slow you down. |
| Gadget | Adrenaline Shots | Speed means money. You need these to beat the others to the prime looting locations, like the Pharmacy. |
| Tool | Snap Hook | The movement MVP. You can skip stairs, slide through windows, and jump over rooftops to shave off precious seconds. |
↖ The Route: From Piazza Arbusto to Hospital
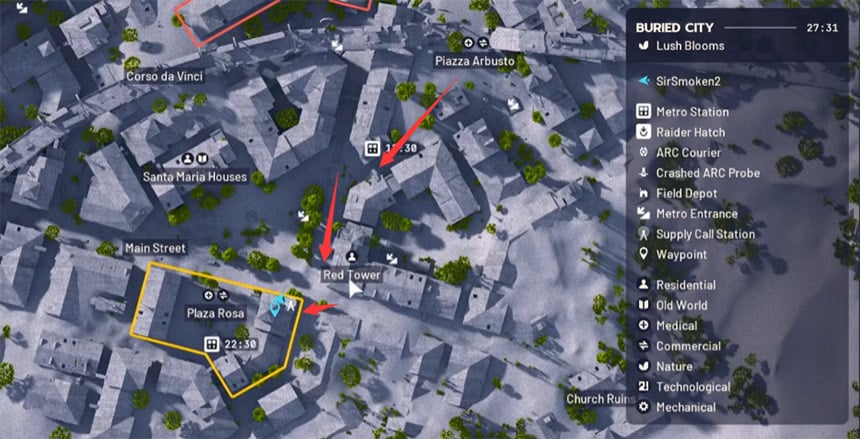
↖ Phase 1: The Sprint (Piazza Arbusto & Red Tower)
As soon as you spawn in, your first move is a dead sprint to the Piazza Arbusto next to Plaza Rosa. Even if you don't have the closest spawn, popping a stim can get you there first.
Why here?
It became evident this place is an intersection for attachments and keys. In this run, we got a Raider Hatch Key right off the bat, which is a plus because one of us couldn't create one.
Looting Tip:
While drawers and filing cabinets might yield some good finds, check the tops of shelves for herbal bandages and light magazines. If you run across a muzzle brake, break it down immediately if you don't need it to save some room.
Now, let's move on to the Red Tower and be sure to use your Snap Hook.
- The Roof: There is frequently a weapon case on the ledge and a backpack can sometimes spawn over there.
- The Lockers: Go ahead and check the red lockers. We got six springs here, which is really cool for crafting.
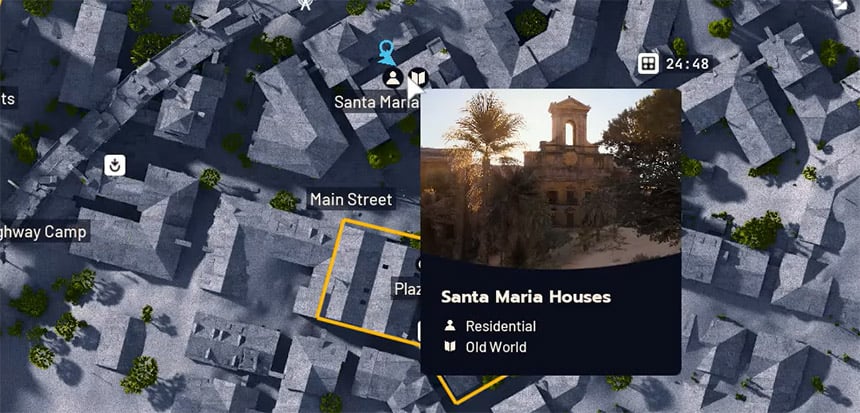
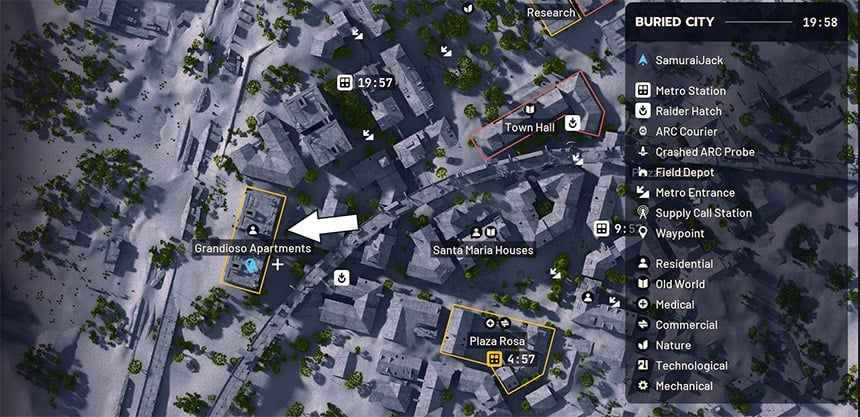
↖ Phase 2: Stacking Value (Santa Maria & Grandioso)
Next, slide your way to the Santa Maria houses. This is where we begin to build our cash stack and here, to start it off, we begin with a frequently overlooked item: Empty Wine Bottles.
The Math:
As far as these bottles are concerned, they sell for 1,000 each, and they can form a max stack of five (5).
That's a 5,000 credit slot that requires no mental effort on your part whatsoever.
Valuables:
Always check for Dart Boards and Projectors.
When entering Grandioso, consider that everything is likely to be looted. However, look at the ledges.
Sometimes players will loot the buildings, but overlook the Weapon Cases on the external ledges.
We pulled a Beretta from one, which we immediately broke down for parts.
↖ Phase 3: The Hazard (Space Travel)
This is where the run gets a little fun. The majority of players do not bother with the Space Travel building, or they only raid the roof.
Floors 2 & 6:
These floors are usually left empty. We found a trash can on the second floor which had a spring cushion (2 springs were in it!).
The Loot: This spot is surprisingly plentiful when it comes to Seeds and Blueprints. We even found a Defib blueprint in here during a same day raid.
The Lesson: Don't assume the building is looted just because the doors are ajar. Check the side rooms and trash cans.
↖ Phase 4: The Jackpot (Buried City Hospital)
If you are fortunate to acquire a Buried City Hospital Key (like we did from the Pharmacy or Admin building), this is your first priority.
The hospital's locked rooms are rarely scavenged since the keys are difficult to locate. However, we've struck gold with the following:
- 1. TAC MK3 Revival Blueprint (New and valuable)
- 2. Wolf Pack Launcher
- 3. Defib Blueprints (Multiple)
Reduced to 183k, we had to make some tough choices about what to keep.
↖ Inventory Management
You are deep into the raid. Your bag is full. What do you prioritize? Here is the strategy we follow to make the most money:
Break Down Guns:
If you find a standard weapon (like a Beretta or a Stitcher), break it down. Yes, a gun is lost value (about 2k), but it also saves you a lot of space. Simple Gun Parts only take 1 slot and magically stack. With the space gained, you can carry a blueprint worth 5k or a full stack of 5 wine bottles.
Prioritize Blueprints:
These are permanent. We once dropped medium shields to carry defib blueprints. The shield is temporary; the blueprint is forever.
↖ FAQ: Frequently Asked Questions
Q: Can you find blueprints in Day Raids?
A: Yes. Day Raids, though, are the safest and allow for quicker movements but higher drop rates can be found in Night Raids and Electromagnetic Storms. With the exception of the Hospital and Space Travel blueprints, Admin is also a good place to find blueprints. As shown, you can end up with 4 blueprints in a single sunny run if you check the right places.
Q: What if I don't find a Hospital Key?
A: The run is still highly profitable. Even without the secret room, the route through Pharmacy, Red Tower, and Space Travel usually nets around 100k-120k in loot. The key is just the cherry on top.
Q: Is the Renegade necessary? Can I use a starter gun?
A: You can use anything but the Renegade is more effective and is a good choice as it is fast. The most important thing is to have a gun that can take out the Pops (drones) so that they don't hinder your looting in the run.
↖ Summary
The Buried City map is an economy booster as well. If you follow this rotation—Pharmacy first for keys, then neglected floors of Space Travel, and before moving on, dismantle heavy weapons to manage your inventory—you can turn a regular run into an economic surge.
We began this run with a simple objective and completed it with 4 Blueprints and an inventory rich with materials. Loot can be found in trash bins, on ledges, and waiting for you to retrieve it. Raiders, good luck!

Most Popular Posts
- ARC Raiders Riven Tides Key Room Guide: Best Hotel Keys, Loot Routes, Secure & Crane Storage
- ARC Raiders Bettina Guide: Best Build, Buffs, and How to Use It Against ARC
- Best ARC Raiders Attachments for Every Weapon: Complete Weapon Mod Guide
- ARC Raiders Turbine Boss Guide: Spawn Time, Weak Points, Best Weapons, and Loot
- Arc Raiders Patch 1.27: Regional Pricing, Augment Rework, and Expedition Catch-Up
- ARC Raiders Update Guide: Best Nomadic Envoy Trades, Rascal Grenade Launcher, Durability Buffs
Popular Category Lists
- ARC Raiders / (291)
- Grow a Garden / (286)
- CoD: Black Ops 7 / (166)
- MLB 26 / (150)
- Monopoly Go / (148)
- Star Citizen / (129)
- ARK Survival Ascended / (91)
- Steal a Brainrot / (90)
- Sailor Piece / (68)
- Forza Horizon 6 / (67)
- Diablo IV / (62)
- Blox Fruits / (62)
- Adopt Me / (58)
- Grow a Garden 2 / (57)
- CoD: BLACK OPS 6 / (55)
- Path of Exile 2 / (48)
- Monster Hunter Wilds / (46)
- Windrose / (44)
- Path of Exile / (40)
- Bee Swarm Simulator / (37)