


 0
0Monster Hunter Wilds Bow Builds: Mastering the Dragon Piercer Build Guides
- Ben
- Share
- Monster Hunter Wilds
- 03/11/25
- 15899
The series of Monster Hunter is one of the most praised game series due to the elaborate mechanized combat and the variety of weapons that is available to the player. In the latest game of the franchise, Monster Hunter Wilds, the option of using the bow and arrow is available, which gives players unmatched precision and power through the Dragon Piercer Bow. In this guide, We explain the detailed steps and mechanics along with the optimal setups for mastering the Dragon Piercer Bow. This is targeted towards both skilled hunters and beginners who want some good gameplay pointers.
- The Allure of the Dragon Piercer
- Dragon Piercer Mechanics in Wilds
- Combat Rhythm
- Recommendations on Armor and Skills
- Armor Sets
- Talisman
- Decorations
- Key Skills
- Gameplay Guidance
- Final Remarks
↖ The Allure of the Dragon Piercer
Dragon Piercer is without a question one of the most appealing moves to the bow. In the fifth generation of Monster Hunter, the feature of charged shots was added, which allow the player to deal even more damage through the super move of Dragon Piercer. The super move allows the user to do extremely high amounts of raw damage due to the surmounted hits that are landed. Although it is considered to be a very niche playstyle, Monster Hunter Wilds has made its reinterpretation core to the experience, making it, in fact, the best way to play as a bow user.
In Wilds, the monster elemental hit zones are not as beneficial as the raw damage zones, which is a much more preferred approach. Because of this, the Dragon Piercer is now more useful because it can use its high motion values to secure faster kill times than traditional bows, overcoming most scenarios.
↖ Dragon Piercer Mechanics in Wilds
Knowing how to use Dragon Piercer in Wilds is crucial in maximizing its potential. The move has two distinct versions:
Powerful Slow Dragon Piercer:
This version is done from a state where you did not charge your bow or shoot a prior shot. It has a slow charge-up, but delivers significantly more damage. There is a backward slide animation which creates distance from the monster.
Quick Dragon Piercer:
Triggered as a follow-up to a standard bow attack, this version is faster to carry out and recover from, although dealing slightly less damage.
Don't forget that both extremes have their use case depending on the scenario. The slower, more powerful shot is more useful when a monster is vulerable such as during a knockdown. The faster variant on the other hand allows for consistent fluid combos and damage during active engagements.
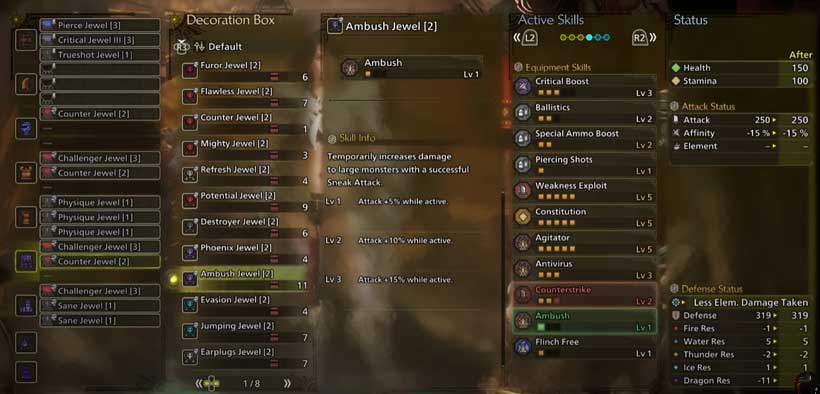
Optimal Bow: Griefbringer Earthstock
When using a Griefbringer Earthstock bow, I recommend a Dragon Piercer-centric build in Wilds. This bow has the best stats for this playstyle because of its built-in features:
Raw Attack: Sits at 250, placing it amongst the top contenders in the category.
Affinity: -15%. Not optimal, but balanceable due to skill changes.
Coating: Close Range Coating; gives an additional 40% damage increase to Dragon Piercer shots.
Skills: Contains two ranks of Ballistics and Special Ammo Boost. Accurancy and damage are enhanced with these skills.

↖ Combat Rhythm
In order to maximize the usability of your Dragon Piercer:
Positioning: Make sure that when you shoot a Dragon Piercer, you will be targeting a monster's most vulnerable hit zones. Proper positioning ensures maximum damage output.
Rhythm: Start with the commanding Dragon Piercer and slowly work your way up by weaving to maintain a wrenching flow while escaping damage.
Dodge: The output of an attack allows for stamina recovery and prepares for more Dragon Piercers.
↖ Recommendations on Armor and Skills
An optimized Dragon Piercer build requires a more or less cohesive set of armor pieces and a combination of skills. The following combination works best:
↖ Armor Sets
- Head: Guardian Full Helm
- Chest: Arc Vulcan Chest
- Arms: Guardian Arcel Gloves
- Waist: Gore Beta Waist
- Legs: Gore Beta Legs

↖ Talisman
Preferred is a Two Weakness Exploit Talisman which gives two ranks of Weakness Exploit.
↖ Decorations
Challenger Jewels: Jewels required to complete Agitator that helps with increasing raw damage and affinity during monster enrages.
Critical Boost Jewels: Boosts critical damage dealt.
Constitution Jewels: Helps with managing stamina.
Piercing Shots Jewel: Jewels needed to help with piercing attack power as beneficial for Dragon Piercer.
↖ Key Skills
Weakness Exploit: Helps you achieve maximum affinity when targeting weak zones in the monster.
Critical Boost: Allows for a greater boost in damages dealt during critical hits.
Agitator: Helps with raw attack and affinity while attacking the monster during enrages.
Special Ammo Boost: Helps with boost in damage on Dragon Piercer.
Constitution: Main focus is to lower the amount of stamina required for the user in order for effective movement.
Optional skills can be Counterstrike for added strength when recovering from hits unlike some Evade Windowwhile utility personalization skills such as Partbreaker can help suit user preferences.
↖ Gameplay Guidance
Flexibility: Do not forget to utilize the standard attacks of the bow whenever possible, even as you focus on spamming Dragon Piercers.
Stamina Optimization: Even in the absence of Stamina Surge, the flow of stamina drain is relatively easy to control due to Constitution and Discerning Dodge.
Focus Mode Benefits: Being able to reposition your aim during a charge ensures that every shot is fired at the appropriate target, resulting in fewer wasted shots.
Close Range Precision: It is crucial to be relatively close to the monster for maximum damage with the Griefbringer Earthstock's Close Range Coating. Learn to maintain the optimal range to the monster without risking too much.
Build Link: Checking here
↖ Final Remarks
Monster Hunter Wilds offers the Dragon Piercer Bow build and with it, the ability to balance between tactics and brute force, fundamentally altering how players engage with the bow weapon class. This playstyle is best suited for hunters who appreciate the chaos of dealing massive damage, as its unparalleled raw damage potential and satisfying mechanics will be sure to gratify.
Most Popular Posts
- MH Wilds Artian Weapons Guide: Materials, Craft and Upgrades
- Monster Hunter Wilds Bow Builds: Mastering the Dragon Piercer Build Guides
- MH Wilds: All Weapons Tier List & Ranking | Speedrun Clear Time
- MH Wilds New Endgame Builds: Zoh Shia Armor Set
- How to Obtain Rare Monster Hunter Wilds Commission Tickets?
- Monster Hunter Wilds Best Endgame Angelbein Bow Build Guides
Popular Category Lists
- Grow a Garden / (286)
- ARC Raiders / (262)
- CoD: Black Ops 7 / (166)
- Monopoly Go / (146)
- MLB 26 / (144)
- Star Citizen / (112)
- Steal a Brainrot / (89)
- Sailor Piece / (68)
- ARK Survival Ascended / (67)
- Diablo IV / (61)
- Forza Horizon 6 / (60)
- Blox Fruits / (60)
- CoD: BLACK OPS 6 / (55)
- Adopt Me / (53)
- Path of Exile 2 / (48)
- Monster Hunter Wilds / (46)
- Windrose / (44)
- Path of Exile / (40)
- Grow a Garden 2 / (40)
- Bee Swarm Simulator / (36)


