0
0Star Citizen 4.8.1 Money Guide: Best aUEC Methods for Hauling and Weapon Salvage
- RCHM
- Share
- Star Citizen
- 06/16/26
- 3728
Star Citizen 4.8.1 has two money loops worth your time: Pyro Redwind hauling and weapon salvage conversion.
If you have a large hauler and Redwind reputation, hauling is the better earner. A clean Senior-rank Pyro run can hit 11M+ aUEC in about 90 minutes. If you prefer slower, hands-on work, weapon salvage can still pull around 1M aUEC/hour by stripping Hammerhead weapons and converting them into Hadanite and sellable materials.
- Best Star Citizen 4.8.1 Money Methods
- Pyro Redwind Hauling: Best High-Profit Method
- Best Ships for Redwind Hauling
- Best Pyro Locations With External Freight Elevators
- Critical Freight Elevator Rule
- Safe Elevator Routine
- Best Redwind Route: Gaslight to Ruin Station
- Senior Redwind Hauling: 11M+ aUEC Runs
- Senior Route Strategy
- Avoid These Redwind Contract Bugs
- Weapon Salvage Money Method
- Weapon Salvage Setup
- Weapon Salvage Step-by-Step
- 1. Unlock Salvage Claims
- 2. Buy Hammerhead Claims
- 3. Strip and Load Weapons
- 4. Process With Fabricator
- 5. Sell Materials
- Redwind Hauling vs Weapon Salvage
- FAQ
- What is the best money method in Star Citizen 4.8.1?
- What is the best Redwind hauling route?
- Which Pyro locations have external freight elevators?
- How do I avoid losing cargo to freight elevator bugs?
- Is weapon salvage worth doing?
- Summary
↖ Best Star Citizen 4.8.1 Money Methods
| Method | Best Use Case | Realistic Payout | Main Requirement |
|---|---|---|---|
| Pyro Redwind Hauling | Large cargo ships | 7–9M aUEC/hour | Member+ Redwind rep |
| Weapon Salvage | Chill solo money | ~1M aUEC/hour | Salvage claims + fabricator |
| Refueling | Service gameplay | High, varies | Refuel-capable ship |
| Trading | Market players | Unstable | Capital + risk tolerance |
For pure profit, Redwind hauling wins.
For low-pressure gameplay, weapon salvage is safer and easier to run casually.
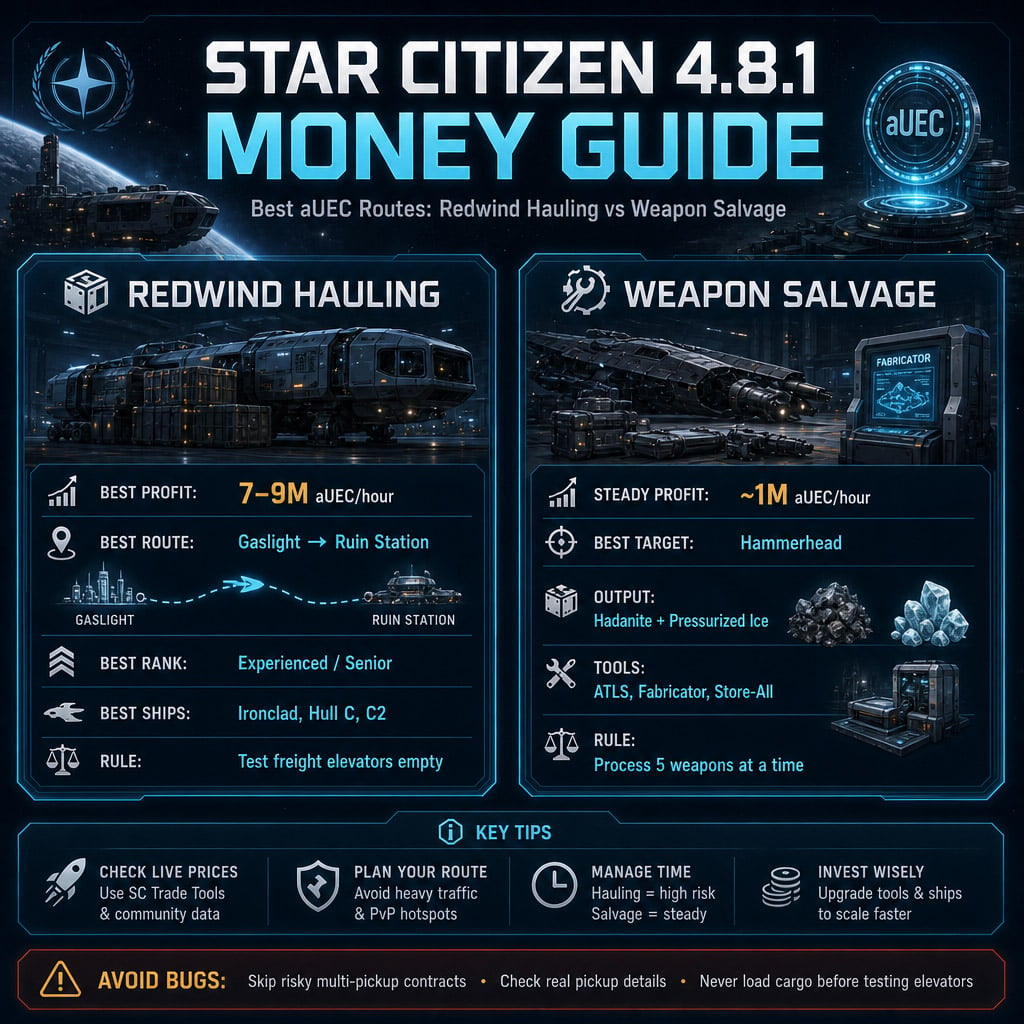
↖ Pyro Redwind Hauling: Best High-Profit Method
Redwind hauling pays because you can stack contracts and move massive cargo in one route.
The sweet spot starts at Member rank. It gets much better at Experienced and becomes serious money at Senior.
| Redwind Rank | Mission Quality | Worth Doing? |
|---|---|---|
| Junior | Mostly planetary routes | Not ideal |
| Member | Station-to-station starts | Yes |
| Experienced | Strong Pyro routes | Very good |
| Senior | Big contract stacking | Best |
| Master | Likely stronger | Test when unlocked |
↖ Best Ships for Redwind Hauling
Use a ship that can move huge volume without making loading painful.
| Ship | Why Use It | Notes |
|---|---|---|
| Ironclad | Huge cargo space | Best all-round pick |
| Hull C | Massive station hauling | Great for station routes |
| C2 Hercules | Easier handling | Lower capacity |
| Polaris / Idris | Can work | Slower logistics |
The best ship is not always the biggest. The best ship is the one you can load, fly, and unload fast.
↖ Best Pyro Locations With External Freight Elevators
Use external freight elevators whenever possible. They save time and make large-hauler work less miserable.
| Location | Use |
|---|---|
| Gaslight | Best pickup point |
| Ruin Station | Best delivery hub |
| Mumi Refueling | Good pickup |
| Checkmate | Good pickup, check contract details |
| Orbituary | Useful filler route |
| Stanton Gateway | Route option |
| Nyx Gateway | Route option, watch mislabeled contracts |
The best beginner-friendly route is Gaslight → Ruin Station.
↖ Critical Freight Elevator Rule
Before loading cargo, test the elevator empty.
If the terminal instantly kicks you out, the elevator may be resetting. If cargo is on the grid during that reset, it can disappear.
| What Happens | Meaning | Action |
|---|---|---|
| Opens normally | Probably safe | Raise/lower once |
| Instantly closes | Resetting or bugged | Do not load cargo |
| Cargo vanishes | Broken elevator | Leave or server hop |
| Works after test | Safer | Load carefully |
↖ Safe Elevator Routine
1. Land.
2. Open the freight terminal.
3. Raise/lower the elevator empty.
4. If it kicks you out, wait and retry.
5. Only load cargo after it behaves normally.
This one habit saves millions.
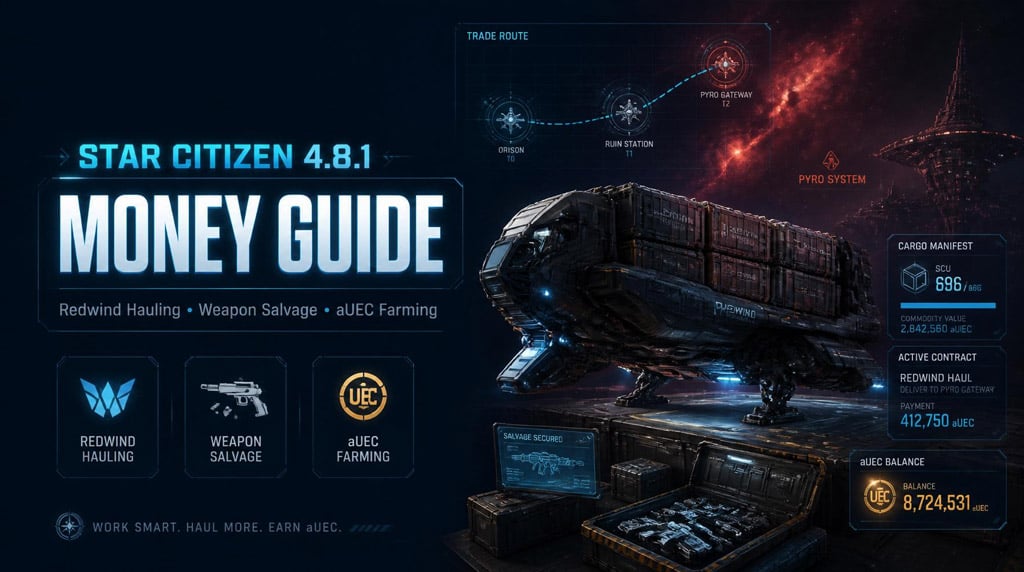
↖ Best Redwind Route: Gaslight to Ruin Station
At Experienced rank, Gaslight often shows several contracts worth about 795K aUEC each.
Stack them. Load once. Deliver once.
| Contract Stack | Payout | Route |
|---|---|---|
| 4 Experienced contracts | ~3.18M aUEC | Gaslight → Ruin |
| 2 return contracts | ~1.59M aUEC | Ruin → Gaslight |
| Full loop | ~4.77M aUEC | Gaslight ↔ Ruin |
This route is strong because it is simple. No terrain. No awkward planetary stops. No long chain of random destinations.
If you are building Redwind reputation, live on this route until better Senior contracts open.
↖ Senior Redwind Hauling: 11M+ aUEC Runs
Senior rank is where hauling becomes a real money printer.
A strong run can stack around 10 contracts, mostly ending at Ruin Station.
| Run Stat | Example Result |
|---|---|
| Contracts completed | 10 |
| Runtime | ~90 minutes |
| Payout | 11.167M aUEC |
| Effective rate | ~7.4M aUEC/hour |
| Optimized rate | 8–9M aUEC/hour |
↖ Senior Route Strategy
Build around one delivery hub. Usually Ruin Station.
| Pickup | Delivery | Priority |
|---|---|---|
| Gaslight | Ruin Station | High |
| Mumi Refueling | Ruin Station | High |
| Orbituary | Ruin Station | Medium |
| Checkmate | Ruin Station | Medium |
| Nyx Gateway | Ruin Station | Situational |
Use a notepad. Seriously. Write down pickup points before moving. The contract list gets messy fast, and one wrong stop burns more time than you think.
↖ Avoid These Redwind Contract Bugs
Some multi-pickup hauling contracts are still unreliable.
The dangerous type: multiple pickup locations → one delivery location.
Cargo may spawn only at the bottom-listed pickup location in the detailed contract view. Sometimes the contract title lies. The details matter.
| Bugged Behavior | Risk | Fix |
|---|---|---|
| Multiple pickups listed | Cargo may not count | Avoid if possible |
| Duplicate pickup names | Hidden real location | Check details |
| Bottom pickup differs | Cargo spawns there | Route to that address |
| Cargo not counted | Failed payout | Use single-pickup jobs |
Best rule: take single-pickup contracts when farming money.
Experiment later. Earn first.
↖ Weapon Salvage Money Method
Weapon salvage is slower than hauling, but it is easy to run solo.
You buy salvage claims, strip ship weapons, process them with a fabricator, then sell the output.
The best target is the Hammerhead.
| Target | Why It Works |
|---|---|
| Hammerhead | Around 24 Size 4 weapons |
| C2 Hercules | Poor weapon count |
| Large military ships | Good if weapon-heavy |
| Reclaimer | Situational |
Two Hammerheads can fill a large ship with weapons and produce strong material value.
↖ Weapon Salvage Setup
| Item | Purpose |
|---|---|
| Ironclad Assault / large cargo ship | Holds stripped weapons |
| Argo ATLS | Fast unloading |
| Fabricator | Dismantles weapons |
| Store-All containers | Holds Hadanite/materials |
| Refinery station access | Buy and use fabricator |
The Argo ATLS is not optional if you care about hourly profit. Moving weapons by hand kills the method.
↖ Weapon Salvage Step-by-Step
↖ 1. Unlock Salvage Claims
Run salvage contracts until larger claims appear.
| Contract Tier | Purpose |
|---|---|
| 300 aUEC | Starter rep |
| 10K aUEC | Progression |
| 20K aUEC | Better claims |
| Hammerhead claims | Main farm |
Expect to spend some money building access. Treat it as an unlock cost.
↖ 2. Buy Hammerhead Claims
Take Hammerhead salvage contracts when available.
A good run:
| Contracts | Cost | Expected Result |
|---|---|---|
| 1 Hammerhead | ~20–30K | ~24 weapons |
| 2 Hammerheads | ~40–60K | ~48 weapons |
| C2 add-on | Extra | Usually not worth it |
↖ 3. Strip and Load Weapons
Strip the turrets. Load the weapons neatly.
Bad weapon placement wastes space. Align them cleanly in the cargo bay.
↖ 4. Process With Fabricator
At a refinery station, unload weapons to storage and use a fabricator.
Do not process everything at once.
| Batch Size | Reliability |
|---|---|
| 1–5 weapons | Safe |
| 5 weapons | Best |
| 10+ weapons | Bug risk |
| Whole page | Bad idea |
Process five weapons at a time. It is slower, but it works.
↖ 5. Sell Materials
Weapons can break down into Hadanite, Pressurized Ice, and other minerals.
| Material | Approx. Value |
|---|---|
| Hadanite | ~600K aUEC per SCU |
| Pressurized Ice | ~4K–5K aUEC per SCU |
| Other minerals | Bonus income |
Example from two Hammerheads:
| Output | Estimated Value |
|---|---|
| Nearly 1 SCU Hadanite | ~600K |
| Around 49 SCU Pressurized Ice | ~200K |
| Total | ~800K aUEC |
With faster stripping and clean logistics, this can reach ~1M aUEC/hour.
↖ Redwind Hauling vs Weapon Salvage
| Factor | Redwind Hauling | Weapon Salvage |
|---|---|---|
| Best payout | Much higher | Lower |
| Hourly rate | 7–9M aUEC/hour | ~1M aUEC/hour |
| Best ship | Ironclad / Hull C | Ironclad Assault / C2 |
| Main risk | Freight elevators | Fabricator bugs |
| Gameplay | Logistics | Manual stripping |
| Best for | Serious farming | Chill solo runs |
If you have Redwind rep and a big hauler, run hauling.
If elevators are broken or you want a slower loop, run weapon salvage.
↖ FAQ
↖ What is the best money method in Star Citizen 4.8.1?
Pyro Redwind hauling is the best of these two methods. With Senior reputation and a large hauler, it can hit 7–9M aUEC/hour.
↖ What is the best Redwind hauling route?
Gaslight → Ruin Station. At Experienced rank, stack the ~795K aUEC contracts and deliver them together.
↖ Which Pyro locations have external freight elevators?
The key locations are Gaslight, Ruin Station, Mumi Refueling, Checkmate, Orbituary, Stanton Gateway, and Nyx Gateway.
↖ How do I avoid losing cargo to freight elevator bugs?
Test the elevator empty first. If it instantly closes or kicks you out, do not load cargo. Wait, retry, or change server.
↖ Is weapon salvage worth doing?
Yes, but not as the top money method. It is a solid solo loop worth around ~1M aUEC/hour if you strip Hammerheads, use an ATLS, process in small batches, and sell Hadanite efficiently.
↖ Summary
For Star Citizen 4.8.1 money farming, the hierarchy is clear.
Best profit: Pyro Redwind hauling.
Best route:Gaslight → Ruin Station.
Best payout tested:11.167M aUEC in about 90 minutes.
Best casual backup: Hammerhead weapon salvage into Hadanite.
The winning habit is simple: stack clean contracts, test elevators empty, avoid bugged multi-pickup jobs, and keep your route tight. That is how you turn Pyro hauling from a gamble into a repeatable money run.

Most Popular Posts
- Star Citizen Covalex Cargo Hauling 4.8: Fast Reputation Route, Best Ships, and Master Unlocks
- Star Citizen 4.8 Solo Ship Guide: Best Purchasable PvP & PvE Ships, Loadouts, Components
- Star Citizen 4.8.3 XenoThreat Event Guide: Fast Points, Best Missions, Rewards, and Ship Strategy
- Star Citizen 4.8 Best Component Blueprints: Fast Farming Roadmap for Crafting
- Star Citizen 4.8 aUEC Farming Guide: Best Money Methods, First Ships, and Fast Progression
- Star Citizen 4.8 aUEC Guide: 3M+ Money per Hour with Salvage Cargo Runs
Popular Category Lists
- ARC Raiders / (291)
- Grow a Garden / (286)
- CoD: Black Ops 7 / (166)
- MLB 26 / (150)
- Monopoly Go / (148)
- Star Citizen / (128)
- ARK Survival Ascended / (90)
- Steal a Brainrot / (90)
- Sailor Piece / (68)
- Forza Horizon 6 / (67)
- Diablo IV / (62)
- Blox Fruits / (62)
- Adopt Me / (58)
- Grow a Garden 2 / (57)
- CoD: BLACK OPS 6 / (55)
- Path of Exile 2 / (48)
- Monster Hunter Wilds / (46)
- Windrose / (44)
- Path of Exile / (40)
- Bee Swarm Simulator / (37)