0
0Subnautica 2 Tadpole Upgrades Guide: Blueprint Locations, Depth Module, Armor, Charger & Tadpole Pens Code
- FROST
- Share
- Subnautica 2
- 05/20/26
- 639
The Tadpole becomes one of the best early exploration vehicles in Subnautica 2 once upgraded. The catch: most upgrades are scattered around the Tadpole Pens, the purple resource base, and deeper canyon routes. Mark the purple base early. That one beacon saves a lot of wasted swimming.
- Subnautica 2 Tadpole Upgrades: Quick Location Table
- Before You Start: Required Gear
- How to Find the Tadpole Pens in Subnautica 2
- Purple Resource Base: The Main Tadpole Upgrade Hub
- Engine Efficiency Module Location
- Hull Chassis Part 1 and Hull Depth Module Mk1 Location
- Strike Armor Location
- Photovoltaic Charger Location
- Hull Chassis Part 2 Location
- Cavitation Muffler Location
- Hull Chassis Part 3 Location
- How to Get the Tadpole Pens Access Code
- Best Tadpole Upgrade Order
- Common Mistakes That Waste Time
- FAQ
- Where is the Tadpole in Subnautica 2?
- Where is the Hull Depth Module Mk1?
- How do I get the Photovoltaic Charger?
- How do I open the locked Tadpole Pens door?
- What is the best Tadpole upgrade to get first?
- Summary
↖ Subnautica 2 Tadpole Upgrades: Quick Location Table
Use this as the fast checklist. Grab the depth module early, then go deeper for the hull parts.
| Upgrade / Blueprint | What It Does | Where to Find It | Must-Have Gear |
|---|---|---|---|
| Tadpole Blueprint | Unlocks Tadpole vehicle | Tadpole Pens east of Drop Pod | Heat Adaptation |
| Scout Ray Chassis | Helps with longer routes | Tadpole Pens area | Scanner |
| Engine Efficiency Module | Reduces power drain | Purple resource base | Tadpole recommended |
| Hull Chassis Part 1 | Hull progression | Crystal structure below purple base | Watch crush depth |
| Hull Depth Module Mk1 | Increases max depth | Same route as Hull Part 1 | Scanner |
| Strike Armor | Boosts durability | Below purple base, near lit lower platform | Beacon recommended |
| Photovoltaic Charger | Charges from sunlight | Starship wreck southeast of purple base | Repair Tool |
| Hull Chassis Part 2 | Hull progression | Green canyon around 430 m | Depth Module Mk1 |
| Cavitation Muffler | Makes Tadpole quieter | Ridge above Hull Part 2 | Depth Module Mk1 |
| Hull Chassis Part 3 | Hull progression | Rocky platform southeast of muffler | Depth Module Mk1 |
| Tadpole Pens Access | Opens locked Pens door | Black box cave below Tadpole Pens | Heat Adaptation, Air Bladder useful |
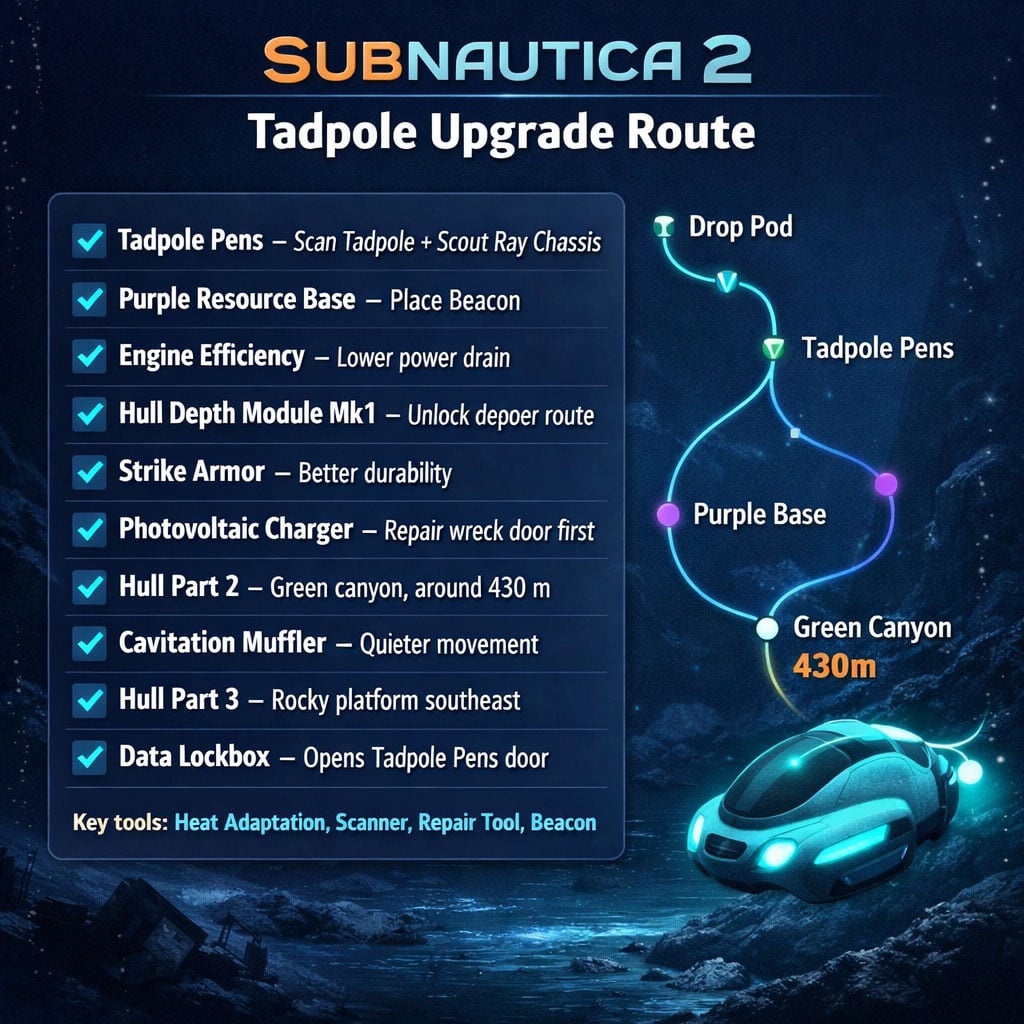
↖ Before You Start: Required Gear
Do not brute-force this route underprepared. You will waste time or lose the Tadpole.
Bring:
- Heat Adaptation — needed for hot water near the Pens.
- Scanner — required for blueprints.
- Repair Tool — required for Photovoltaic Charger.
- Beacon — place it at the purple resource base.
- Air Bladder — useful for the black box cave.
- Hull Depth Module Mk1 — install before going near 430 m.
Best practical route:
1. Get Heat Adaptation through Noah's questline.
2. Find the Tadpole Pens.
3. Scan the Tadpole and Scout Ray Chassis.
4. Reach the purple resource base.
5. Drop a beacon.
6. Start collecting upgrades.
↖ How to Find the Tadpole Pens in Subnautica 2
From the Drop Pod, head east to east-southeast, roughly 90–105 degrees.
You are on the right route when:
- The water gets hot.
- Large wreckage appears.
- You see a huge tree-like structure.
- Broken habitat pieces appear near a canyon.
The Tadpole Pens sit near the canyon edge. If you drop deep over the edge, you overshot it.
Enter the damaged habitat. Inside, scan:
- Tadpole Blueprint
- Scout Ray Chassis
The Scout Ray Chassis is worth grabbing now. Later upgrade runs are around 1,400 m from the Drop Pod.
↖ Purple Resource Base: The Main Tadpole Upgrade Hub
From the Drop Pod, head east for about 1,400 m.
You will pass a large alien-looking tower before reaching a purple resource station/base structure.
Do this immediately:
- Place a beacon.
- Check your Tadpole depth limit.
- Keep this location as your upgrade hub.
Most Tadpole upgrade routes branch from here. No beacon means painful backtracking.
↖ Engine Efficiency Module Location
At the purple resource base, search the station area for the Tadpole data card.
This unlocks the Engine Efficiency Module.
Why it matters:
- Less battery drain.
- Longer deep trips.
- Fewer emergency returns.
Get this before doing repeated canyon runs.
↖ Hull Chassis Part 1 and Hull Depth Module Mk1 Location
From the purple resource base, dive down toward the crystal-like structures.
Target depth: 150–165 m.
Look for a small entrance in the structure. Move carefully. This route can push close to early crush depth.
Inside, collect:
- Hull Chassis Part 1
- Hull Depth Module Mk1
Install Hull Depth Module Mk1 before going deeper. Do not ignore this. The next major hull part sits near 430 m.
↖ Strike Armor Location
Return to the purple resource base.
Move toward the nearby edge where a distant tower is visible. Look down for lights below. Follow them to the lower platform.
Scan the data tablet there to unlock Strike Armor.
Why it is good:
- More Tadpole durability.
- Better survival against hostile creatures.
- Safer deep route mistakes.
If you tend to scrape walls while fleeing predators, this module earns its slot fast.
↖ Photovoltaic Charger Location
Bring a Repair Tool.
From the purple resource base, head southeast across the canyon toward the large starship wreck.
At the wreck:
1. Find the pillar-like structure.
2. Enter the nearby doorway.
3. Turn right.
4. Repair the damaged door.
5. Go through and check the room path.
6. Scan the Photovoltaic Charger blueprint.
What it does:
- Recharges the Tadpole using sunlight.
- Works best in brighter, shallower water.
- Pairs well with Engine Efficiency Module.
This is not a deep-zone power solution, but it makes surface and mid-depth travel much cleaner.
↖ Hull Chassis Part 2 Location
Install Hull Depth Module Mk1 first.
From the purple resource base, follow the route down toward the ring-like landmark. Move across toward the strange eye-like formation.
Keep the column on your left and push forward.
You are close when:
- The biome turns green.
- You see green fuel or goo-like material.
- Electric enemies start showing up.
- Depth approaches 430 m.
Scan Hull Chassis Part 2 near the green canyon area.
If the Tadpole starts taking pressure damage, leave. You missed the depth upgrade or did not install it.
↖ Cavitation Muffler Location
From Hull Chassis Part 2, go upward to the nearby ridge.
Look for:
- Debris
- Cable-like wreckage
- Raised terrain above the green canyon
Scan the data card for the Cavitation Muffler.
Effect:
- Makes the Tadpole quieter.
- Helps avoid unwanted creature attention.
- Very useful in predator-heavy routes.
It will not make you invisible. It just makes you less annoying to the ocean's murder roster.
↖ Hull Chassis Part 3 Location
From the Cavitation Muffler location, turn toward the higher ridge and head generally southeast.
Look for another rocky outcrop with a small platform on top.
Scan Hull Chassis Part 3 there.
Recommended setup:
- Hull Depth Module Mk1
- Strike Armor
- Enough power for the return trip
This completes the main hull chain currently available on this route.
↖ How to Get the Tadpole Pens Access Code
The locked Tadpole Pens door does not need manual code entry. You need the correct data lockbox.
Start at the Tadpole Pens.
Follow the path close to the seafloor until you find three holes in the terrain. Drop through one and point southwest.
Continue down until you find:
- A container area
- A cave entrance on the left
- A large Titan robot inside
Swim into the cave and collect the data lockbox near the Titan robot.
Then return to the locked Tadpole Pens door. It should open automatically.
Bring:
- Heat Adaptation
- Air Bladder
- Scanner
The cave also has extra scannables, so clear it properly before leaving.
↖ Best Tadpole Upgrade Order
This order keeps the route safe and efficient.
| Order | Goal | Reason |
|---|---|---|
| 1 | Heat Adaptation | Survive hot water routes |
| 2 | Tadpole Blueprint | Unlock the vehicle |
| 3 | Scout Ray Chassis | Better long-distance travel |
| 4 | Purple Base Beacon | Main route anchor |
| 5 | Engine Efficiency Module | Lower power drain |
| 6 | Hull Chassis Part 1 | Start hull progression |
| 7 | Hull Depth Module Mk1 | Required for deeper parts |
| 8 | Strike Armor | More durability |
| 9 | Photovoltaic Charger | Better shallow recharge |
| 10 | Hull Chassis Part 2 | Deep hull progression |
| 11 | Cavitation Muffler | Quieter movement |
| 12 | Hull Chassis Part 3 | Finish current hull route |
| 13 | Tadpole Pens Data Lockbox | Opens locked door |
↖ Common Mistakes That Waste Time
| Mistake | Fix |
|---|---|
| Not placing a beacon at the purple base | Drop one immediately |
| Going to 430 m without Depth Module Mk1 | Install it first |
| Forgetting the Repair Tool | Bring it for the charger wreck |
| Searching for a typed keycode | Get the data lockbox instead |
| Ignoring Heat Adaptation | Progress Noah's quests first |
| Fighting electric enemies too early | Grab armor and leave fast |
↖ FAQ
↖ Where is the Tadpole in Subnautica 2?
The Tadpole Blueprint is inside the Tadpole Pens, east to east-southeast of the Drop Pod. Follow the hot-water route past wreckage and the large tree-like landmark.
↖ Where is the Hull Depth Module Mk1?
The Hull Depth Module Mk1 is below the purple resource base, near the crystal-like structure at about 150–165 m. It is found on the same route as Hull Chassis Part 1.
↖ How do I get the Photovoltaic Charger?
Go southeast from the purple resource base to the starship wreck. Bring a Repair Tool, fix the damaged door, and scan the charger blueprint inside.
↖ How do I open the locked Tadpole Pens door?
Find the data lockbox in the cave below the Tadpole Pens. Drop through the terrain holes, head southwest, enter the cave near the container area, and collect it near the Titan robot.
↖ What is the best Tadpole upgrade to get first?
Get the Engine Efficiency Module first, then the Hull Depth Module Mk1. Efficiency helps every trip. The depth module unlocks the deeper route to later hull upgrades.
↖ Summary
For a clean Tadpole upgrade run, follow this priority: Tadpole Pens → purple resource base → Engine Efficiency → Hull Depth Module Mk1 → Strike Armor → Photovoltaic Charger → deeper hull parts → Tadpole Pens data lockbox.
The key landmark is the purple resource base. Beacon it. Most upgrade routes start there.
The key progression item is Hull Depth Module Mk1. Install it before pushing to 430 m.
The locked Tadpole Pens door is not solved with a typed code. Grab the data lockbox from the cave below the Pens, then return and walk in.

Most Popular Posts
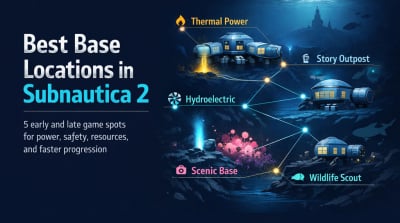
- Best Base Locations in Subnautica 2: Top 5 Early and Late Game Spots
- Subnautica 2 Power Storage Guide: How to Unlock Backup Base Power and Survive the Night
- Subnautica 2 Resource Guide: Best Locations for Silver, Lithium, Deepwing Eggs, Metal Farms, and Late-Game Materials
- Subnautica 2 Best Base Locations: Safe Starts, Resource Hubs, Power Spots, and Late-Game Bases
- Subnautica 2 Best Biomes for Base Building: Ranked by Safety, Resources, and Practical Value
- Subnautica 2 Tadpole Upgrades Guide: Blueprint Locations, Depth Module, Armor, Charger & Tadpole Pens Code
Popular Category Lists
- Grow a Garden / (286)
- ARC Raiders / (271)
- CoD: Black Ops 7 / (166)
- Monopoly Go / (148)
- MLB 26 / (148)
- Star Citizen / (125)
- Steal a Brainrot / (89)
- ARK Survival Ascended / (81)
- Sailor Piece / (68)
- Forza Horizon 6 / (65)
- Diablo IV / (61)
- Blox Fruits / (61)
- Adopt Me / (56)
- CoD: BLACK OPS 6 / (55)
- Grow a Garden 2 / (51)
- Path of Exile 2 / (48)
- Monster Hunter Wilds / (46)
- Windrose / (44)
- Path of Exile / (40)
- Bee Swarm Simulator / (36)