


 0
0Windrose Blacksmith Build Guide: Functional Pirate Town Workshop with Outdoor Forge
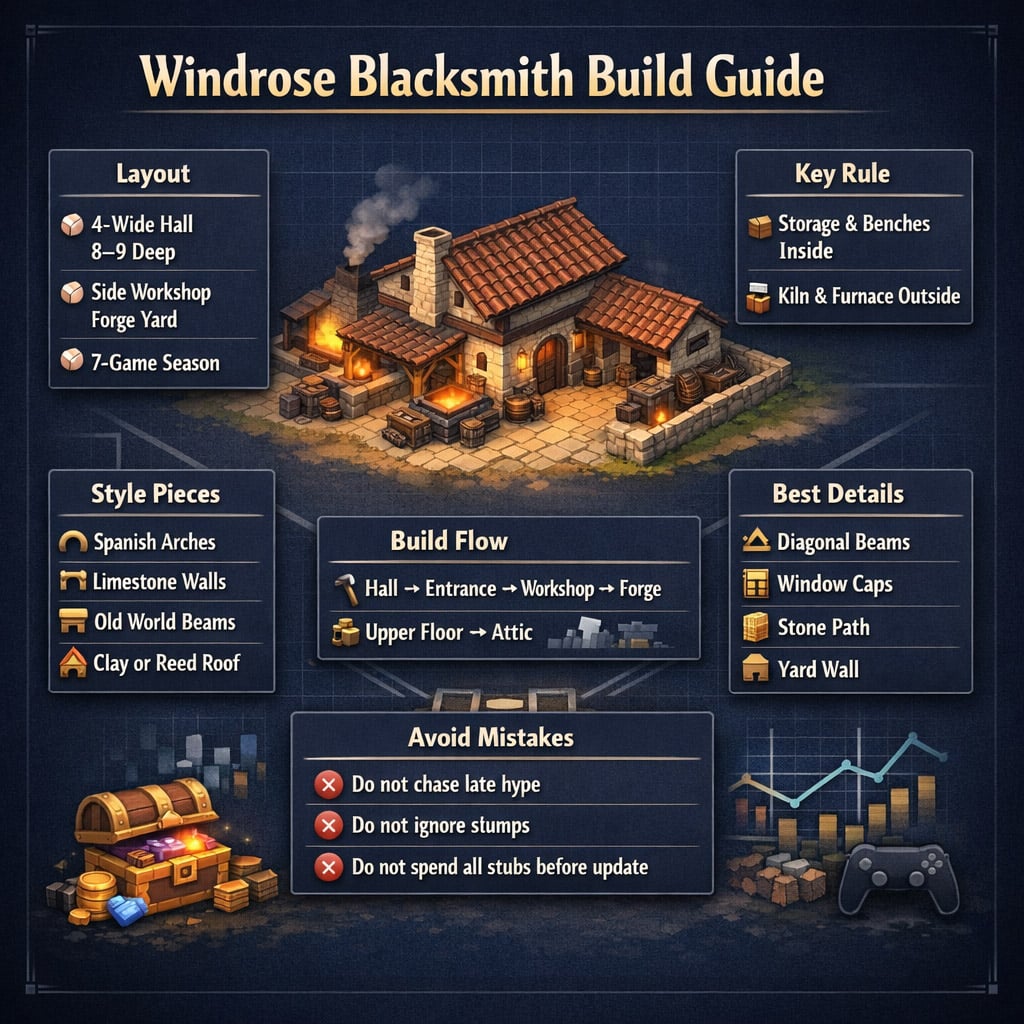
A blacksmith in Windrose should not just look good from the street. It also needs to work. The big catch is that stations like the kiln and furnace need outdoor placement, so a fully enclosed blacksmith shop can quickly become a very pretty mistake.

For this build, we're making a tall pirate-town blacksmith with a warehouse-style ground floor, a side workshop, an outdoor forge yard, and upper rooms for storage or living space. I like this layout because it solves the practical problem first, then adds the town-building flavor around it.
- Build Overview
- Materials and Building Sets
- Step 1: Lay Out the Main Building
- Step 2: Build the Ground Floor
- Step 3: Add the Arched Front Entrance
- Step 4: Add the Side Workshop and Outdoor Forge Yard
- Step 5: Build Up with Beams and Windows
- Step 6: Add the Steep Roof and Attic
- Step 7: Make the Stairs Comfortable
- Step 8: Finish the Exterior Details
- Final Interior Plan
- Common Mistakes to Avoid
- FAQ
- What size should a Windrose blacksmith be?
- Why does the forge yard need to be outside?
- What should go inside the blacksmith?
- Which building pieces look best for this style?
- How do we make the blacksmith look less boxy?
- Is this build good for a small base?
- Summary
If your base feels flat or your crafting area is scattered everywhere, this is one of the best buildings to add. It gives your town height, purpose, and a proper working corner for metal production.
↖ Build Overview
This blacksmith is medium-sized, but it feels larger because of the steep roof and layered walls. The footprint stays manageable for a town street while still giving us enough room for storage, crafting, and decoration.
| Part | Recommended Setup |
|---|---|
| Main building | About 4 foundations wide |
| Depth | Around 8–9 foundations |
| Side workshop | About 3 foundations wide |
| Forge yard | Small outdoor square beside the workshop |
| Floors | Ground floor, upper floor, attic |
| Main purpose | Storage, crafting, smelting, town decoration |
The basic idea is simple: keep storage and benches inside, keep heat-heavy stations outside.
That one rule makes the whole build more reliable.
↖ Materials and Building Sets
You can copy the style closely or swap pieces based on what you have unlocked. The design works best when we mix stone, wood, and steep roofing.
| Set / Piece Type | Best Use |
|---|---|
| Spanish pillars and arches | Front entrance |
| Limestone walls | Workshop and upper walls |
| Old World beams | Supports and wall detail |
| Clay or reed steep roofs | Tall roof shape |
| Large double doors | Storage hall entrance |
| Decorative windows | Upper floors and attic |
If you are missing a set, focus on the structure first. The arches, outdoor yard, and steep roof matter more than exact textures.
↖ Step 1: Lay Out the Main Building
Start with a rectangular base. A 4-wide main hall works well because it gives enough space for storage without eating the whole street.
We usually want the blacksmith to feel like a storage-and-work building, not a tiny hut. Pull the building back around 8 or 9 foundations if you have room.
Suggested layout:
| Zone | Purpose |
|---|---|
| Front entrance | Main visual feature |
| Ground hall | Ore, ingot, coal, and tool storage |
| Side wing | Indoor crafting stations |
| Outdoor yard | Kiln, furnace, forge, anvil |
| Upper floors | Extra storage or living area |
If you are building in a town, leave a bit of space in front for a street or path. This makes the arched entrance look much better.
↖ Step 2: Build the Ground Floor
Use stone or limestone-style walls for the lower floor. It should look sturdy because this is where all the heavy materials would be stored.
Add large double doors to the main hall. They give the building a warehouse feel and make it look believable as a blacksmith storage area.
Good ground-floor setup:
- Big front or side doors
- Open space for chests
- Strong corner walls
- A few windows, but not too many
- Beams or pillars for extra depth
This floor is mainly functional. We want easy movement, storage access, and a clear route to the side workshop.
↖ Step 3: Add the Arched Front Entrance
The front arches are what give this build its personality.
Use tall pillars, then connect them with arch pieces. Around three pillar pieces high usually gives a nice height without making the entrance look stretched.
| Front Detail | Why It Helps |
|---|---|
| Pillars | Adds height and strength |
| Arches | Creates a town-style entrance |
| Small wall caps | Blends arches into the build |
| Covered walkway | Makes the front feel less flat |
If the entrance feels off, fix it before building upward. Once the roof and upper floors are in place, adjusting the front becomes more annoying.
↖ Step 4: Add the Side Workshop and Outdoor Forge Yard
This is the most important functional part.
The kiln and furnace need to be outside. So instead of forcing them indoors, build a side yard beside the workshop.
Place the side workshop on one side of the main hall, about 3 foundations wide. Add a door from the workshop into the yard so the whole area feels connected.
| Item | Best Placement |
|---|---|
| Kiln | Open-air yard |
| Furnace / forge | Beside the kiln |
| Anvil | Near the work area |
| Crafting benches | Inside side workshop |
| Stone path | Between door and yard |
If a station is not working, check whether a roof or wall is blocking its outdoor condition. Move it farther into the open if needed.
This layout feels natural: materials come from storage, crafting happens inside, smelting happens outside.
↖ Step 5: Build Up with Beams and Windows
For the upper floor, let the structure stick out slightly if you like that old-town look. Then frame the walls with beams.
This is where the blacksmith starts to look less like a box.
Use:
- Vertical beams on corners
- Diagonal beams across wall sections
- Windows on each visible side
- Small roof caps above windows
- Slight overhangs for depth
| Detail | Effect |
|---|---|
| Diagonal beams | Makes walls feel handcrafted |
| Window caps | Breaks up flat surfaces |
| Overhangs | Adds shadow and depth |
| Mixed stone and wood | Gives a proper town-building style |
From experience, the biggest visual upgrade is not one huge decoration. It is layering small pieces until every wall has shape.
↖ Step 6: Add the Steep Roof and Attic
The steep roof is the main reason this blacksmith looks good in a town. It adds height and makes the skyline less flat.
Use steep roof pieces and build upward carefully. Add one or two small roof projections with windows if the roof looks too plain.
| Roof Feature | Why Use It |
|---|---|
| Steep main roof | Adds height |
| Roof overhangs | Makes edges cleaner |
| Small window projection | Breaks up large roof areas |
| Ridge beam | Makes the roof look reinforced |
If roof pieces refuse to line up, adjust the wall height by one piece. Most roof issues come from uneven support levels.
The attic can be used for rare materials, extra storage, or a small scenic room overlooking your docks or town.
↖ Step 7: Make the Stairs Comfortable
Do not leave cramped stairs just because they technically work. If you keep getting stuck while moving through the building, rebuild them early.
A good stair layout should connect:
| Floor | Use |
|---|---|
| Ground floor | Main storage and entrance |
| Upper floor | Workshop storage or display room |
| Side upper room | Bedroom or small private room |
| Attic | Rare storage or overflow |
In my build, a slightly wider turning staircase felt much better than a narrow straight one. It used a bit more room, but the movement was smoother. That trade is worth it.
↖ Step 8: Finish the Exterior Details
Once the building works, add details. This is where the blacksmith becomes part of the town instead of just a crafting box.
Good finishing touches:
- Stone path outside
- Low wall around the forge yard
- Extra beams under overhangs
- Roof caps above windows
- Pillars on exposed corners
- Decorative hanging pieces if unlocked
A simple rule works well: every large wall should have a window, beam pattern, or small roof detail.
Do not overdo it too early if you are still unlocking decorations. Build the shell now, then return later with better props.
↖ Final Interior Plan
Here is a clean room plan that keeps the building practical.
| Area | Recommended Use |
|---|---|
| Ground hall | Ore, ingots, coal, spare tools |
| Side workshop | Weapons bench and crafting stations |
| Outdoor yard | Kiln, furnace, forge, anvil |
| Upper floor | Extra storage or display area |
| Side upper room | Bedroom or kitchen |
| Attic | Rare materials or overflow storage |
This layout works because every room has a job. That makes the blacksmith feel believable and easy to use.
↖ Common Mistakes to Avoid
| Mistake | Fix |
|---|---|
| Putting kiln or furnace indoors | Move them into the outdoor yard |
| Making the stairs too narrow | Rebuild before decorating |
| Building flat walls | Add beams, windows, or roof caps |
| Using one huge plain roof | Add a small roof projection |
| Decorating too early | Wait until more sets are unlocked |
| Forgetting storage flow | Keep chests near crafting areas |
These are small fixes, but they make a big difference during normal play.
↖ FAQ
↖ What size should a Windrose blacksmith be?
A practical size is about 4 foundations wide and 8–9 foundations deep, with a small side workshop and outdoor forge yard. This gives enough room without making the building too bulky.
↖ Why does the forge yard need to be outside?
Some production stations, especially the kiln and furnace, need outdoor placement to function. If they are under a roof or too enclosed, they may not work correctly.
↖ What should go inside the blacksmith?
Use the ground floor for metal storage, the side workshop for crafting benches, the upper floor for extra storage or display, and the attic for rare materials.
↖ Which building pieces look best for this style?
Spanish arches, limestone walls, Old World beams, steep roofs, large double doors, and decorative windows work very well together for a pirate-town blacksmith.
↖ How do we make the blacksmith look less boxy?
Add layered beams, diagonal supports, window caps, roof overhangs, and one or two small roof projections. These details create depth without needing heavy decoration.
↖ Is this build good for a small base?
Yes, but reduce the depth and keep only the important parts: storage hall, side workshop, and outdoor forge yard.
↖ Summary
This Windrose blacksmith works because it starts with function. The outdoor forge yard keeps the kiln and furnace usable, the ground floor handles storage, the side wing holds crafting stations, and the steep roof gives the building a strong town silhouette.
The best version of this build is not the one with the most decoration. It is the one where we can move easily, craft quickly, store materials nearby, and still stop for a second to think, Yeah, this place looks like an actual blacksmith.

Most Popular Posts
- Windrose Best Weapons Tier List, Traits, and Build Picks
- Windrose Completion Guide: Max Comfort, Weapons, Armor, Quests and Missable Items
- Windrose Agility Build Guide: Best Stats, Weapons, Talents, Food and Boss Setup
- Windrose Best Currency Making Guide: Fastest Silver Farm With Piracy
- Windrose Best Early-Midgame Builds: Strong Setups for the Foothills
- Best Windrose Builds Guide: S-Tier Weapons, Stats, Gear, and Talents
Popular Category Lists
- Grow a Garden / (286)
- ARC Raiders / (267)
- CoD: Black Ops 7 / (166)
- Monopoly Go / (147)
- MLB 26 / (146)
- Star Citizen / (122)
- Steal a Brainrot / (89)
- ARK Survival Ascended / (77)
- Sailor Piece / (68)
- Forza Horizon 6 / (65)
- Diablo IV / (61)
- Blox Fruits / (61)
- CoD: BLACK OPS 6 / (55)
- Adopt Me / (55)
- Path of Exile 2 / (48)
- Grow a Garden 2 / (48)
- Monster Hunter Wilds / (46)
- Windrose / (44)
- Path of Exile / (40)
- Bee Swarm Simulator / (36)


