


 0
0Windrose Workshop and Storage Room Build Guide: Roof, Loft, and 65-Box Storage
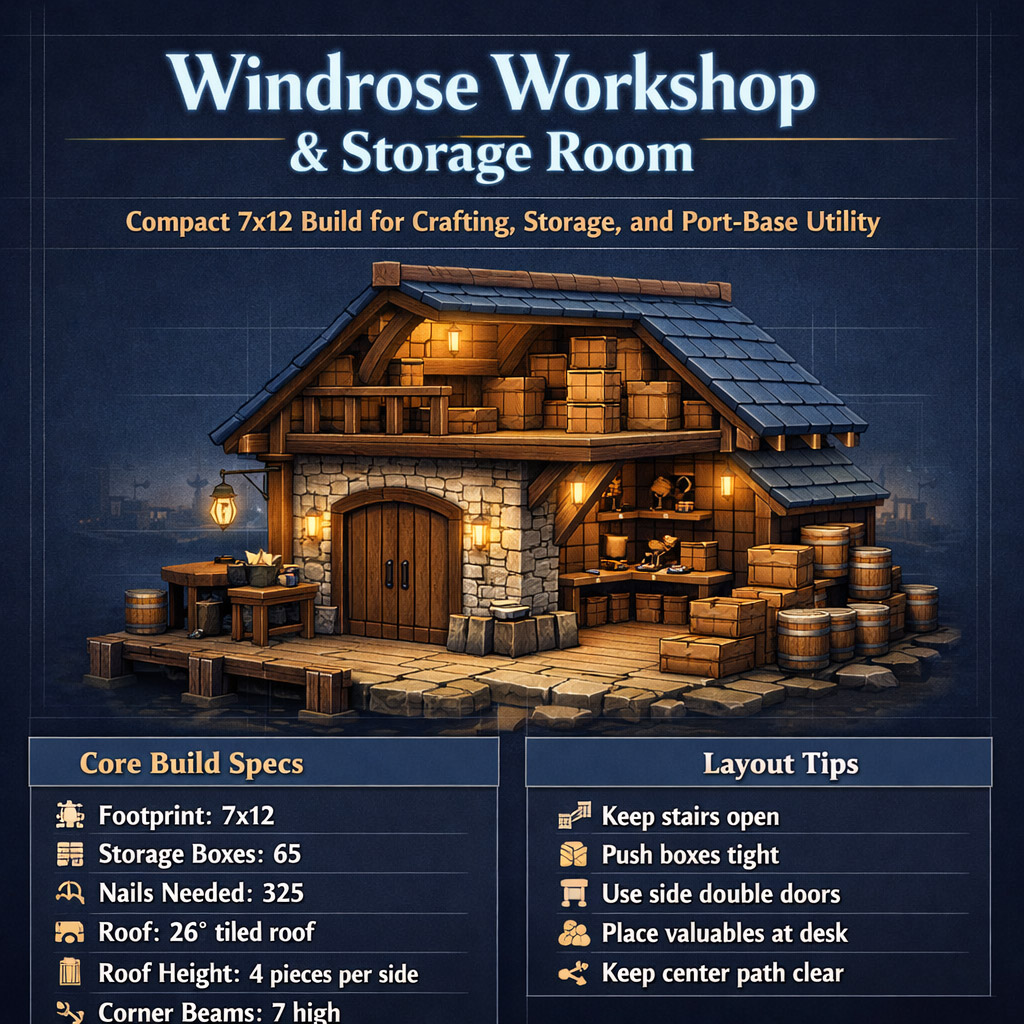
Good Windrose workshop should do three things well: hold crafting stations, store bulk materials, and stay easy to move through. This build uses a 7x12 footprint, a tall stone shell, an upstairs storage loft, and a tight 65-box storage setup. It is compact, clean, and built for daily use.

- Windrose Workshop Build Specs
- Foundation and Door Layout
- Door Placement
- Window Placement
- Window Layout Table
- Stone Shell and Wall Height
- Front Decorative Ledge
- Interior Stairs and Loft Floor
- Stair Setup
- Mahogany Beam Trim
- Overhanging Tiled Roof
- Roof Frame
- Roof and Gable Ends
- Optional Covered Alley Build
- Alley Setup
- Upstairs Storage Room: 65-Box Layout
- Storage Box Placement
- Desk and Chest Setup
- Ground-Floor Workshop Layout
- Storage Organization System
- Decoration Tips That Do Not Hurt Function
- FAQ
- What size should the Windrose workshop be?
- How many storage boxes does this workshop use?
- Can this workshop be built without the tavern?
- Why use a side double door?
- How do I stop the roof pieces from clipping?
- Summary
↖ Windrose Workshop Build Specs
| Part | Setup |
|---|---|
| Workshop size | 7x12 |
| Combined with tavern | 17x12 |
| Storage boxes | 65 |
| Nails for boxes | 325 |
| Roof pitch | 26° tiled roof |
| Roof height | 4 roof pieces per side |
| Main entrance | Side double doors |
The layout works as a standalone workshop or beside another building. If you build it next to a tavern, you can add the covered alley. If not, skip that part.
↖ Foundation and Door Layout
Start with a 7x12 foundation.
Build walls around the edge, but leave a gap for the side entrance.
↖ Door Placement
On the door side:
1. Count 3 wall sections from the front.
2. Delete wall sections 4 and 5.
3. Add a single wall at the end of the third wall.
4. Stack another single wall on top.
5. Place the double door in the 2-wall gap.
This keeps the entrance central enough for movement, but not so central that it ruins the interior layout.
If the door feels too far forward, your stairs and workstations will fight for space. This offset avoids that.
↖ Window Placement
Use double sash windows. Keep the flat side facing outward.
↖ Window Layout Table
| Wall | Placement |
|---|---|
| Front | 3 windows, with 1-wall gaps between them |
| Back | Same as front |
| Door side | From back: window after 2 walls, gap 2, window; from front: window after 1 wall |
| Opposite side | From front: gap 2, window, gap 2, window, gap 1, window, gap 2, window |
The front and back stay balanced. The sides look more natural and less boxy.
If the stair-side window looks awkward later, move it to the corner or use a double-window look. It cleans up the interior fast.
↖ Stone Shell and Wall Height
Use stone beams on all four corners.
Each corner should be 7 beams high.
Then fill the wall gaps:
1. Fill between windows with large limestone walls.
2. Add one upper layer of normal limestone walls.
3. Add one more upper layer of large limestone walls.
| Layer | Piece |
|---|---|
| Main lower wall | Large limestone wall |
| Upper trim layer | Normal limestone wall |
| Final upper layer | Large limestone wall |
| Corners | 7-high stone beams |
This gives the workshop enough height for a proper loft. It also makes the building feel like a working warehouse instead of a flat stone box.
↖ Front Decorative Ledge
This part is optional, but worth doing.
At the front:
1. Place timber and stone wall pieces under the outer front windows.
2. Cap them with marble floor.
3. Use the ledge for plants, lanterns, crates, or benches.
| Piece | Use |
|---|---|
| Timber and stone wall | Ledge support |
| Marble floor | Ledge top |
| Small decor | Visual detail |
It breaks up the front wall and gives the building a finished port-town look.
↖ Interior Stairs and Loft Floor
The stairs go inside, near the back-left area when entering.
↖ Stair Setup
1. Place a large mahogany floor one single-wall height above the windows.
2. Snap pier stairs to it.
3. Drag the stairs down to the ground.
4. Extend the upstairs floor with large mahogany floors.
Leave a clean stairwell opening.
| Loft Rule | Why It Matters |
|---|---|
| Leave open space above stairs | Prevents head collision |
| Keep 3 floor pieces from stair edge | Gives safe movement |
| Fill the rest of the loft | Maximizes storage space |
If you bump your head going upstairs, the opening is too tight. Delete floor pieces and widen it.
Add railings around the stairwell and sloped railings along the stairs. Then place a timber pillar under the loft corner near the stairs. It is mostly visual, but it makes the loft look supported.
↖ Mahogany Beam Trim
Upstairs, cap the top of the stone walls with large mahogany beams.
This is not required for function. It is required if you want the build to look clean.
| Without Trim | With Trim |
|---|---|
| Stone-to-roof transition looks rough | Interior looks finished |
| Faster build | Better screenshot/base-tour quality |
| Less detail | Stronger workshop style |
Use the beams around the top edge before starting the roof frame.
↖ Overhanging Tiled Roof
This build uses an overhanging roof. It looks much better than a flush roof.
↖ Roof Frame
Use large mahogany beams.
1. Add T-shaped beam sections at each corner.
2. Add small square beam sections on the gable ends.
3. Connect the frame front to back.
4. Keep the frame slightly outside the wall line.
Fill the eave gaps with single planked floors.
This creates the overhang and hides ugly roof-wall gaps.
↖ Roof and Gable Ends
Use:
- 26° triangle walls
- Tiled roof pieces
- Planked walls
- Double sash windows
Roof rule:
| Roof Part | Setup |
|---|---|
| Left slope | 4 tiled roof pieces high |
| Right slope | 4 tiled roof pieces high |
| Gable angle | 26° triangle walls |
| Gable center | Double sash window |
Place the triangle walls on the outer roof frame, not deep inside the wall. That is what gives the roof its overhang.
If planked walls poke through the roof, delete them and place the triangle walls first. Then rebuild around them.
↖ Optional Covered Alley Build
Only do this if the workshop sits beside another building.
↖ Alley Setup
| Part | Placement |
|---|---|
| Stone pillars | 2 high from corner |
| Stone arch | On top of pillars |
| Limestone wall | 1 layer above arch |
| Arch beams | Cap the top |
| Timber beams | Every 2 large wall sections |
Run timber beams across to the nearby building.
Keep the spacing at every 2 wall sections. One-wall spacing looks crowded. Three-wall spacing looks too empty.
Good alley decor:
- Barrels
- Benches
- Lanterns
- Rope
- Hanging shell decor
- Crates
- Water fountain
This turns dead space into one of the best-looking utility areas in the base.
↖ Upstairs Storage Room: 65-Box Layout
This is the main reason the build works.
You need:
| Item | Amount |
|---|---|
| Storage boxes | 65 |
| Nails per box | 5 |
| Total nails | 325 |
↖ Storage Box Placement
| Section | Boxes | Note |
|---|---|---|
| Left long wall | 14 | Start tight in corner |
| Right long wall | 14 | Match opposite side |
| Middle row 1 | 14 | Keep boxes touching |
| Middle row 2 | 14 | Same spacing |
| Extra boxes | 9 | Finish layout |
| Total | 65 | Full loft storage |
The trick is simple: no gaps.
Place the first box tight in the corner. Push every next box right against the last one. If you leave small gaps early, the final boxes will not fit cleanly.
If the last box does not fit, delete the row and restart. You get resources back, so fix it instead of living with a crooked storage wall.
↖ Desk and Chest Setup
Add a small desk area upstairs with mahogany walls and a marble floor top.
Place 3 chests on it.
| Chest | Best Use |
|---|---|
| Chest 1 | Gold, silver, valuables |
| Chest 2 | Trade goods, faction items |
| Chest 3 | Rare materials, tar, dust, insignias |
Then add 6 raw iron chests in a back corner.
Use two groups of three:
| Chest Group | Use |
|---|---|
| Group 1 | Weapons |
| Group 2 | Armor, rings, amulets |
Angle the corner chests slightly. It saves space and looks better than a flat row.
↖ Ground-Floor Workshop Layout
Keep the ground floor for crafting. Do not turn it into a storage maze.
| Zone | Best Placement |
|---|---|
| Smithing | One end of the room |
| Tannery | Opposite end |
| Spinning/loom | Near tannery |
| Quick storage | Near stairs or door |
| Decor | Against walls only |
The center path must stay open. If you keep bumping into barrels, the layout is wrong.
Best practical setup:
- Heavy crafting at one end.
- Leather and textile work at the other.
- Quick-access boxes near the stairs.
- Bulk storage upstairs.
- Valuables on the desk.
That gives you a clean loop: enter, craft, store, leave.
↖ Storage Organization System
A big storage room is useless if everything is random.
Use signs if available. Keep categories consistent.
| Category | Best Location |
|---|---|
| Wood and planks | Long wall row |
| Stone and limestone | Long wall row |
| Ore and bars | Near smithing side |
| Nails and parts | Desk-side boxes |
| Cloth, rope, leather | Tannery side |
| Trade goods | Desk chest |
| Weapons | Raw iron chests |
| Armor and jewelry | Raw iron chests |
| Rare materials | Desk chest |
| Overflow | Far loft boxes |
If you open more than three boxes to find one item, your system needs labels or fewer mixed categories.
↖ Decoration Tips That Do Not Hurt Function
Decorate the edges. Keep walkways clear.
Good decor for this build:
| Area | Decor |
|---|---|
| Front ledge | Plants, lanterns, crates |
| Alley | Barrels, benches, hanging decor |
| Upstairs boxes | Rope, books, scrolls, candles |
| Desk | Papers, candles, valuables |
| Ground floor | Tools, crates, work clutter |
Do not block:
- Stair bottom
- Stair top
- Doorway
- Crafting station access
- Main center path
Pretty is good. Pretty and annoying is bad.
↖ FAQ
↖ What size should the Windrose workshop be?
Use a 7x12 footprint. It is large enough for crafting stations, stairs, a loft, and a full storage room without wasting space.
↖ How many storage boxes does this workshop use?
The full upstairs layout uses 65 storage boxes. You need 325 nails total.
↖ Can this workshop be built without the tavern?
Yes. The workshop works as a standalone build. Skip the covered alley section if there is no second building beside it.
↖ Why use a side double door?
A side double door keeps the front clean for decoration and makes the building feel more like a real workshop or warehouse. It also works better with the internal stair layout.
↖ How do I stop the roof pieces from clipping?
Place the 26° triangle walls on the outer roof frame first. If planked walls poke through the roof, delete them, set the triangle walls correctly, then rebuild the gable wall.
↖ Summary
This Windrose workshop and storage room is built around function first: 7x12 footprint, side double doors, tall limestone shell, overhanging tiled roof, and a 65-box upstairs storage loft.
The key numbers are simple:
| Key Build Number | Value |
|---|---|
| Footprint | 7x12 |
| Storage boxes | 65 |
| Nails | 325 |
| Roof height | 4 pieces per side |
| Corner beam height | 7 beams |
Get the shell right. Keep the stairwell open. Snap the roof frame outward. Push storage boxes tight together. Then organize the room by category.
The result is a workshop that looks good, stores a serious amount of materials, and actually works during everyday crafting.

Most Popular Posts
- Best Windrose Builds Guide: S-Tier Weapons, Stats, Gear, and Talents
- Windrose Swamp Guide: All Swamp Items, Farming Routes, Crafting Uses, and Best Weapons
- Windrose Blacksmith Build Guide: Functional Pirate Town Workshop with Outdoor Forge
- Windrose Greatsword Crit Build Guide: Best Privateer Armor Setup for High Damage
- Windrose Base Download Guide: How to Install Spro’s Pirate Mansion Save on Your PC
- Windrose Precision Rapier Build: Best OP Setup for Bosses, Camps, Boarding, Solo, and Co-op
Popular Category Lists
- ARC Raiders / (296)
- Grow a Garden / (286)
- CoD: Black Ops 7 / (166)
- MLB 26 / (150)
- Monopoly Go / (148)
- Star Citizen / (129)
- ARK Survival Ascended / (91)
- Steal a Brainrot / (90)
- Sailor Piece / (68)
- Forza Horizon 6 / (67)
- Diablo IV / (62)
- Blox Fruits / (62)
- Adopt Me / (58)
- Grow a Garden 2 / (57)
- CoD: BLACK OPS 6 / (55)
- Path of Exile 2 / (48)
- Monster Hunter Wilds / (46)
- Windrose / (44)
- Path of Exile / (40)
- Bee Swarm Simulator / (37)


