


 0
0ARC Raiders Best Spot to Farm New Blueprints with Stella Montis Loading Bay Route
- KIVRI
- Share
- ARC Raiders
- 12/20/25
- 3595
If you're tired of doing ten runs for one ARC Raiders blueprint, the fix usually isn't fight harder—it's loot smarter. I stopped roaming Stella Montis randomly and started repeating one container-dense breach location with a strict loot order. The result: way more blueprint rolls per minute, and a noticeably better success rate.
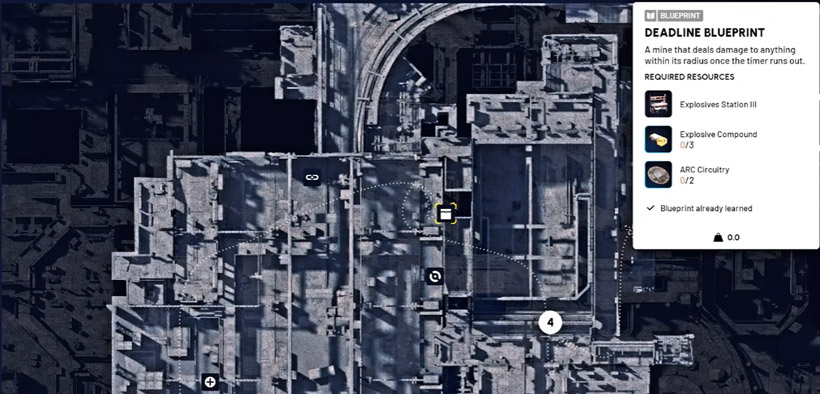
Below is the exact approach I use to farm the new blueprints (Deadline, Seeker Grenade, Pulse Mine, Gas Mine, Trailblazer). I'll show you where to go, what to open first, and how to keep your risk low—even if you're avoiding PvP.
- 1) What makes this blueprint farm work
- 2) Exact location: Stella Montis → Loading Bay → breachable locker room
- Why the breach-door detail matters
- 3) My testing notes: duo felt significantly better than trio
- What this means
- 4) Loot priority: what to open first (this is the real sauce)
- Priority list
- 5) Low-risk strategy: naked run + safe pocket blueprint farming
- If–Then decision rules (use these in real time)
- 6) Repeatable run checklist (copy this mindset)
- FAQ
- 1) Are these new blueprints only on Stella Montis?
- 2) Why did duo feel better than trio?
- 3) Day or night?
- 4) What if I arrive and the room is already breached?
- 5) What containers matter most?
- Summary
↖ 1) What makes this blueprint farm work
This method isn't magic. It's just probability, forced to behave.
- Blueprints are a roll. The more high-value containers you open, the more rolls you get.
- This area gives you dense, fast loot in a small footprint (so you spend less time walking and more time opening).
- In my experience, these new gadget blueprints show up most reliably on Stella Montis, and this spot is one of the best repeat and print routes.
That means your goal isn't find a blueprint. Your goal is: maximize container opens per run.
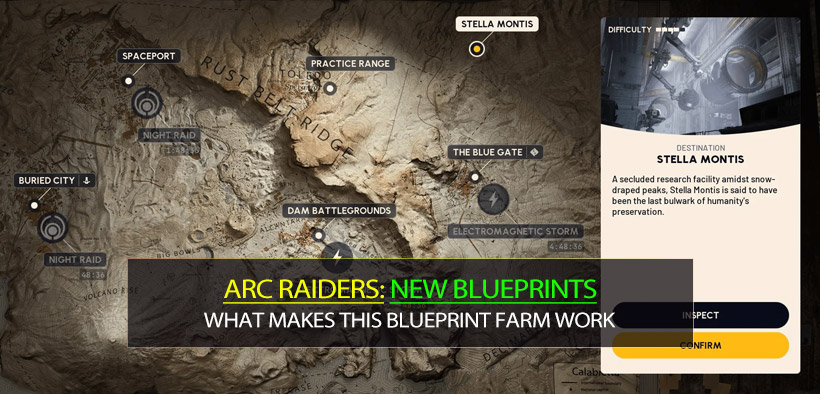
↖ 2) Exact location: Stella Montis → Loading Bay → breachable locker room
On the Stella Montis map, head to Loading Bay. The key room is easy to identify once you've seen it:
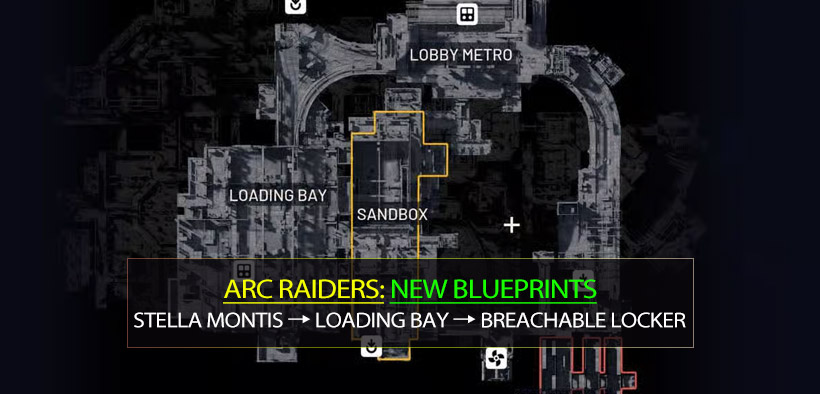
- It has two entrances, and both are breachable doors.
- Inside is a cluster of lockers, bins, and small containers.
- Nearby, there are also breachable square containers and often extra loot in the surrounding micro-area (including a kitchen-like section).
↖ Why the breach-door detail matters
Because it tells you two important things fast:
1. Unbreached door = high chance the room is untouched.
2. Breached door = someone was here, so you switch to a different decision tree (see the If–Then section below).
↖ 3) My testing notes: duo felt significantly better than trio
I ran repeated sessions across: day vs night and duo vs trio. This isn't a perfect scientific study, but it was consistent enough to change how I queue when I'm blueprint-hunting.
Here's what I saw:
| Mode / Time | Observed blueprint rate (from this area) | What it means in practice | Best for |
|---|---|---|---|
| Duo (Day) | ~2–3 blueprints per run | Less contesting, more time to fully loot | Fast, consistent farming |
| Trio (Day) | ~1 blueprint every ~4 runs | More interruptions, more competition | PvP-heavy groups |
| Trio (Night) | ~1–2 blueprints every ~2 runs | Routes feel more spread, room survives longer | Trios who still want farm value |
↖ What this means
If you're optimizing for blueprints, I'd pick:
- Duo over Trio
- If you must run Trio, Night felt noticeably better.
Not because the game loves duos, but because you actually get to finish the room.
↖ 4) Loot priority: what to open first (this is the real sauce)
If you loot this room in a random order, you'll waste time and die more. I follow a fixed priority because it keeps my runs fast and repeatable.
↖ Priority list
1. Red lockers (highest priority)
- They're quick to check and frequently pay out.
2. Trash cans / small containers (do not skip)
- Weirdly strong for blueprints in my runs, including Deadline-style drops.
- That means if another team half-loots the room, your blueprint edge is often in the stuff they ignored.
3. Any spawned breach container in the room (bonus loot)
- Not always there, but it can be a high-value extra roll.
4. Outside breachable square containers + nearby micro-loot (kitchen area, etc.)
- Same logic: more opens per minute.
↖ 5) Low-risk strategy: naked run + safe pocket blueprint farming
Stella Montis can feel intimidating, so here's how I remove the fear factor:
- Go in light or naked (whatever your comfort level is).
- Sprint to the spot, breach in, loot fast.
- The moment you find a blueprint, stash it in your safe pocket.
- If your goal is blueprints, don't turn it into an ego duel—leave.
↖ If–Then decision rules (use these in real time)
- If the breach door is still intact, then breach immediately and commit to a fast full-clear.
- If the door is already breached, then pause and listen for 2–3 seconds:
- If you hear looting/footsteps, don't force it—hit outside breachable containers or rotate.
- If it's silent, quick-check the key containers, but keep an exit path in mind.
This keeps your blueprint runs consistent instead of turning into coin-flip gunfights.
↖ 6) Repeatable run checklist (copy this mindset)
This is the loop I use so I don't get distracted mid-run:
| Phase | What you do | Success condition | Common mistake |
|---|---|---|---|
| Approach | Check door status, listen | Decide commit or rotate | Breaching instantly while someone's inside |
| Entry | Breach → take cover → scan | Not standing in doorway | Doorway looting = free death |
| Main loot | Red lockers → trash cans → bonus container | You cleared priority containers | Skipping trash cans |
| Extension | Outside breach boxes + nearby quick loot | Maximize rolls per minute | Over-looting with a full bag |
| Exit | Blueprint in safe pocket → leave | Blueprint reaches stash | Staying to fight just one more |
↖ FAQ
↖ 1) Are these new blueprints only on Stella Montis?
From what I've seen while farming, the new gadget blueprints are heavily tied to Stella Montis. If you're not seeing them elsewhere, it may not be bad luck—it may be the loot pool.
↖ 2) Why did duo feel better than trio?
Because blueprint farming is about finishing the loot loop. Duos tend to face less contesting, so you open more containers per run.
↖ 3) Day or night?
- Duo: day felt great and consistent.
- Trio: night felt better for actually getting the room to yourself long enough to loot it.
↖ 4) What if I arrive and the room is already breached?
Treat it as probably contested. Listen first. If there's activity, rotate to the outside breach boxes and nearby loot instead of forcing a fight.
↖ 5) What containers matter most?
Red lockers first, but the underrated difference-maker is trash cans/small containers, because many players skip them.
↖ Summary
The fastest way I've found to farm the new ARC Raiders blueprints is to stop wandering and start repeating one high-density hotspot: Stella Montis → Loading Bay → the two-door breachable locker room. Run it in duos if you can, follow the red locker → trash can loot priority, and use the safe pocket approach to keep risk near zero while you stack blueprints.

Most Popular Posts
- ARC Raiders Riven Tides Key Room Guide: Best Hotel Keys, Loot Routes, Secure & Crane Storage
- ARC Raiders Damage Fireflies Trial Guide: Best Farm Method on Buried City Night Raid
- ARC Raiders Riven Tides Update: New Map & Items, ARC Turbine, Rewards, and Best Early Strategy
- ARC Raiders Bettina Guide: Best Build, Buffs, and How to Use It Against ARC
- Arc Raiders Season 4 Riven Tides Update, Rewards, Safe Skins, and Release Timeline
- ARC Raiders Best Weapons Guide (2026): Best Weapons for PvP, PvE, Solo, and Budget Loadouts
Popular Category Lists
- Grow a Garden / (286)
- ARC Raiders / (266)
- CoD: Black Ops 7 / (166)
- Monopoly Go / (146)
- MLB 26 / (145)
- Star Citizen / (118)
- Steal a Brainrot / (89)
- ARK Survival Ascended / (75)
- Sailor Piece / (68)
- Forza Horizon 6 / (63)
- Diablo IV / (61)
- Blox Fruits / (60)
- CoD: BLACK OPS 6 / (55)
- Adopt Me / (53)
- Path of Exile 2 / (48)
- Monster Hunter Wilds / (46)
- Windrose / (44)
- Grow a Garden 2 / (44)
- Path of Exile / (40)
- Bee Swarm Simulator / (36)


