


 0
0ARC Raiders Blueprints Faster Farming Guide: Best Buried City Loot Route
- KIVRI
- Share
- ARC Raiders
- 01/04/26
- 5063
Blueprint farming feels random in ARC Raiders for a predictable reason: you're rolling the dice too many times on low-yield loot, then losing good runs to PvP chaos or greed. I stopped treating it like a scavenger hunt and started treating it like a repeatable system:
- Right conditions (Storm > Night > Day)
- Right containers (lockers + brown drawers)
- Right behavior (extract early, repeat often)
- 1) The blueprint framework: what actually moves blueprint/hour
- The three multipliers (and what they mean)
- 2) Container priority: what I loot first (and what I ignore)
- High-priority containers (blueprint-focused)
- Low-yield time traps (what I stop doing)
- 3) Day vs Night vs Electromagnetic Storm: when to farm and why
- Mode comparison (how I use each)
- why I treat it as best in slot
- 4) Best blueprint POIs by map (what to hit, what to avoid)
- Blueprint hotspot table (by map)
- 5) The Storm First blueprint SOP
- Blueprint farming SOP
- 6) Buried City: the most consistent south-side loot route
- What this route is optimizing for
- Route SOP (the spine + stabilizers)
- The things went wrong rulebook (this is why it stays consistent)
- 7) Loadout + survival choices that directly increase blueprints/hour
- What I bring when I'm serious about blueprints
- If-then survival rules (the ones that save runs)
- 8) Duplicates: why they happen and how I stop them from wrecking my session
- FAQ
- 1) Is Night always better than Day for blueprints?
- 2) Is Electromagnetic Storm really the best condition?
- 3) If I only have five minutes, what should I loot?
- 4) Which POI is best if I hate PvP?
- 5) How do I stop dying in hotspots like Control Tower or Blue Gate underground?
- 6) Is Grandioso the best blueprint spot in Buried City?
- Closing
↖ 1) The blueprint framework: what actually moves blueprint/hour
ARC Raiders Blueprints drops aren't purely more looting = more blueprints. In practice, your speed comes from stacking three multipliers.
↖ The three multipliers (and what they mean)
- Conditions (Day/Night/Storm): changes the quality of rolls you see.
- Container selection: changes how often you touch loot tables that can roll blueprints.
- Extract frequency: protects your wins and increases independent attempts per hour.
Because duplicates exist, your real objective is simple: increase the number of successful blueprint-capable rolls that end in extraction.
↖ 2) Container priority: what I loot first (and what I ignore)
If you loot everything, you waste time on containers that almost never pay you back in blueprints. I tightened my loop around the containers that repeatedly felt like higher-tier rolls.
↖ High-priority containers (blueprint-focused)
Here's the fast hierarchy I follow in actual raids.
| Container | Why I prioritize it | What it tends to do for blueprints | How I loot it fast |
|---|---|---|---|
| Lockers (most variants) | Quick to check, consistent high-tier behavior in Night/Storm | Better blueprint odds than generic clutter, plus more high-tier items | Sweep them by rows; don't decor loot the whole room |
| Brown drawers (day spawns) | High density and surprisingly good roll behavior | Noticeably better hit rate than low-yield containers | Clear clusters, skip lonely single drawers unless you're already passing |
| Dense cabinet rooms | Efficient when clustered | More rolls per minute (the hidden metric that matters) | Set a time cap and leave |
↖ Low-yield time traps (what I stop doing)
- Wandering for isolated containers
- Full-clearing a building after the good line (lockers/drawers) is done
- Staying in a hot POI because I'm already here
This matters because blueprint farming is an odds game, and odds love repetition—not hero clears.
↖ 3) Day vs Night vs Electromagnetic Storm: when to farm and why
A lot of guides get vague here, so I'll be blunt: conditions matter more than route perfection.
↖ Mode comparison (how I use each)
| Mode / condition | Blueprint pace (what I observed) | Why | Trade-offs | Best use case |
|---|---|---|---|---|
| Day | Lower and less reliable lately | Feels like fewer high-tier outcomes compared to Night/Storm | Better visibility, often calmer | Newer players who need safe extracts more than speed |
| Night | Clearly better baseline than Day | Loot ecosystem feels upgraded; more blueprint-capable outcomes | Darker fights, higher ambush potential | My default for steady progress |
| Electromagnetic Storm | Best by a clear margin | Plays like Night with extra juice; blueprint hits spike | Chaos, lightning pressure, higher risk moments | Best for maximum blueprints/hour |
↖ why I treat it as best in slot
During Electromagnetic Storm sessions, the pattern was strong enough that I use it as a working rule: about one blueprint per loot run on average, with many runs hitting 1–2, and occasional spikes higher—across multiple group members, not just one lucky backpack.
That across the group detail is important. It suggests the condition is affecting the whole loot ecosystem rather than randomly blessing one person.
↖ 4) Best blueprint POIs by map (what to hit, what to avoid)
POIs don't matter because they're magical; they matter because they combine container density + the right container types. Below are the places that repeatedly produced blueprints for me, especially in Night/Storm.
↖ Blueprint hotspot table (by map)
| Map | POI | Best condition | Why it works | Risk | My rule |
|---|---|---|---|---|---|
| The Dam: Battlegrounds | Testing Annex | Storm (also Night) | Dense containers, strong blueprint frequency, often less crowded | Medium | If you hear fighting, then loot edges fast and leave |
| The Dam: Battlegrounds | Control Tower | Night or Storm | Lots of lockers + vertical routes | High | If it's hot, then do a one-floor sweep and rotate |
| Buried City | Grandioso Apartments | Night (Storm strong too) | High density, steady valuables, consistent blueprint chances | Med–High | If you're sharing the building, then take one wing and rotate |
| Buried City | Residential upstairs breach room | Night | Drawer density + mixed containers | Medium | If it's already hit, then pivot immediately |
| Blue Gate | Underground breach room | Night or Storm | Best place I found for augment blueprint potential | High | If you don't have control, then loot fast and extract |
| Blue Gate | Village area | Night/Storm best | Good valuables + attachment blueprint potential | Medium | If partially looted, then check missed lockers/drawers and move |
↖ 5) The Storm First blueprint SOP
Here's the loop I use when the only goal is blueprint completion, not PvP highlights.
↖ Blueprint farming SOP
1. Queue selection: Prioritize Electromagnetic Storm. If it's not available, run Night.
2. First 60 seconds: Pick the closest hotspot from the table above.
3. Container discipline: Loot lockers + brown drawers first, then dense cabinet clusters.
4. Time cap per POI: Don't let one building eat the raid.
- If a fight starts nearby, then you're one bad decision away from converting blueprint run into donation run.
5. Extract logic (the real speed tech):
- If you find a new blueprint, treat the raid as already successful and play safer.
- If you find two blueprints, extraction is usually correct unless the next stop is basically free.
Because blueprint farming is probability, more completed raids per hour beats perfect raids that end in death.
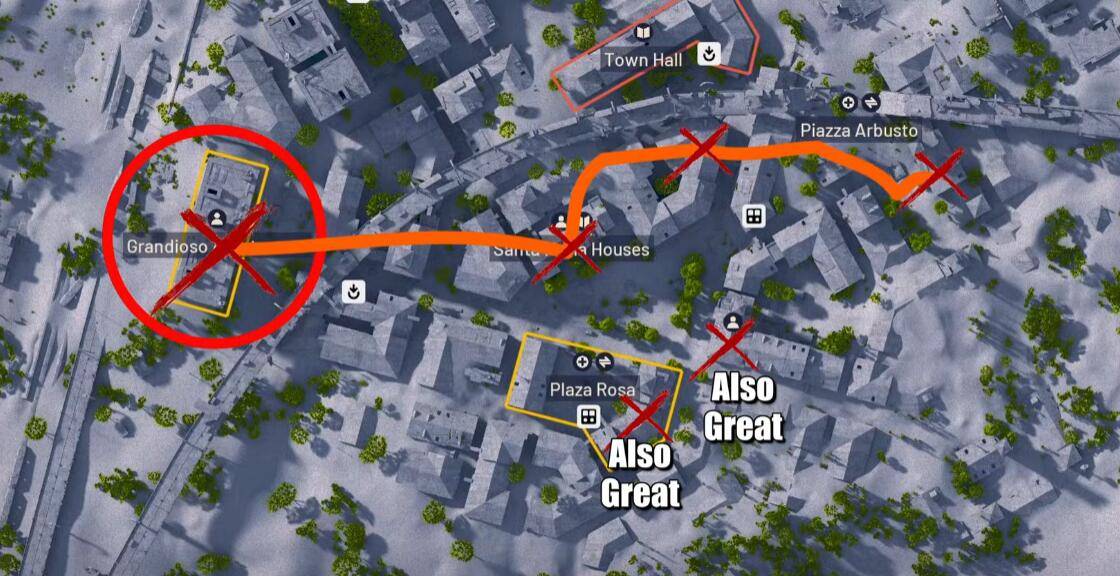
↖ 6) Buried City: the most consistent south-side loot route
Storm/Night is the global multiplier, but you still need a route that behaves like a paycheck. I ran a Buried City south-side loop 10 times, tracked results, and cleaned it into a route that stays profitable even when Grandioso is contested.
↖ What this route is optimizing for
- Blueprint chances that don't depend on one miracle room
- Solid coins per run
- High extract rate (consistency > ego)
↖ Route SOP (the spine + stabilizers)
| Order | Stop | Why it's worth time | What I'm hunting | When I skip |
|---|---|---|---|---|
| 1 | Grandioso Apartments (South) | Best density anchor | Blueprints, high-value sellables, keys/materials | If it's clearly hard-looted and I'm late |
| 2 | Santa Maria house | Free money nearby, often untouched | Sellables + parts/materials | If inventory is already full |
| 3 | Pharmacy | Fast rooms, steady value | Parts, meds (sell or keep), attachments | If it's already cleaned and timing is bad |
| 4 | Red Tower area | People half-loot; side cabinets pay | Leftovers + occasional blueprint | If I'm already on extract timing |
| 5 | Weapon caches along path / zips | High upside per second | Weapons/attachments (easy coins) | If detour adds real risk |
| 6 | Extract (closest safe exit) | Protects streak and time value | Survival + bankroll + blueprint lock-in | I only delay for a free stop |
↖ The things went wrong rulebook (this is why it stays consistent)
- If Grandioso is hard-looted (open doors, empties everywhere), then leave immediately.
- If Grandioso is partially looted, then do a 60–90 second sweep for missed cabinets/side rooms and rotate.
- If another player is contesting the same building, then take one section and pivot; splitting one hallway is wasted time.
- If your inventory is full after Grandioso/Santa Maria, then extract. Extending a full bag is how streaks die.
A detail I didn't expect: blueprints didn't always come from Grandioso. That's good news, because it means the loop works even when the main building is messy.
↖ 7) Loadout + survival choices that directly increase blueprints/hour
You don't need a meta loadout; you need a kit that prevents dumb deaths in Night/Storm and lets you disengage.
↖ What I bring when I'm serious about blueprints
- Smokes: break sightlines in Control Tower and underground breach spaces
- Traps/mines: punish chases, buy looting time
- Simple, reliable weapon: I avoid over-investing when my win condition is extraction
↖ If-then survival rules (the ones that save runs)
- If you hear sustained gunfire inside your target POI, then loot outer containers and rotate.
- If your bag is good enough plus a blueprint, then leave immediately.
- If you must cross open sightlines in Night/Storm, then smoke first and move—visibility is uneven and players abuse it.
↖ 8) Duplicates: why they happen and how I stop them from wrecking my session
Duplicates are part of the system, and the trap is emotional: you get a duplicate, then you start chasing the run to make it feel worth it.
Here's what duplicates usually mean instead:
- You're hitting the right tier of loot tables often enough to roll blueprints repeatedly.
- Your best lever isn't loot more rooms, it's better conditions + more extracted raids per hour.
So if you're seeing duplicates, you're not failing—you're already in the right ecosystem. Your job becomes volume and discipline.
↖ FAQ
↖ 1) Is Night always better than Day for blueprints?
In my testing, yes—Night produced a clear uptick compared to Day runs targeting the same high-yield containers. Day still works, but it felt less reliable for blueprint pace.
↖ 2) Is Electromagnetic Storm really the best condition?
Based on repeated sessions with multiple players seeing the same pattern, Storm consistently produced the most blueprints per loot run. I treat it as the best option when you can handle the risk.
↖ 3) If I only have five minutes, what should I loot?
Lockers and brown drawers first. After that, hit dense clusters you can clear quickly. Don't wander for isolated low-yield containers.
↖ 4) Which POI is best if I hate PvP?
Testing Annex is a strong pick because it often sees less contest than the flashiest hotspots while still producing excellent results in Night/Storm.
↖ 5) How do I stop dying in hotspots like Control Tower or Blue Gate underground?
Go in with a cap: one fast locker sweep, grab adjacent dense loot, then rotate. If resistance shows up early, disengage instead of proving a point.
↖ 6) Is Grandioso the best blueprint spot in Buried City?
Grandioso is the best density anchor, but the consistent results came from the south loop as a system. If you treat Grandioso as mandatory, bad spawns and late arrivals collapse your plan.
↖ Closing
My fastest blueprint progress came from stacking two advantages—conditions (Storm > Night > Day) and containers (lockers + brown drawers)—then protecting those gains with early extracts. When I applied the same mindset to Buried City, the south-side loop delivered repeatable results (10 runs: 590k coins, 6 blueprints, under 2 hours, 0 deaths) because it has built-in pivots for contested or looted POIs. The grind stops being noisy once you decide your real win condition is simple: hit blueprint-capable containers under the right conditions, then extract often enough that RNG can't waste your time.

Most Popular Posts
- ARC Raiders Riven Tides Key Room Guide: Best Hotel Keys, Loot Routes, Secure & Crane Storage
- ARC Raiders Damage Fireflies Trial Guide: Best Farm Method on Buried City Night Raid
- ARC Raiders Riven Tides Update: New Map & Items, ARC Turbine, Rewards, and Best Early Strategy
- ARC Raiders Bettina Guide: Best Build, Buffs, and How to Use It Against ARC
- ARC Raiders Solo Search Supply Drops Guide: Best Buried City Route, Beacon Locations
- Arc Raiders Season 4 Riven Tides Update, Rewards, Safe Skins, and Release Timeline
Popular Category Lists
- Grow a Garden / (286)
- ARC Raiders / (266)
- CoD: Black Ops 7 / (166)
- Monopoly Go / (146)
- MLB 26 / (145)
- Star Citizen / (116)
- Steal a Brainrot / (89)
- ARK Survival Ascended / (74)
- Sailor Piece / (68)
- Forza Horizon 6 / (63)
- Diablo IV / (61)
- Blox Fruits / (60)
- CoD: BLACK OPS 6 / (55)
- Adopt Me / (53)
- Path of Exile 2 / (48)
- Monster Hunter Wilds / (46)
- Windrose / (44)
- Grow a Garden 2 / (42)
- Path of Exile / (40)
- Bee Swarm Simulator / (36)


