


 0
0Arc Raiders Buried City: New Secret Loot Rooms, Fast Coins Routes, and Expedition Rewards
- KITE
- Share
- ARC Raiders
- 12/12/25
- 1819
If you've been dropping into Buried City lately and feel like every good spot is either pre-looted or camped by rats, you're not imagining it. The obvious Arc Raiders Coins rooms are on everyone's radar now, and walking into them late often means walking into someone's crosshair.
- What Buried City Is Actually Good At
- Classic Hidden Spot: The Nameless House Near Grandios – Easy 20–30k
- New Hidden Gem: Santa Maria Rooftop Breach + Secret Lower Floor
- Hospital & JKV: High-Risk, High-Reward Value Engines
- Surviving Extractions: How Not to Die in the Last 30 Seconds
- Expedition: What You Lose, What You Gain, and Why I Changed My Mind
- Turning Buried City into Your Expedition Charger
- FAQ
- Conclusion

I used to be pretty against the whole Expedition reset idea too—losing your gear, your blueprints, your levels sounds awful on paper. But after treating Buried City as a dedicated expedition funding map and running it properly for a while, the math starts to flip:
- The map is small and dense, so time-to-loot is very short.
- A couple of half-hidden rooms pay out 20–30k per run when done right.
- Those extra up to 5 skill points you get from Expedition can completely change how strong your build feels.
Below I'll walk through the key hidden rooms, the most profitable routes, and then how Expedition rewards really work, so you can decide whether a reset is actually worth it for you.
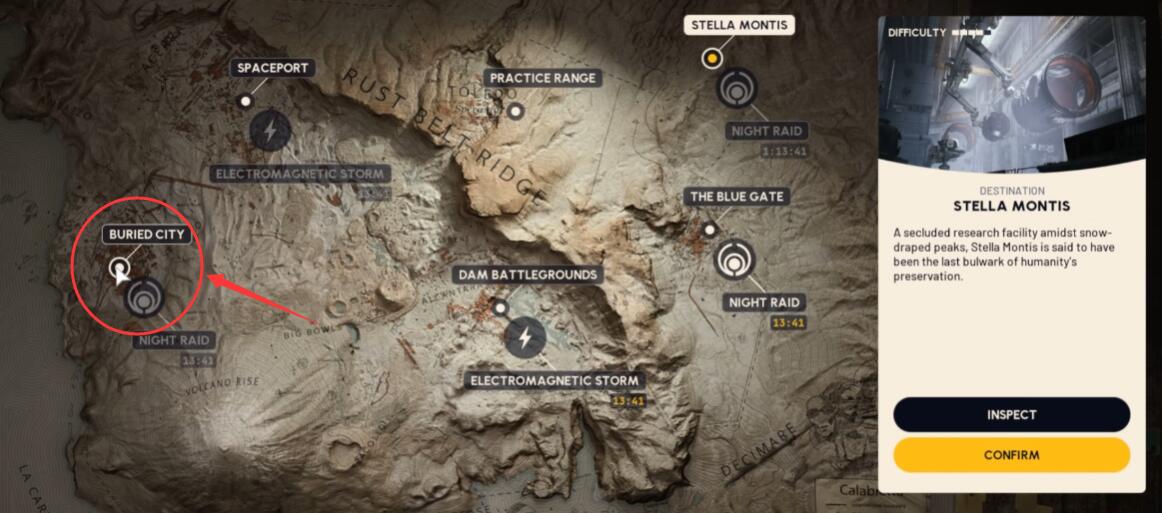
↖ What Buried City Is Actually Good At
Let's start with map identity, because that changes how you should play:
- Buried City = Coins / Value Farming Map
- Spaceport = Ark kills / combat-heavy objectives
- Damn Battlegrounds = pure PvP playground
This matters. It means:
- If your goal is to stack stash value for an Expedition, Buried City is your best friend.
- If you just want fights, you can go to Damn Battlegrounds and not care about efficiency.
- If you're chasing Ark and certain mission types, you head to Spaceport.
From my runs, Buried City looks like this:
| Map | Main Purpose | Key Traits |
|---|---|---|
| Buried City | Currency & loot farming | Compact, dense interiors, short rotations |
| Spaceport | Ark, missions, combat focus | Open spaces, frequent engagements |
| Damn Battlegrounds | PvP, mechanical improvement | Constant fights, unreliable economy |
If you're sitting on a lot of gear and coins but are scared to hit start Expedition, Buried City is exactly where you should be turning that gear into maximum stash value before the reset.
↖ Classic Hidden Spot: The Nameless House Near Grandios – Easy 20–30k
Where it is and how to get in
This one has been mentioned before, but many players still run by it without understanding how profitable it is.
- Location:
Near Grandios Apartments, there's a small unlabeled house on the map.
- Visual cue:
A simple little house with its front door barred from the outside.
- Entry:
You need to pry the door open. Bring whatever tool is required on your build.
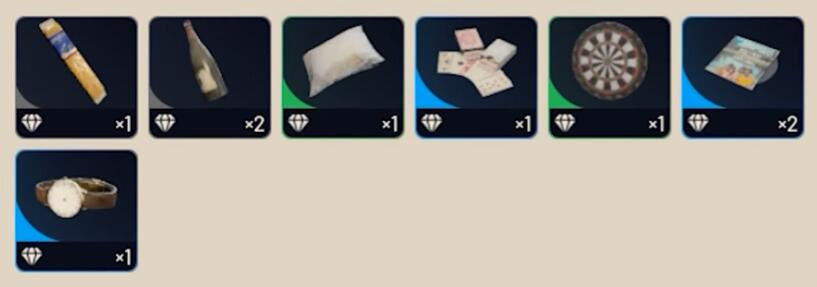
Inside you'll find:
- Multiple searchable drawers and cupboards.
- A bunch of trinkets and small valuables.
- A decent chance of a weapon box.
- I've personally pulled a Tempest blueprint from one of the drawers during a night raid here.
What the runs look like in practice
From repeated runs, it feels like this:
| Aspect | Typical Outcome |
|---|---|
| Single run value | ~20,000–30,000 worth of resources |
| Weapon/blueprint | Random chance, but real highs possible |
| Time spent | 2–3 minutes if you know the approach |
| Risk level | Low to mid; most people focus elsewhere |
It's a tiny house, but the value density is absurdly good.
If you're not feeling super confident or you just loaded in with scuffed gear, this is the perfect warm-up money room before you gamble your life in more contested zones like the hospital.
↖ New Hidden Gem: Santa Maria Rooftop Breach + Secret Lower Floor
This is the real star of the guide. Most players only loot the Security Breach in the attic and leave, completely missing the floor below—where the rest of the money is.
How to reach the Santa Maria rooftop entrance safely
When people say Santa Maria house, they often think of it just as a landmark. The trick is using the building vertically.
Basic path:
1. Mark Santa Maria House on your map
Put your marker directly on the building.
2. Jump onto the external ledge/platform
There's a side you can jump across to and climb up. First-timers often don't realize this is a viable path.
3. Enter from the top entrance and close the door behind you
Don't skip the door. Closing it is step one in not getting surprised mid-loot.
4. Set up a noise-maker or mine at the entrance
- Noise-maker, mine, whatever you have.
- The point is: while you're downstairs looting, it doubles as an early warning system if someone comes in behind you.
You're basically turning the rooftop into your temporary base of operations.
Attic Security Breach: not broken, but still worth hitting
In the attic you'll find a Security Breach panel. Yes, it's not as crazy as it used to be, but it's still:
- Fully RNG per run;
- The usual mix of trinkets, small valuables, occasional weapon boxes;
- Capable of spitting out a very high-value item when you least expect it.
To me it functions as the starter course: you can already walk out with profit just from the attic, but you're leaving money on the table if you stop here.
The real secret: the lower floor that most players ignore
Here's the important part:
A lot of players think I cleared the Security Breach, this building is done, and leave.
They don't realize there's a whole lower floor with its own loot.
The proper sequence should be:
1. Hit the attic Security Breach.
2. Take the zipline or stairs down into the lower level.
3. Sweep the hidden lower rooms.
Downstairs you'll typically see:
- A table littered with trinkets or valuables.
- Several drawers, cabinets, shelves to search.
- A weapon box that spawns in different spots (sometimes on the couch, sometimes in another corner).
- Bags and other loot containers.
In one run, for example, I opened a drawer and pulled:
- A Deadline mine,
- One trinket,
- Another useful item,
and then found a weapon box that happened to roll me a Berleta. Not a god-tier gun, but combined with all the trinkets, the overall run still felt very worthwhile.
Why this spot is so inconspicuous
I consider this more hidden than the Grandios house for two reasons:
1. The floor layout is deceptive
People mentally treat the Security Breach as the main event, so once they loot the attic, their brain checks the box and they move on.
2. Top looted ≠ bottom looted
I've had multiple raids where the Security Breach was already stripped when I arrived,
- but everything downstairs was untouched—bags still closed, tables full.
For you, this means:
If you're willing to go those extra few steps after the attic, you often get to loot a full-value room that the first team literally didn't know existed.
↖ Hospital & JKV: High-Risk, High-Reward Value Engines
Once you've got the Grandios house and Santa Maria route dialed in, you can start adding big game locations: the hospital and the JKV building.
Hospital: insane loot, equally insane attention
Placement & behavior:
- It sits near the edge of the map, which means: any squad that spawns near that side will probably rush it first.
- The multi-floor layout and tight corridors make it perfect for both ambushes and being ambushed.
Key money rooms:
1. First floor locker room near the key room
- Tons of trinkets.
- Solid medical supplies and utility items.
- Very high value per minute if you get there early.
2. Other floors
- Each floor has a good spread of general loot.
- The issue isn't is there stuff here? but how many people are also here?
Risk management suggestions:
- If you're solo:
- The moment you hear heavy fighting inside, consider skipping or flanking instead of pushing straight in.
- If you're duo or trio:
- Assign roles: one watches stairs and listens, one or two loot.
- Don't have the entire squad snuggled into tiny rooms with no one watching the approach.
JKV Building: multi-floor value in the middle of everything
JKV sits roughly in the center of the map near the parking structure. This makes it a natural crossroads.
Characteristics:
- Each floor offers decent loot, nothing as spiky as hospital, but more consistent.
- Floor-to-floor sound propagation is tricky—you'll hear steps but not always know which level.
- It's a great place to test or train your audio awareness.
Here's how JKV feels on paper:
| Aspect | Description |
|---|---|
| Value | Solid; not as explosive as hospital, but steady |
| Risk | Mid-to-high due to central position |
| Best for | Players with decent aim and sound awareness |
| Playstyle fit | Clear one area at a time, don't overstay |
If you start your run with Grandios house + Santa Maria attic + lower room, then optionally hit hospital, and finally sweep JKV on your way to extraction, your stash value per raid climbs extremely fast when you stay alive.
↖ Surviving Extractions: How Not to Die in the Last 30 Seconds
Looting is half the game; extracting alive is the other half. Buried City extractions are notorious for campers and corner rats.
Simple extraction rules that save real money
1. Don't ego-challenge fights at the extraction
If you hear heavy gunfire near your chosen evac, treat it as compromised. You can always rotate or wait.
2. Always grenade the corners before you commit
People love corners, under stairwells, and tight angles. A single grenade is cheaper than losing your whole run.
3. Have someone cover while the others extract
- In squads: one watches the direction you came from or any known angle.
- Solo: time your extraction when the map is quieter, don't leave it to the last seconds with multiple squads funneling in.
Noise-makers and mines as cheap insurance
Those traps you dropped at Santa Maria or other entrances aren't just lethal—they're information tools.
- If you hear one go off while you're still inside, you know someone is poking around your building.
- That's your cue to shorten your loot cycle and adapt: either set up to fight or start planning your exit earlier.
If you look at your death history and notice a pattern of died on the way out after a huge haul, you probably need to invest more effort into the last 30 seconds of your raid, not just the first 10 minutes.
↖ Expedition: What You Lose, What You Gain, and Why I Changed My Mind
The word Expedition scares a lot of players because it sounds like pushing a reset button on months of progress. Let's break down losses vs rewards cleanly so you can see the real trade.
What Expedition wipes out
Triggering Expedition will remove:
| Item / Aspect | What happens after Expedition |
|---|---|
| Bench levels | Levels reset, but unlocked benches stay |
| Blueprints | All lost |
| Player level | Reset; you re-grind XP and skill tree |
| Stash inventory | Completely wiped (weapons, gear, items) |
Sounds brutal, right?
Especially when you look at your rare blueprints and think about all those one day I'll build this guns.
But ask yourself honestly:
- How many of your epic blueprints are you actively crafting and using?
- How many rare items just sit there in your stash because they feel too precious to burn?
For me, the answer was: I was hoarding way more than I was using. Once I accepted that, the permanent rewards from Expedition started to look better.
What Expedition gives you back long-term
Rewards from finishing an Expedition fall into three buckets: cosmetics, permanent upgrades, and temporary buffs.
1) Cosmetic flex rewards
- A janitor cap for Scrappy the Rooster.
- The Patchwork Raider outfit.
- An Expedition indicator icon so others can see you've completed one.
If you like to flex your experience visually, these are your badges of honor.
2) Permanent, account-impacting bonuses
- +12 stash slots
- If you're a hoarder, this is huge.
- Even if you're not, having breathing room feels great once you start re-stacking value.
- Up to 5 extra skill points (the real prize)
Calculation:
- At the moment you trigger Expedition, the game looks at your total stash value (including coins).
- For every 1 million of stash value, you get +1 skill point, up to 5 million → +5 skill points.
Important:
- Weapons, gear, attachments—all their values count.
- It's not just raw currency; your whole stash matters.
This is the main reason my attitude flipped. I already had my skill tree maxed, but there was one thing I wanted to push to the absolute limit: melee damage.
If you've ever spec'd hard into melee, you know how ridiculous it can get.
Five more points might not look like much on paper, but when those points go into something like melee damage on top of an already strong build, the difference in close encounters is massive.
3) Temporary boost rewards
You also get a set of time-limited buffs after Expedition (duration is system-defined and subject to change):
| Bonus type | Effect | Max stacks |
|---|---|---|
| Material gain (Scrappy) | +6% materials, stacks to 18% | 18% |
| XP gain | +5% XP, stacks to 15% | 15% |
| Repair / upgrade boost | +10% repair efficiency, to 30% | 30% |
Personally, that +30% repair boost is a big deal.
When a typical repair only pushes your condition up by ~50%, that extra 30% makes each repair feel much less punishing and less wasteful.
In practice, these temp buffs are like an accelerator for your second life:
you reset your account, but you level, farm, and repair faster than a fresh player, so you climb back up smoother.
↖ Turning Buried City into Your Expedition Charger
If you're seriously considering an Expedition, here's how I'd shape my Buried City gameplay around that goal.
Suggested raid pacing
Early phase: play safe, build a base
- Focus on: Grandios nameless house → Santa Maria attic + lower room → safe extraction.
- Aim: get steady 20–30k+ runs, pick up trinkets and a few valuable weapons, build your stash foundation.
Mid phase: stable value with controlled risk
- Keep your standard start (nameless house + Santa Maria).
- Add hospital and/or JKV depending on spawns, audio, and how geared you are that raid.
- Aim: consistently push your total stash value towards that 3–5 million range.
Late phase: push to 5 million+ before Expedition
- Bring stronger loadouts so you clear faster and die less.
- Prioritize:
- High-yield known rooms (hospital 1F locker room, Santa Maria downstairs, JKV floors you know well).
- Surviving extractions over squeezing in one more room.
- At this stage, staying alive with what you already have is more profitable than overextending for that last 5k.
Mindset check: is Expedition worth it for you?
If you recognize yourself in these statements:
- Your stash is regularly full and you hate deleting things.
- You own many epic blueprints but only truly use a handful.
- Your skill tree is good, but there's one or two talents you'd love to over-invest in (like melee damage).
Then Expedition stops being a giant punishment and starts looking more like:
A trade: convert your current hoarded value into a stronger, more efficient version of your account.
Buried City is simply the best place to stack that value before you hit the button.
↖ FAQ
Q1: I play pretty ratty and avoid direct fights. Is Buried City still good for me?
Yes. Buried City is perfect for slower, methodical players. Focus on:
- The nameless house near Grandios.
- Santa Maria attic + lower room.
- Hospital 1F locker room when it sounds quiet.
You can get rich by playing patient and listening more than you shoot.
Q2: Do I really need to hit exactly 5 million stash value before Expedition?
You don't need to, but here's how it breaks down:
- 1 million stash value → +1 skill point
- 3 million → +3 skill points
- 5 million → +5 skill points (cap)
If you're casually triggering Expedition, anything you get is a bonus.
But if you've decided to commit to a reset, pushing to 5 million with focused Buried City farming makes the sacrifice feel a lot more justified.
Q3: I keep dying at extractions after great runs. Any low-effort habits that help?
Two habits will save you more than any fancy theory:
1. Always toss a grenade into likely corners before you step in.
2. Pause at the edge of extraction and listen for 2–3 seconds.
It's boring, but it instantly cuts down on died to a guy in the corner I never checked deaths.
Q4: Security Breach got nerfed; is it still worth a detour?
On its own, it's not god-tier anymore. But in places like Santa Maria, the attic Security Breach + lower hidden room combo is absolutely worth hitting every raid.
Think of it as a guaranteed stop on a money route, not as your sole jackpot.
↖ Conclusion
For me, Buried City has turned into a purpose-built Expedition prep map:
- It's compact, fast, and easy to chain-run.
- The Grandios nameless house and Santa Maria's two-level loot setup give you a reliable economic backbone.
- The hospital and JKV add that high-ceiling potential when you're willing to accept the risk.
- And Expedition, while it wipes a lot, pays you back with +12 stash slots, up to +5 skill points, and strong temporary boosts—which feel much better once you've used Buried City to max out your stash value.
If you're on the fence about resetting, start by mastering these Buried City routes, watch your stash number climb, and only then decide.
When you see your value sitting comfortably in that multi-million range, hitting Expedition feels less like a loss and more like cashing out a smart investment.

Most Popular Posts
- ARC Raiders Riven Tides Key Room Guide: Best Hotel Keys, Loot Routes, Secure & Crane Storage
- ARC Raiders Damage Fireflies Trial Guide: Best Farm Method on Buried City Night Raid
- ARC Raiders Riven Tides Update: New Map & Items, ARC Turbine, Rewards, and Best Early Strategy
- ARC Raiders Bettina Guide: Best Build, Buffs, and How to Use It Against ARC
- Arc Raiders Season 4 Riven Tides Update, Rewards, Safe Skins, and Release Timeline
- ARC Raiders Solo Search Supply Drops Guide: Best Buried City Route, Beacon Locations
Popular Category Lists
- Grow a Garden / (286)
- ARC Raiders / (262)
- CoD: Black Ops 7 / (166)
- Monopoly Go / (146)
- MLB 26 / (145)
- Star Citizen / (112)
- Steal a Brainrot / (89)
- Sailor Piece / (68)
- ARK Survival Ascended / (67)
- Diablo IV / (61)
- Forza Horizon 6 / (60)
- Blox Fruits / (60)
- CoD: BLACK OPS 6 / (55)
- Adopt Me / (53)
- Path of Exile 2 / (48)
- Monster Hunter Wilds / (46)
- Windrose / (44)
- Path of Exile / (40)
- Grow a Garden 2 / (40)
- Bee Swarm Simulator / (36)


