0
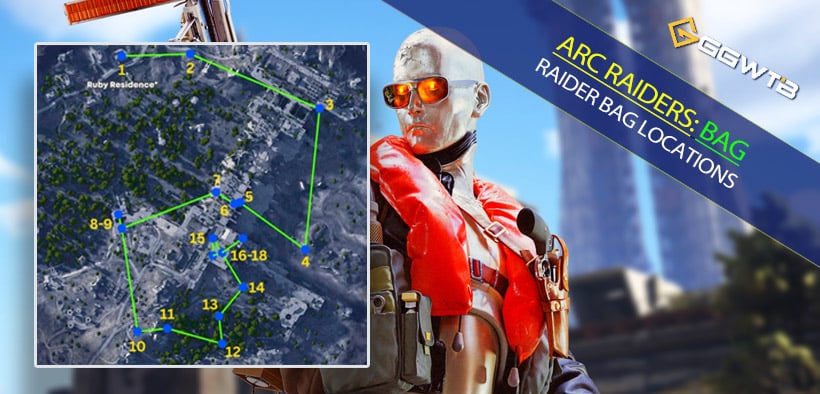
0ARC Raiders Dam Battlegrounds: Raider Bag Locations & Full Loot Route Guide
- KIVRI
- Share
- ARC Raiders
- 12/04/25
- 5707
If you've spent some time in ARC Raiders, you've probably noticed something: standard containers are fine, but they don't really move the needle on your progression. The things that do matter—blueprints, pink (rare) items, high-value materials—tend to come from better sources. Raider Bags are one of the most reliable ones.
- Route Overview & Overall Strategy
- Joining the Route from Different Spawns
- Northern Start: Apartments & Ridges (Spots 1–4)
- Spot 1 – Ruby Residence Top Floor Bag
- Spot 2 – Victory Ridge Ruins Bag
- Spot 3 – Power Generation Complex Hillside Scrap Pile Bag
- Spot 4 – Red Lakes Bag Near Raider Hatch & Tarp
- Spot 5 – Dam Top Breach Room Bag (Bridge & Ladder Route)
- Spot 6 – Dam Bottom Floodgates Middle Bag (Near Zipline Up)
- Spot 7 – Floodgates Top Bag Beside Permanent Zipline
- Spot 8 – Left Room Inside Main Entrance
- Spot 9 – Opposite Side Room on the Other Wing
- Spot 10 – Formakai Hills Hidden Rock Bag
- Spot 11 – Formakai Hills Rock-Behind Bag (NW of Scrapyard)
- Spot 12 – Formakai Hills Wreckage Bag
- Spot 13 – North of Wreckage, Rocks Toward Control Tower
- Spot 14 – West of Testing Annex Scrap Camp Bag
- Spot 15 – Primary Facility Ground Floor Bag
- Spot 16 – Interior Bag Near Early Path
- Spot 17 – First Bathroom Bag
- Spot 18 – Control Tower Rooftop Outer Ledge Bag
- FAQ: Common Questions About the Route & Bags
- Conclusion: Turning Random Looting into a Repeatable Farm Route
This guide is built around three key ideas:
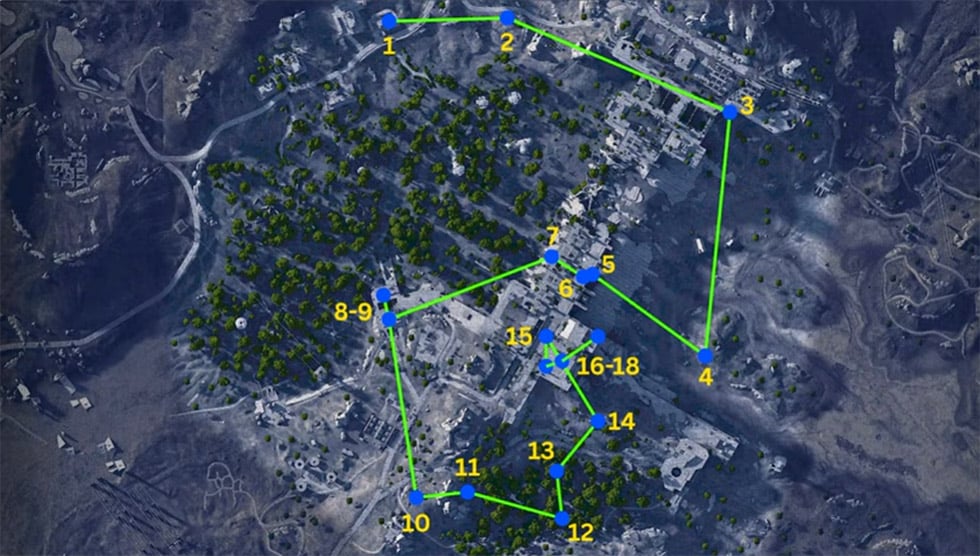
- It covers all 18 Raider Bag locations on Dam Battlegrounds.
- None of the bags are cherry-picked: every bag shown is looted on first visit, so the loot quality you see is roughly what you can expect too.
- It uses a planned loop route, starting in the north but flexible enough that you can join from any spawn on the perimeter.
Keeps two very practical realities in mind:
Your inventory will absolutely fill up.
The route is planned so you hit several points where it's reasonable to extract instead of pushing deeper.
Research & Administration is a PVP magnet.
That's why this route puts it last. If you're full or not in great shape, you can skip it and leave rich instead of feeding someone else.
If you want a run where just wandering around turns into a structured, high-yield farm route, this is what you're looking for.
↖ Route Overview & Overall Strategy
Before diving into spot-by-spot directions, let's look at the big picture.
Route Logic
The ideal starting point for this loop is in the north, around Pale Apartments / Ruby Residence, and the route moves like this:
North section (Spots 1–4)
Ruby Residence → Victory Ridge → Power Generation Complex hillside → Red Lakes
Dam & water facilities (Spots 5–10)
Dam top breach room → floodgate bottom → floodgate top → Water Treatment double bags → hidden Formakai Hills rock loot
Southern hills & wreckage (Spots 11–14)
Multiple Formakai Hills bags → wreckage → rocks north of wreckage → west of Testing Annex camp
Primary Facility & Research & Administration (Spots 15–18)
Primary Facility ground floor → three high-risk bags in Research & Administration
In practice, this means:
- The early route (1–7) is relatively safer and focused on building up loot.
- The middle route (8–15) ramps up loot density and complexity.
- The final route (16–18) is a deliberate step into a high-PVP, high-reward zone.
↖ Joining the Route from Different Spawns
You don't always spawn in the north, so the route needs to be flexible.
If you notice that:
You spawn near Swamp Outpost / southern edge
→ Start around Spots 8–9 (Water Treatment), then flow into 10–15, and only later decide if you want to push into R&A.
You spawn somewhere north or northeast
→ Follow the intended order: start with Spots 1–4, then move toward the dam and onward.
The important part is:
you're not forced to run 1 to 18 in strict order; instead, you attach yourself to the loop from wherever you are and ride it until your inventory or risk tolerance says enough.
Risk Management & Extraction Timing
You should think of Research & Administration (Spots 16–18) as optional endgame spice, not mandatory content.
- If your inventory is almost full and your meds are low, extract around Primary Facility (Spot 15) instead of forcing the R&A push.
- If the server feels hot—constant gunfire, lots of dead bodies— treat R&A as only if I'm feeling brave and ready to lose this run.
Your goal is not just find all 18 spots; it's to convert those spots into actual loot you bring home.
↖ Northern Start: Apartments & Ridges (Spots 1–4)
This section is relatively safe and very straightforward, making it a great warmup and early-loot phase.
↖ Spot 1 – Ruby Residence Top Floor Bag
Area: Ruby Residence / Pale Apartments to the north.
How to find it:
- Look for the distinct red building.
- Head inside and go all the way up to the top floor.
- Once you reach the top, turn around—the Raider Bag will be right behind you.
Landmarks:
- Red-colored building.
- Relatively open top floor with good visibility.
Why you want it:
- Safe, simple, and hard to mess up.
- Great first bag to set the tone for your run.
- The rooftop vantage lets you quickly scan for other players in the area.
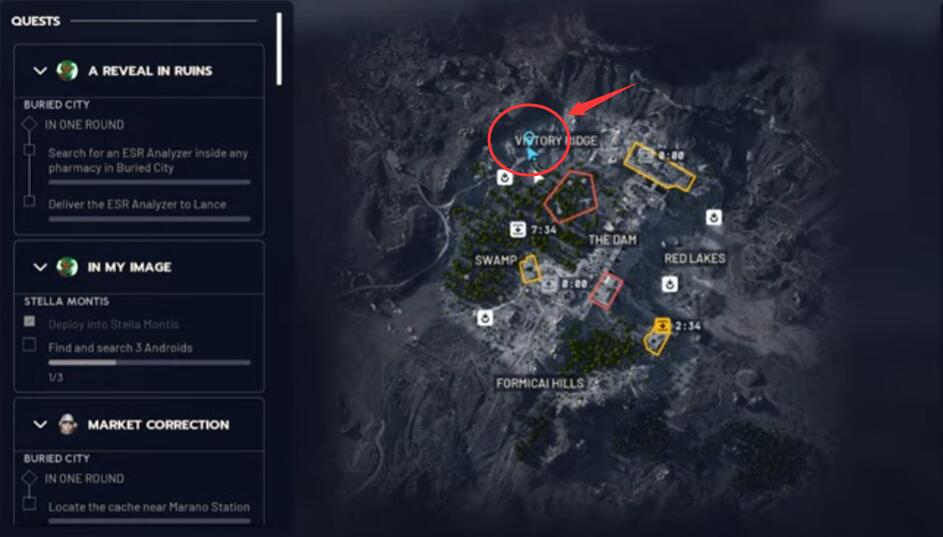
↖ Spot 2 – Victory Ridge Ruins Bag
Area: Victory Ridge in the north.
How to find it:
- Move toward noticeable ruined building structures.
- Once you reach the ruins, look for climbable debris such as broken walls or beams.
- Climb up, jump across, and you'll find the bag nearby.
Landmarks:
- Collapsed structures, broken walls.
- A ruined building cluster that stands out from the terrain.
Why it's worth it:
- Naturally follows Spot 1 as you traverse the northern ridge.
- Open area with reasonable visibility, so you're less likely to get ambushed.
- Helps you fill your inventory early without committing to risky zones yet.
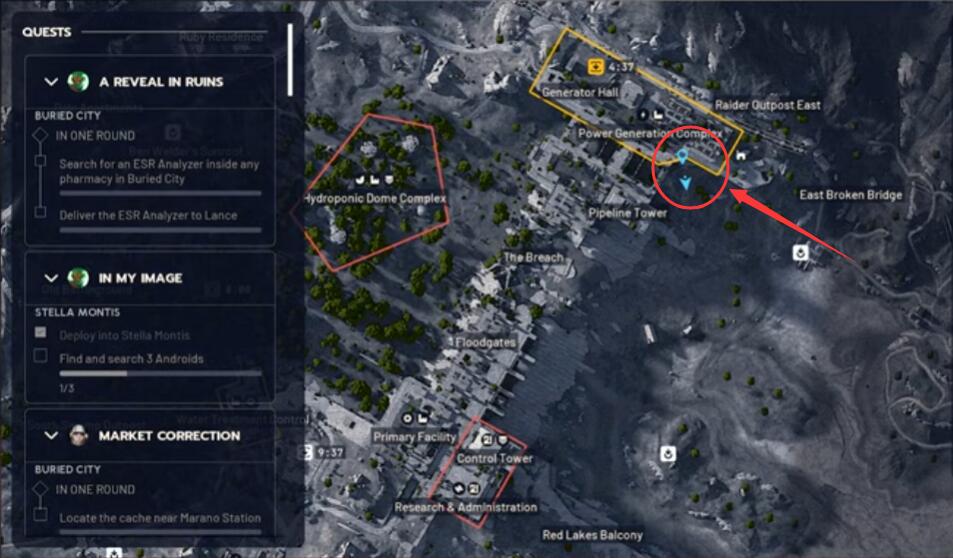
↖ Spot 3 – Power Generation Complex Hillside Scrap Pile Bag
Area: Below the Power Generation Complex, on a hillside.
Important note:
This bag is not inside the complex, it's below it on a hill.
How to find it:
- Move down from the Power Generation Complex to the hillside beneath it.
- At the top of that hill, look for a pile of scrap/metal debris.
- The Raider Bag is inside that scrap pile.
Loot potential observation:
In the original run, this bag actually produced some of the best loot in the entire route—a strong mix of valuables, blueprints, and rare items.
If you're short on time and want to prioritize, Spot 3 is a high-priority bag.
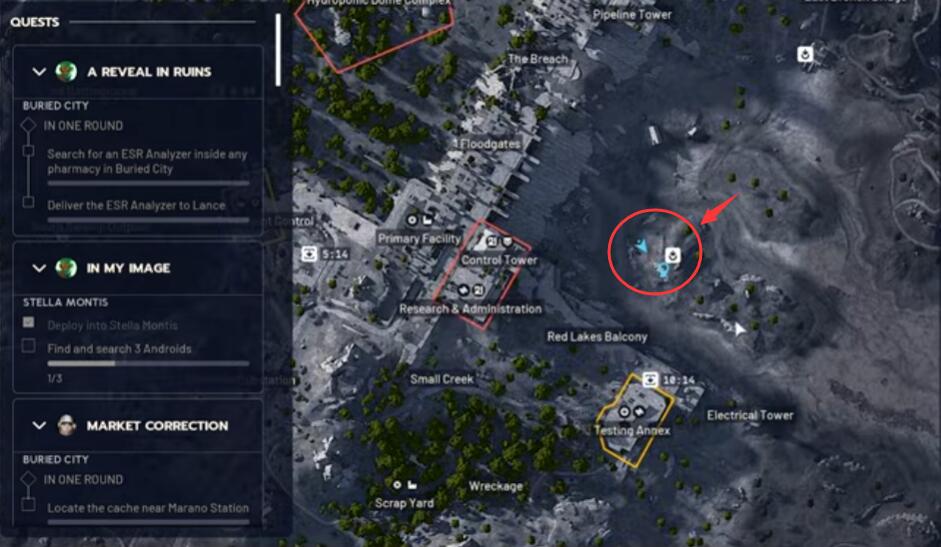
↖ Spot 4 – Red Lakes Bag Near Raider Hatch & Tarp
Area: Red Lakes, near a Raider Hatch.
How to find it:
- Locate the Raider Hatch within the Red Lakes area.
- Nearby you'll see a large tarp (fabric cover) on the ground or over objects.
- The bag is right next to this tarp—if you see the tarp, you're in the right spot.
Why it's important:
- It's a natural transition point from the northern terrain into the dam region.
- Red Lakes can have more player activity; if you see corpses or disturbed mobs, stay alert.
- Grabbing this bag nicely sets you up to move toward Spot 5 at the dam.
Dam & Water Facilities: Mid-Route High-Value Zone (Spots 5–10)
From here, you start interacting more with the dam's verticality and man-made structures. Loot density rises, and so does the danger.
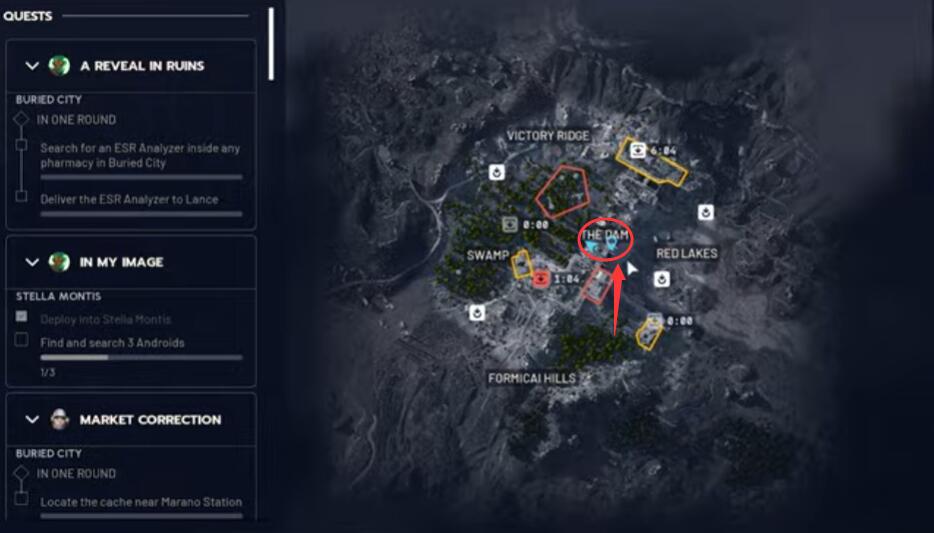
↖ Spot 5 – Dam Top Breach Room Bag (Bridge & Ladder Route)
Area: Top of the dam, inside a locked breach room.
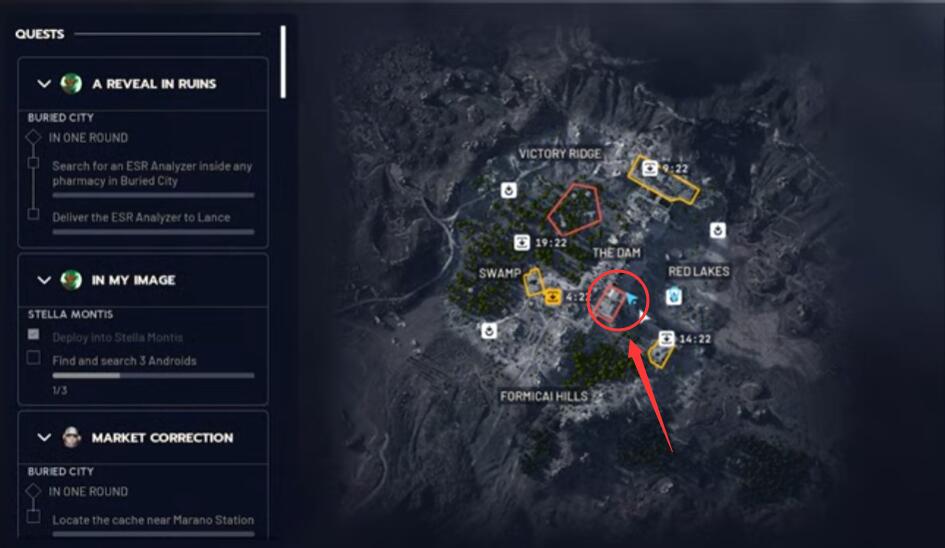
How to climb from lower side to top side:
1. Go to the far left corner of the dam (when facing it).
2. Aim your camera slightly downward and sprint up the sloped surface.
3. If your stamina doesn't let you reach the top:
- There's a halfway ledge where you can pause and regenerate stamina.
- From there, sprint up the rest of the way.
Once you're on top:
Drop off onto the main structure and climb the nearby ladder.
You'll interact with:
- A first bridge you can lower.
- Another bridge further along.
That first breach room, right after the first bridge you lower, is also loaded: it has a weapon case and two security lockers—definitely check it.
Bag location:
The Raider Bag is inside one of the upper breach rooms you access after crossing the bridges and going deeper.
Safety tip:
- The dam top has open sightlines and windows where players can watch the bridges.
- As you cross each bridge, assume someone could be aiming at you. Move with caution.
↖ Spot 6 – Dam Bottom Floodgates Middle Bag (Near Zipline Up)
Area: Bottom of the floodgates, roughly in the middle section.
How to find it:
- Head down to the base of the floodgates.
- Move toward the central area, then look to the left-hand corner.
- A Raider Bag is sitting there in the corner.
- Near this spot is a zipline going upward—this will be key for the next spot.
Route significance:
- This bag is the launch point for Spot 7.
- Once you loot it, take the zipline right next to it to reach the floodgates' top platform.
↖ Spot 7 – Floodgates Top Bag Beside Permanent Zipline
Area: Top of the floodgates, on a platform with a permanent zipline.

How to identify it:
- Ride up the zipline from Spot 6.
- At the top, you'll see a platform with a permanent zipline (not a temporary, deployable one).
- The Raider Bag is right next to this zipline.
Practical advice:
- When you arrive at the top, don't immediately sprint to the bag.
- Check the area first—players sometimes listen for ziplines and wait for you to pop up.
- If you hear shooting above before using the zipline, consider pausing or taking a different route and circling back.
Spots 8 & 9 – Water Treatment Control Building Double Bags
Area: Water Treatment Control Building.
This single building can spawn two Raider Bags, making it one of the best value-per-minute stops on the route.
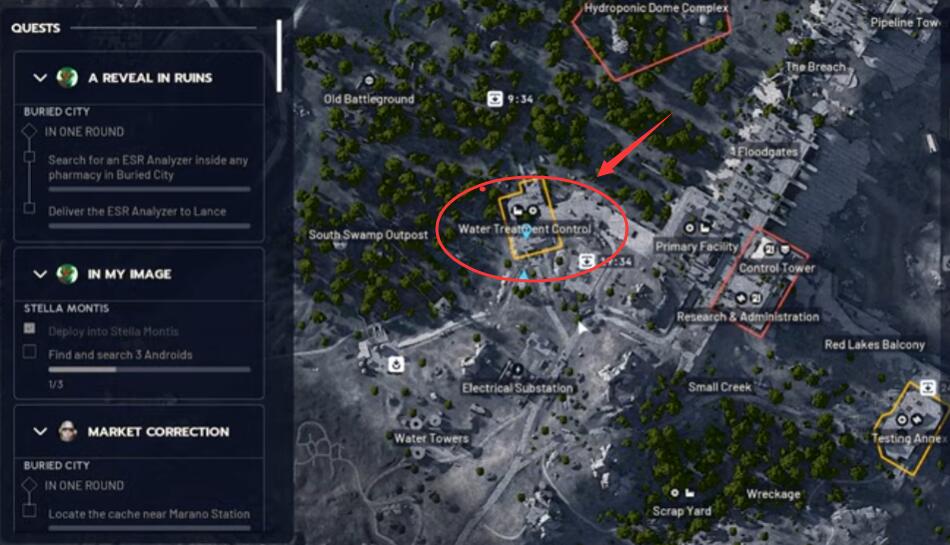
↖ Spot 8 – Left Room Inside Main Entrance
- Enter the Water Treatment Control building via the main door.
- As soon as you go inside, turn left into the first room.
- A Raider Bag can spawn in this room.
- In the recorded run it didn't appear, but this is a known spawn point.
↖ Spot 9 – Opposite Side Room on the Other Wing
- Go back out to the corridor from Spot 8.
- Turn right and continue through to the opposite side of the building.
- In a room on this far side, you'll find the second Raider Bag sitting in the open.
Why this building is so good:
Two bags in one building is huge for efficiency.
If you spawn in the south (like near Swamp Outpost), this is an ideal entry point to your route: Start with Water Treatment, then move to Formakai Hills and further north.
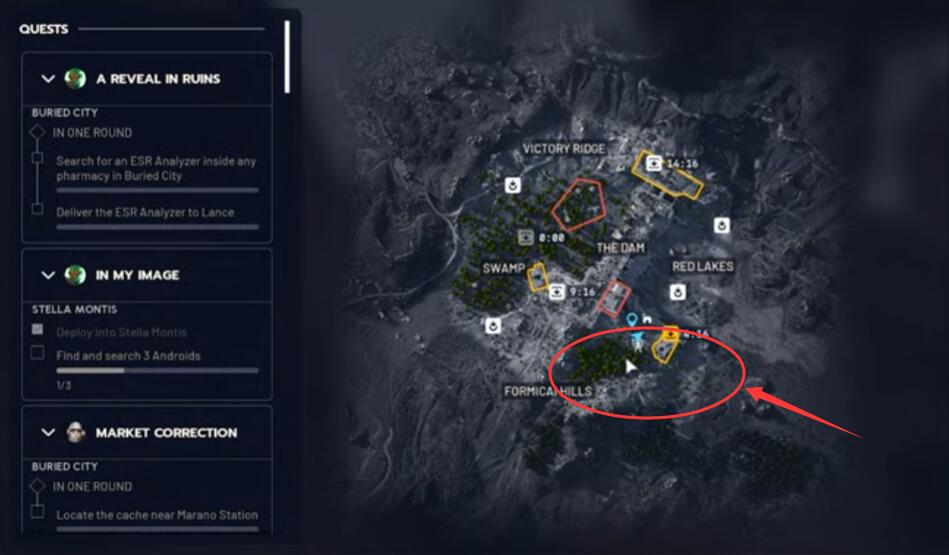
↖ Spot 10 – Formakai Hills Hidden Rock Bag
Area: Southern Formakai Hills.
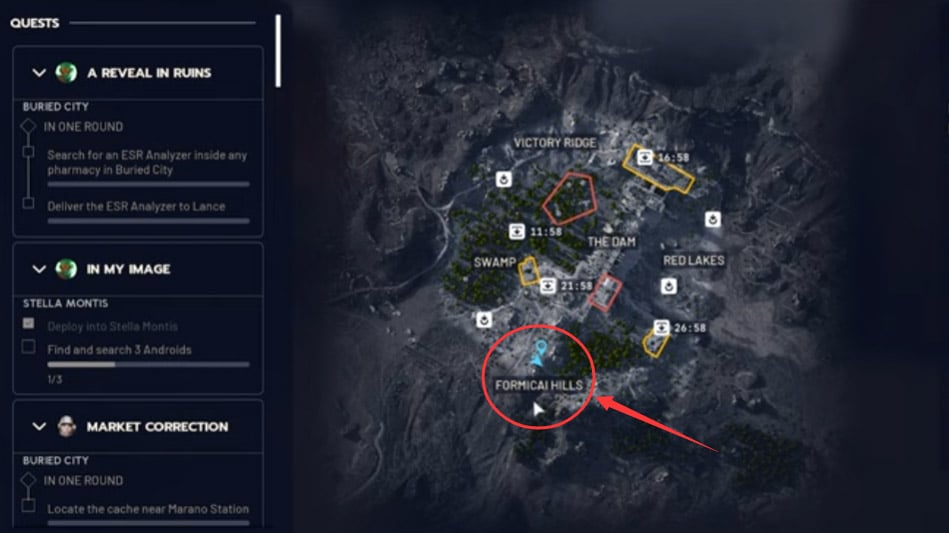
What's special:
- There's a specific rock here that looks solid but can be looted.
- You can't really see the bag visually—it's likely clipped inside the rock—but you still get the loot prompt.
How to handle it:
- Find the identified rock in the Formakai Hills south.
- Move your crosshair over the rock surface.
- When you see the loot interaction pop up, grab it.
Why you shouldn't skip it:
From both player reports and actual loot samples, this invisible bag has strong loot quality.
Because it's not visually obvious, many players simply ignore it, effectively leaving you a private, high-value stash.
Southern Hills + Primary Facility + Research & Administration (Spots 11–18)
From here on, you're in high-yield but higher-risk territory. Terrain gets more complex, and you start approaching central points with more player traffic.
↖ Spot 11 – Formakai Hills Rock-Behind Bag (NW of Scrapyard)
Area: Formakai Hills, northwest of the scrapyard.
How to find it:
- Identify the scrapyard in Formakai Hills.
- Locate the nearby road.
- Follow the road northwest a bit.
- Look for a large rock off to the side. The bag is behind this rock.
Route context:
Combos nicely with Spot 10 as part of a small Formakai cluster.
The hilly terrain gives you plenty of cover, but also lets enemies approach unseen, so keep checking angles.
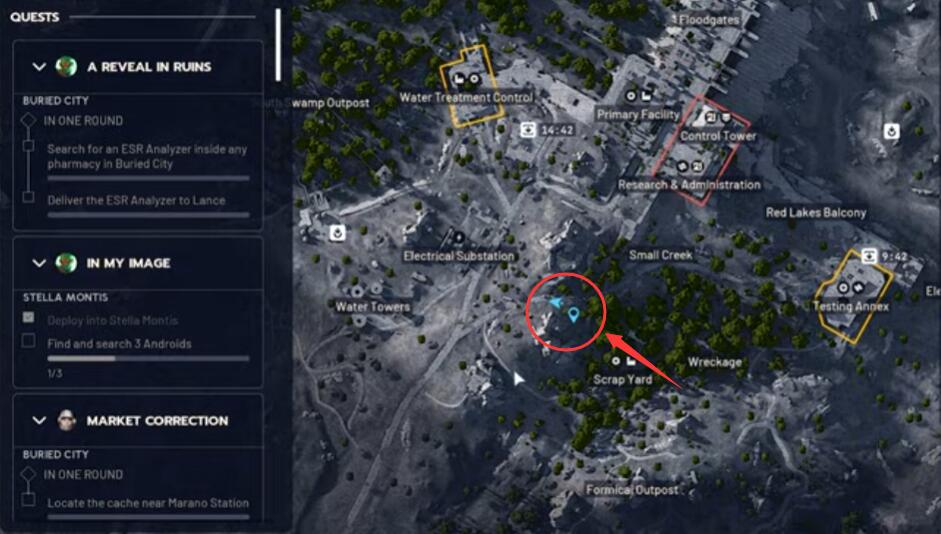
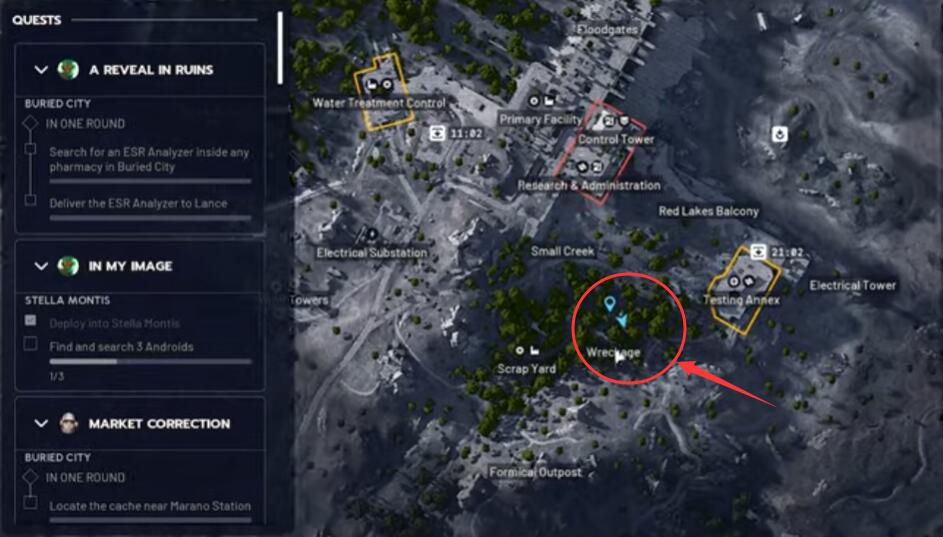
↖ Spot 12 – Formakai Hills Wreckage Bag
Area: Wreckage site in Formakai Hills.
How to find it:
- Move toward the obvious wreckage (ship/vehicle remains).
- Once at the wreckage, move slightly off to one side.
- A Raider Bag will be sitting in the open near the wreckage.
Why it's a good stop:
- Lots of scrap and wreckage = lots of natural cover.
- The bag is easy to find and quick to loot, which keeps your route efficient.
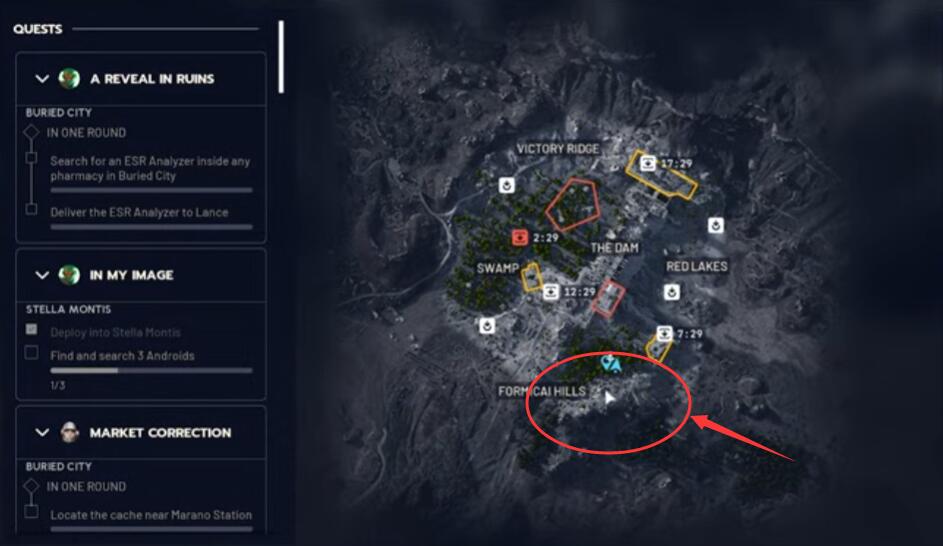
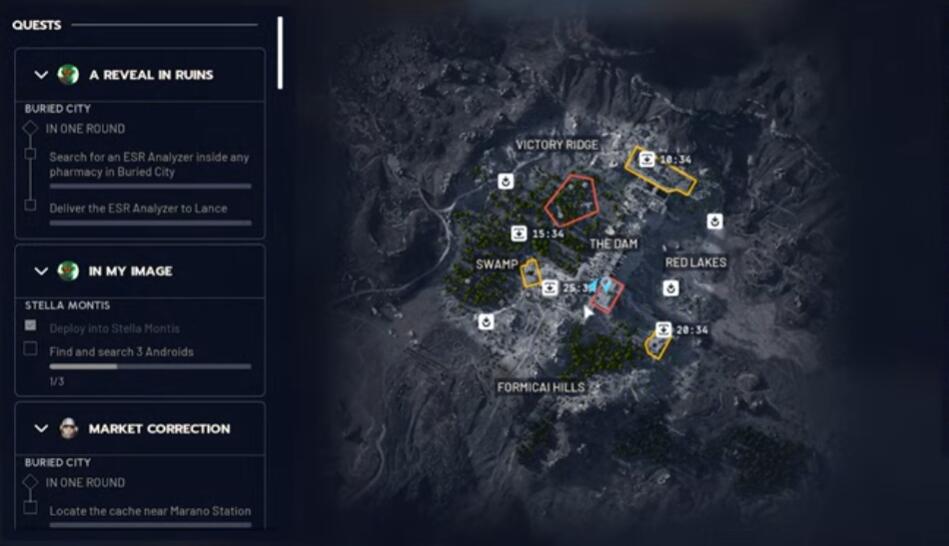
↖ Spot 13 – North of Wreckage, Rocks Toward Control Tower
Area: Just north of Spot 12, en route to the control tower.
How to find it:
- From the Wreckage (Spot 12), head directly north.
- Use the control tower in the distance as your reference point.
- As you move in that direction, you'll hit a cluster of rocks.
- The bag sits right by these rocks.
Why it matters:
This spot naturally pulls you closer toward higher-tier structures and facilities.
It's a bridge between the more open Formakai areas and the more built-up Testing Annex / Primary Facility region.
↖ Spot 14 – West of Testing Annex Scrap Camp Bag
Area: West of the Testing Annex.
Area characteristics:
- A makeshift camp built from scrap metal and ruined structures.
- One prominent scrap building / shack stands out.
Bag location:
- Inside that scrap building.
- Enter the shack and you'll see the bag sitting inside.
Risk notes:
- Monsters sometimes roam here; clear the outside first before diving into the shack.
- Because the camp has limited sightlines, it can be dangerous if you hear gunfire approaching—exiting to the outside area is often safer than turtling inside.
↖ Spot 15 – Primary Facility Ground Floor Bag
Area: Primary Facility, ground floor.
How to find it:
- Look for the large open gate at the lower level of the Primary Facility.
- You can enter from multiple directions, but the big open door is the easiest to recognize and navigate through.
- Once inside on the ground floor, you'll find the bag not far from the main entrance.
Why this is a key decision point:
By the time you hit Spot 15, your inventory is probably getting pretty full.
Many players relax a bit here, but the Primary Facility is a common traffic node.
If you're:
- Low on meds,
- Carrying lots of valuable loot,
- Not interested in PVP, then extracting after Spot 15 is often smarter than pushing into Research & Administration.
Spots 16–18 – Research & Administration: Triple High-Risk Bags
Area: Research & Administration Building.
Think of this as the gamble phase of your run.
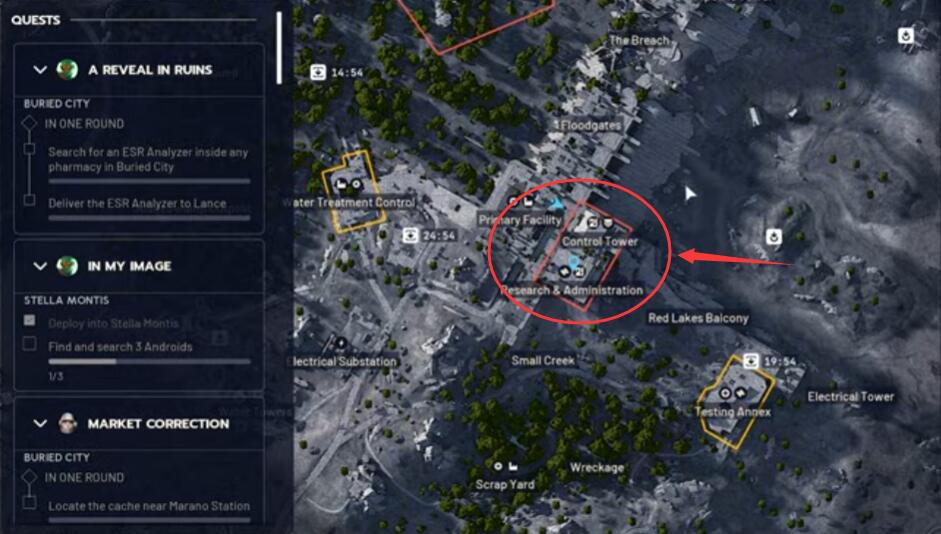
If you decide to go in, assume:
- High PVP likelihood.
- Mix of enemy types:
- Regular mobs,
- Arc units,
- Turrets,
- And other players who also know how good this place is.
Entry & Overall Path
- Approach the front entrance of Research & Administration.
- Once inside, you'll deal with:
- Explosives/traps,
- Close-quarters enemies,
- Tight corridors.
- You'll utilize:
- Internal zip lines,
- Breach doors,
- Ladders,
to move upward through the building toward the control tower and rooftop.
Let's break down the bag locations.
↖ Spot 16 – Interior Bag Near Early Path
Location overview:
- Enter through the front door.
- After clearing the initial enemies and dealing with early explosions, you go up via a zipline.
- Somewhere along that early internal path, there is a fixed Raider Bag spawn inside one of the rooms.
In the recorded run it didn't spawn, but this is a recognized spawn.
Tactical tip:
- Don't rush through just because you know where the bag should be.
- Check for signs of prior combat:
- Dead mobs in odd positions,
- Open doors, spent casings, or recently looted containers.
- If everything screams someone just passed through, slow down.
↖ Spot 17 – First Bathroom Bag
Detailed location:
- From the room where Spot 16 can spawn, head back out into the corridor.
- Move down the hallway until you hit a line of bathrooms.
- The first bathroom contains the Raider Bag:
- Open the door, and you'll see it inside.
Why this spot is interesting:
- Bathrooms are small spaces with lots of cover, making them good for quick inventory management.
- At the same time, if someone hears you in there, you can get cornered easily—so don't linger.
↖ Spot 18 – Control Tower Rooftop Outer Ledge Bag
This is arguably the most mechanically demanding and dangerous bag in the entire route.
Step-by-step path (conceptual):
1. From inside R&A, work your way through the halls and up via zipline(s) and stairs to reach the control tower area.
2. Find a breach door that opens a path to a zipline leading further upward.
3. Take that zipline to reach a higher platform.
4. From there, proceed upward again—eventually you'll fight through an area with:
- One or two turrets (sometimes none, sometimes multiple),
- Possibly Arc enemies.
5. After cleaning up the rooftop zone, you locate a ladder going down to an outer ledge area.
Critical movement detail:
- When you descend the ladder, do NOT go all the way down.
- Midway down, you need to perform a side hop:
- Hold your left movement key and jump off the ladder at the right moment,
- Landing on an outer ledge that wraps around the structure.
Hazards:
- Turrets can spawn on both corners of this outer ledge.
- There can also be a turret hanging in a spot that covers the path to the bag.
- With low health and no meds (as in the original run), this becomes extremely punishing.
Bag location:
- After you successfully side-hop onto the outer ledge, carefully move around the edge.
- You'll find the Raider Bag sitting on that ledge.
Brutal but honest advice:
- If you're low HP, out of meds, and already loaded with loot, it's okay to skip Spot 18.
- The noise from fighting turrets and Arc enemies on the rooftop is effectively a server-wide announcement that there's loot and chaos here.
- A disciplined player knows when to walk away from a high-risk bag—even if it hurts a little.
↖ FAQ: Common Questions About the Route & Bags
Q1: Do these 18 Raider Bags spawn every match?
Not exactly.
- These are fixed potential spawn locations, meaning:
- A bag can spawn there,
- But it might not every single match.
- If you reach the location and there's no bag:
- The bag either didn't spawn this round, or
- Someone looted it before you got there.
- This is clearly shown in the run by:
- Spot 8 (Water Treatment left room),
- Spot 16 (R&A interior room), which sometimes simply don't spawn in that instance.
Q2: How long does a full 18-spot run usually take?
It depends on how aggressively you play and how many fights you take:
- Cautious solo play: around 25–40 minutes.
- Efficient duo/trio: can be trimmed down to 20–30 minutes if you move decisively.
Remember, the real measure of success isn't I touched all 18 spot locations, it's I brought home a lot of good loot without throwing the run.
Q3: What loadout is recommended for this route?
- Backpack:
- Medium or larger.
If your bag is too small, you'll hit capacity before you even reach the dam top or Primary Facility.
- Weapons:
- One mid-to-long-range weapon for:
- Dam top,
- Floodgates,
- Hills and open areas.
- One close-range weapon for:
- Tight corridors,
- Primary Facility interior,
- Research & Administration.
- Other gear:
- Plenty of healing items—especially important for R&A.
- Any tools or consumables that help manage:
- Turrets,
- Armored enemies,
- Crowd control situations.
Q4: Is Research & Administration really worth the risk?
It depends on two things: your current state and your goal for that run.
- You probably shouldn't go if:
- Your inventory is already full of good loot,
- Your meds are low,
- The server feels very active (constant gunfire, lots of bodies).
- You might want to go if:
- You're specifically hunting high-end loot,
- You enjoy PVP and want to contest a hot zone,
- The match feels relatively quiet and you're confident in your team.
In other words, R&A is a choice, not an obligation.
Q5: What if I spawn in the south—how do I adapt the route?
- If you spawn near Swamp Outpost or other southern edges:
- Start with Water Treatment Control (Spots 8–9).
- Then route through 10 → 11 → 12 → 13 → 14 → 15.
- After that, decide if you:
- Push into 16–18 (R&A),
- Or extract with what you already have.
The core idea is: start with what's closest, then connect into the broader loop instead of forcing yourself to sprint north first.
↖ Conclusion: Turning Random Looting into a Repeatable Farm Route
Once you learn these 18 Raider Bag locations and how they link together, Dam Battlegrounds stops being a chaotic question mark and starts feeling like a structured, repeatable farming route:
- The north (Spots 1–4) gives you a safe warmup and early loot.
- The dam & water facilities (Spots 5–10) escalate loot quality and density.
- The southern hills & Primary Facility (Spots 11–15) form a natural checkpoint where you can either cash out or push further.
- Research & Administration (Spots 16–18) is your optional high-stakes finale that can turn a good run into a ridiculous one—if you make it out.
If you often feel like you're just wandering and hoping to stumble into good loot, try running this route a few times.
Soon you'll notice that with the same map and the same enemies, the difference between a mediocre haul and a huge payday is simply knowledge of where to go and when to leave.

Most Popular Posts
- ARC Raiders Riven Tides Key Room Guide: Best Hotel Keys, Loot Routes, Secure & Crane Storage
- ARC Raiders Riven Tides Update: New Map & Items, ARC Turbine, Rewards, and Best Early Strategy
- ARC Raiders Bettina Guide: Best Build, Buffs, and How to Use It Against ARC
- Best ARC Raiders Attachments for Every Weapon: Complete Weapon Mod Guide
- ARC Raiders Turbine Boss Guide: Spawn Time, Weak Points, Best Weapons, and Loot
- Arc Raiders Patch 1.27: Regional Pricing, Augment Rework, and Expedition Catch-Up
Popular Category Lists
- Grow a Garden / (286)
- ARC Raiders / (283)
- CoD: Black Ops 7 / (166)
- MLB 26 / (149)
- Monopoly Go / (148)
- Star Citizen / (128)
- Steal a Brainrot / (90)
- ARK Survival Ascended / (85)
- Sailor Piece / (68)
- Forza Horizon 6 / (66)
- Diablo IV / (62)
- Blox Fruits / (62)
- Adopt Me / (57)
- CoD: BLACK OPS 6 / (55)
- Grow a Garden 2 / (54)
- Path of Exile 2 / (48)
- Monster Hunter Wilds / (46)
- Windrose / (44)
- Path of Exile / (40)
- Bee Swarm Simulator / (37)