


 0
0ARC Raiders Expeditions Guide For Dummies (Foundation to Departure)
- KIVRI
- Share
- ARC Raiders
- 02/11/26
- 1093
Expeditions in ARC Raiders are not just another project line. They're a deliberate character reset with long-term power baked in: extra stash slots and bonus skill points across wipes. The catch is equally real: anything you commit is gone if you choose not to depart when the window opens.
We'll walk the whole chain from Stage 1 to Stage 5 with the fastest ways we've used in practice—when to craft, when to buy from traders, where to farm, and what to carry so you don't donate your sanity along with your resources.
- Core Concept: What an Expedition Really Does?
- What You Lose Vs Keep?
- Timing: The Hidden Constraint
- Stage 1 — Foundation
- Fast Approach
- If You're Short On Steel Springs
- Stage 2 — Core Systems
- Craft vs Buy vs Loot
- Cooling Coils: Where We Farm Them
- Stage 3 — Framework
- The Easy Three
- Light Bulbs: Guaranteed Spawn Route
- Shredder Gyros: Only One Real Way
- Stage 4 — Outfitting
- Advanced Electrical Components: Craft Them, Don't Farm Them
- Frequency modulation boxes & Ion sputters: focus Stella Montis
- Leaper pulse units: controlled hunting on Dam Battlegrounds
- Stage 5 — Load Stage
- What Counts As What?
- Cheese Methods
- Provisions: The Only Category You Can't Fully Brute-force
- Stage 6 — Departure
- What We Do In The Final Weeks?
- FAQs
- Q1. If We Finish Stages 1–5, Do We Have To Depart?
- Q2. What's The Fastest Single Bottleneck Item In Stage 2?
- Q3. How Do We Guarantee Light Bulbs Without Wasting Hours?
- Q4. Where should we farm shredder gyros?
- Q5. Ion Sputters Feel Impossible—are We Doing Something Wrong?
- Q6. What's The Smartest Way To Finish Stage 5 Quickly?
- Wrap-Up
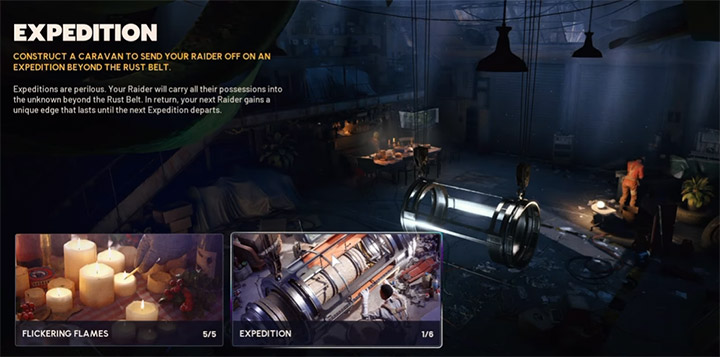
↖ Core Concept: What an Expedition Really Does?
Before donating a single part, lock in the why and the cost, because this decision is the only irreversible part.
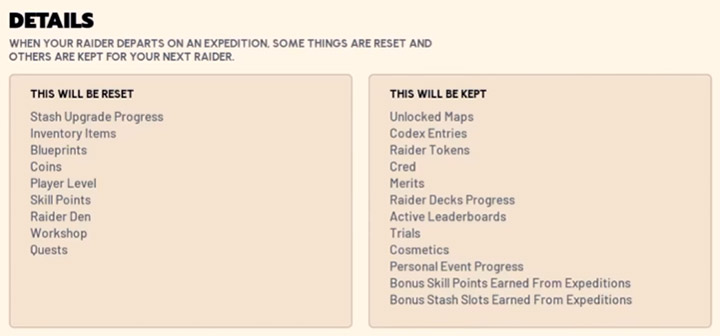
↖ What You Lose Vs Keep?
If you depart, you reset things like:
- Upgrade progress, inventory items, blueprints, coins
- Player level, skill points (baseline), den/workshop progress, quests
You keep things like:
- Unlock maps, codex entries
- Raider tokens, cred merits, leaderboard/trials progress
- Cosmetics, personal event progress
- Prior expedition bonuses (bonus skill points / stash slots)
If you're not 80–90% sure you'll actually depart, don't start committing rare items. If you commit and then back out later, those items were effectively burned for nothing.
↖ Timing: The Hidden Constraint
The expedition cycle is time-based (commonly rotating windows). That means:
- Stages 1–5 are prep
- Stage 6 is the actual departure window
So your real job is to finish Stage 5 early, then spend remaining days building total inventory value (cash + stash value).
↖ Stage 1 — Foundation
Stage 1 is a bulk-donation warm-up:
- Metal parts
- Plastic parts
- Arc alloy
- Steel springs
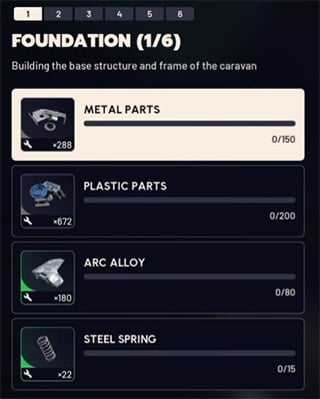
↖ Fast Approach
- Metal/plastic parts: you'll drown in these naturally; donate immediately.
- Arc alloy: drops from ARC encounters broadly; don't hoard.
- Steel springs: common loot and dismantle output.
↖ If You're Short On Steel Springs
Use the daily trader supply:
Celeste sells steel springs (daily limited quantity).
Stage 1 should be done in one sitting unless you're brand-new and under-looting containers.
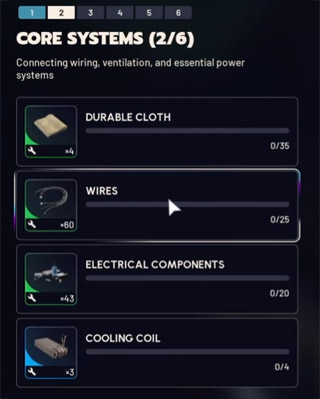
↖ Stage 2 — Core Systems
You'll donate:
- Durable cloth
- Wires
- Electrical components
- Cooling coils (the bottleneck)
↖ Craft vs Buy vs Loot
Here's the most reliable path we use:
| Item | Best Method | Fallback | Notes |
|---|---|---|---|
| Durable cloth | Craft in Workshop/Refiner | Loot | Costs a lot of fabric; craft only when you're close. |
| Wires | Loot everywhere | Buy from Celeste (daily) | Also comes from dismantling many items. |
| Electrical components | Craft (plastic + rubber parts) | Loot | Crafting is consistent; looting is swingy. |
| Cooling coils | Farm industrial zones | Repeat runs | Rare; plan a focused loop. |
↖ Cooling Coils: Where We Farm Them
Dam Battlegrounds → Primary Facility (industrial/loading bay).
Why This Works:
- It's industrial-tagged, so cooling coils are in the right loot table.
- It's often less contested than the hottest high-value nodes nearby.
- Dense containers = more rolls per minute.
Execution Rule: If you enter the loading bay and don't see coils, still clear the whole container line, then check nearby interior breachable rooms. Cooling coils can appear anywhere, so volume wins.
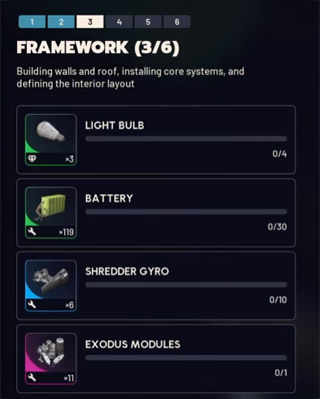
↖ Stage 3 — Framework
You'll donate:
- Light bulbs ×4
- Batteries ×30
- Shredder gyros ×10
- Exodus module ×1
↖ The Easy Three
| Item | Typical Source | Trader Shortcut | Our Take |
|---|---|---|---|
| Batteries | Common loot / recycling | Celeste sells (daily) | Don't waste time farming them deliberately. |
| Exodus module | Rare loot, higher in high-value areas | Celeste sells (1/day) | Buy it if RNG hates you. |
| Light bulbs | Drawers/lockers/utility loot | Guaranteed spawn (see below) | Use the guaranteed source and move on. |
↖ Light Bulbs: Guaranteed Spawn Route
Dam Battlegrounds → Electrical Substation → the car outside.
- Search the car (hood/bonnet loot).
- Guaranteed light bulb each time.
If you find yourself stuck at 3/4, this solves it in one run, no drama. Put it in your safe pocket if you're running hot zones.
↖ Shredder Gyros: Only One Real Way
- Go to Stella Montis
- Hunt Shredders
- Kill 10, loot 10 gyros
How We Kill Shredders Consistently?
- Use cover (hard cover, not vibes).
- Aim at thrusters until they ignite.
- Respect the explosion timing—cover saves meds.
Loadout philosophy: we don't need fancy; we need repeatable. A solid heavy weapon + enough ammo + heals beats expensive gear fear.
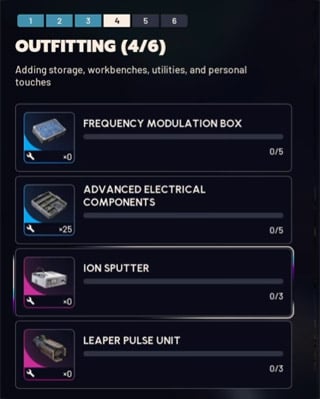
↖ Stage 4 — Outfitting
You'll donate:
- Frequency modulation boxes ×5
- Advanced electrical components ×5
- Ion sputters ×3
- Leaper pulse units ×3
↖ Advanced Electrical Components: Craft Them, Don't Farm Them
Craft chain:
- Wires + Electrical components → Advanced electrical components
- Electrical components can also be crafted from plastic + rubber parts.
If you notice you're short on wires, buy the daily batch from Celeste and keep crafting.
↖ Frequency modulation boxes & Ion sputters: focus Stella Montis
We've had the best consistency in Stella Montis → Medical Research even if the item tooltip points you toward Exodus themes.
Medical/tech containers in that zone produce the right kind of high-tier electronics frequently enough that repetition beats map-hopping.
Risk Management: Contested Loot
Medical Research is often PvP-heavy. If you're getting deleted on entry:
- Run cheaper kits to reduce tilt-cost.
- Prioritize safe pocket usage for your first high-tier drop.
- Loot fast, rotate out, bank, repeat.
Behavioral note: Some lobbies trend cooperative over time, but assume nothing. If you see a player acting friendly, treat it as temporary non-aggression, not a contract.
↖ Leaper pulse units: controlled hunting on Dam Battlegrounds
Goal: 3 pulse units, often 1 per Leaper (sometimes more).
Where We Check?
- Water Treatment Elevator area (good extraction proximity)
- Testing Annex
- Red Lakes
- Near Hydroponic Dome Complex / swamp edges
How We Kill Leapers Fast?
- Bring explosive solutions (launcher + ammo, or strong grenades).
- Use a nearby building/structure as cover.
- Aim for the weak point (commonly the eye behaviorally—front-facing vulnerability).
If you loot a Leaper, then: search the full loot profile; sometimes you'll pull multiple pulse units and skip extra hunts.
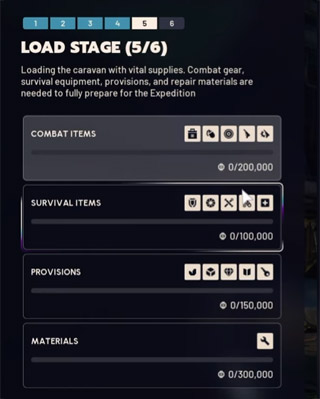
↖ Stage 5 — Load Stage
Stage 5 is simple mechanically and annoying psychologically: you must donate categories until you hit target values.
Targets:
- Combat items: 200,000
- Survival items: 100,000
- Provisions: 150,000
- Materials: 300,000
↖ What Counts As What?
| Category | What usually qualifies | Fastest way to hit value | Common trap |
|---|---|---|---|
| Combat | Weapons, ammo, grenades | Donate spare guns; buy cheap guns to convert cash → value | Donating good weapons you still need for farming. |
| Survival | Heals, shields, defibs, augments | Craft or bulk-buy defibs/heals if rich | Small-value items take many clicks. |
| Provisions | Trinkets, duplicate blueprints, seeds | Farm trinket-dense buildings | Donating keys (often worthless) expecting progress. |
| Materials | Parts/components | Donate surplus; craft high-value components | Over-donating rare craft bottlenecks you'll need later. |
↖ Cheese Methods
If you're behind schedule:
- Combat: buy guns (daily limits apply), donate immediately.
- Survival: buy/craft defibs and donate.
- Materials: craft advanced components and donate.
This means: cash can be converted into expedition progress when time is the constraint.
↖ Provisions: The Only Category You Can't Fully Brute-force
You can't reliably buy your way to provisions value. You need trinkets and valuable provision loot.
Our Highest Repeatable Trinket Routes
Dam Battlegrounds → Research & Administration building (upper floors)
Lockers + drawers = high trinket density.
- Spaceport → Departure Building (specific rooms can be stacked with trinkets)
- Buried City → Hospital (lockers/drawers route)
2 solid trinket runs in a dense building can easily push you into the six-figure provision value range if you prioritize lockers/drawers and extract clean.
↖ Stage 6 — Departure
When Departure opens, you can choose to send your raider off. Your rewards scale with total value, typically:
- Cash on hand
- + inventory/stash value

A past target used by many players as a planning anchor is ~5,000,000 total value for maximizing bonus skill point thresholds (exact thresholds can vary by season/wipe rules). We treat that as our working goal unless the current expedition panel states otherwise.
↖ What We Do In The Final Weeks?
- Keep farming high-value trinket routes for provisions value.
- Bank expensive electronics and modules instead of using them up.
- Avoid donating items you still need to farm efficiently (your farming kit is an investment).
↖ FAQs
↖ Q1. If We Finish Stages 1–5, Do We Have To Depart?
No. But if you don't depart, anything you committed into the expedition is effectively gone. Treat your donations as locked-in the moment you click commit.
↖ Q2. What's The Fastest Single Bottleneck Item In Stage 2?
Cooling coils. Target industrial zones, and run a repeatable loop. On Dam Battlegrounds, we've had strong results at Primary Facility because it's container-dense and often less contested.
↖ Q3. How Do We Guarantee Light Bulbs Without Wasting Hours?
Dam Battlegrounds, Electrical Substation, loot the car outside. It's a consistent, repeatable guaranteed source. Safe-pocket it if you're entering during peak PvP hours.
↖ Q4. Where should we farm shredder gyros?
Stella Montis only, by killing Shredders. Bring cover-first tactics and aim thrusters. The gyro count is a straight grind—optimize for survival and repetitions.
↖ Q5. Ion Sputters Feel Impossible—are We Doing Something Wrong?
Usually it's not wrong, it's low drop rate + high contest. Our most consistent zone has been Stella Montis Medical Research. If you're dying frequently, run cheaper kits and extract immediately after the first valuable drop.
↖ Q6. What's The Smartest Way To Finish Stage 5 Quickly?
Convert resources where you can:
- Combat: donate spare guns (or buy and donate).
- Survival: craft/buy defibs/heals.
- Materials: donate surplus components.
But for Provisions, plan actual trinket runs; it's the category most players under-estimate.
↖ Wrap-Up
If we treat the expedition like a checklist, it feels grindy. If we treat it like a short campaign—craft the craftables, buy the daily-limited pain points, and farm only the truly rare drops—it becomes predictable.
Note: When you complete Expedition 1 and unlock Expeditions 2, all items in your account, including crafting tables, blueprints, and gold, will be cleared, and you will gain an additional 5 skill points.
Our best results come from one simple rule: remove randomness wherever the systems allow it (guaranteed spawns, trader purchases, crafting chains), and spend your RNG budget only on the few items the game forces you to farm (cooling coils, shredder gyros, ion sputters, and provision trinkets). That's how we finish early, then spend the remaining days calmly stacking inventory value for Departure.

Most Popular Posts
- ARC Raiders Riven Tides Key Room Guide: Best Hotel Keys, Loot Routes, Secure & Crane Storage
- ARC Raiders Damage Fireflies Trial Guide: Best Farm Method on Buried City Night Raid
- ARC Raiders Riven Tides Update: New Map & Items, ARC Turbine, Rewards, and Best Early Strategy
- ARC Raiders Bettina Guide: Best Build, Buffs, and How to Use It Against ARC
- ARC Raiders Solo Search Supply Drops Guide: Best Buried City Route, Beacon Locations
- Arc Raiders Season 4 Riven Tides Update, Rewards, Safe Skins, and Release Timeline
Popular Category Lists
- Grow a Garden / (286)
- ARC Raiders / (266)
- CoD: Black Ops 7 / (166)
- Monopoly Go / (146)
- MLB 26 / (145)
- Star Citizen / (118)
- Steal a Brainrot / (89)
- ARK Survival Ascended / (75)
- Sailor Piece / (68)
- Forza Horizon 6 / (63)
- Diablo IV / (61)
- Blox Fruits / (60)
- CoD: BLACK OPS 6 / (55)
- Adopt Me / (53)
- Path of Exile 2 / (48)
- Monster Hunter Wilds / (46)
- Windrose / (44)
- Grow a Garden 2 / (44)
- Path of Exile / (40)
- Bee Swarm Simulator / (36)


