


 0
0ARC Raiders Low-Risk PvE Loot Spots: Beat High-Tier Zones
- ELSA
- Share
- ARC Raiders
- 06/29/26
- 96
High-tier zones look good on paper. In practice, they are often stripped, camped, or full of players chasing the same containers.
These low-risk PvE loot spots in ARC Raiders are better for consistent profit. We tested each route across multiple runs. The result: blueprints, Wolfpacks, Bobcats, Ventors, Ospreys, rare trinkets, magnetic accelerators, and strong crafting mats from areas most players ignore.
The rule is simple:
Avoid obvious hot zones. Hit dense container routes. Extract once the bag is worth protecting.

- Best Low-Risk Loot Spots in ARC Raiders
- 1. Floodgates to Treehouse Route
- Route
- Why It Works
- Execution Tip
- 2. Corso Da Vinci Highway Rooftop Cluster
- Key Checks
- Tested Loot
- Execution Tip
- 3. Spaceport Tower Between Arrival and Departure
- Loot Layout
- Tested Loot
- Execution Tip
- 4. East Plains Warehouses
- Loot Checks
- Tested Loot
- Execution Tip
- 5. Blue Gate Maintenance Bunker + Extraction Building
- Route
- Tested Loot
- Why It Is So Good
- Execution Tip
- 6. Blue Gate Highway Collapse Route
- Route Checks
- Tested Loot
- Required Gear
- 7. Robotic Sandbox A Storage Room
- Key Loot
- Tested Loot
- Execution Tip
- 8. Stella Montis Western Tunnel
- Loot Checks
- Tested Loot
- Execution Tip
- 9. Tennis Court to Dried Riverbed Route
- Route
- Tested Loot
- Execution Tip
- Best Routes by Loot Goal
- Loot Priority: What to Keep First
- FAQ
- What is the safest low-risk loot spot in ARC Raiders?
- Which route is best for blueprints?
- Which spot gives the best weapons?
- Are these routes good for solo players?
- Best Low-Risk PvE Loot Spots in ARC Raiders
- 1. Floodgates to Treehouse Route
- Key Loot Checks
- Route
- Why It Works
- 2. Corso Da Vinci Highway Rooftop Cluster
- Key Loot Checks
- Route
- Best Finds
- 3. Spaceport Tower and Breachable Room
- Key Loot Checks
- Why It Is Good
- 4. East Plains Warehouses
- Key Loot Checks
- Best Finds
- Route Tip
- 5. Maintenance Bunker + Extraction Building
- Key Loot Checks
- Test Results
- Why We Run It
- 6. Highway Collapse Route
- Key Loot Checks
- Required Gear
- Best Finds
- 7. Robotic Sandbox A Storage Room
- Key Loot Checks
- How to Open the Storage Room
- Best Finds
- Combat Tip
- 8. Western Tunnel Security Lockers
- Key Loot Checks
- Best Finds
- Why It Works
- 9. Tennis Court to Dried Riverbed Route
- Key Loot Checks
- Best Finds
- Route Tip
- Best ARC Raiders PvE Routes by Goal
- Loot Priority: What to Keep and What to Drop
- FAQ
- What is the safest loot spot in ARC Raiders?
- Which low-risk route is best for blueprints?
- Which spot gives the best weapons?
- Do premium containers always spawn?
- When should I extract?
- Summary
↖ Best Low-Risk Loot Spots in ARC Raiders
| Rank | Location | Best Loot Types | Risk |
|---|---|---|---|
| 1 | Maintenance Bunker + Extraction Building | Wolfpacks, weapons, trinkets, attachments | Very Low |
| 2 | Robotic Sandbox A | Blueprints, Bobcat, Osprey, rare mats | Medium |
| 3 | Western Tunnel | Security lockers, Wolfpack, Level 2 weapons | Low |
| 4 | Tennis Court to Dried Riverbed | Blueprints, trinkets, backpacks, seeds | Very Low |
| 5 | Floodgates to Treehouse | Ventor, Raider cache, weapon case | Low |
| 6 | Corso Da Vinci Rooftops | Wolfpack, attachments, weapon cases | Low-Medium |
| 7 | East Plains Warehouses | Magnetic accelerators, trinkets, mats | Very Low |
| 8 | Spaceport Arrival/Departure Middle | Security lockers, Bobcat, Anvil | Low |
| 9 | Highway Collapse | Blueprints, Elephant Obelisk, backpacks | Low |
↖ 1. Floodgates to Treehouse Route
This is a clean early route with strong container variety. Low player traffic. Fast extraction.
↖ Route
| Stop | Check | Key Loot |
|---|---|---|
| Top of Floodgates | Backpack | Advanced mechanical components, gun parts |
| Zipline path to swamp | Raider cache | Blueprints, shields, grenades |
| Treehouse with slanted car | Weapon case / grenade tube | Weapons, explosives |
| Small wall nearby | Weapon case | Ventor, Osprey blueprint |
| Broken field depot | Drawers / computer | Trinkets, small valuables |
| Central Swamp Lift | Extract | Safe exit |
↖ Why It Works
This route can hit backpack + Raider cache + weapon case + extraction in one smooth line.
Tested highlights:
| Run | Best Finds |
|---|---|
| 1 | Ventor, medium shield, advanced mechanical parts, complex gun parts |
| 2 | Ventor, Osprey blueprint, 2 heavy fuse grenades |
↖ Execution Tip
If the treehouse weapon case is missing, check the small wall weapon case before leaving. That second spawn carried both test runs.
↖ 2. Corso Da Vinci Highway Rooftop Cluster
This is not one loot room. It is a compact loot square with several premium checks packed together.
↖ Key Checks
| Area | Container | Possible Loot |
|---|---|---|
| Highway truck | Weapon case | El Toro, weapons, gun parts |
| Room below highway | Weapon case / drawers | Trinkets, mod parts |
| Small tower ledge | Backpack | Fuel, cloth, gun parts |
| Rooftop hatch | Security locker / weapon case | Wolfpack, Osprey, lenses |
| Blue container room | Blue containers | Attachments, augments |
| Chimney rooftop | Backpack | Complex gun parts |
| Final zip room | Drawers / grenade tube / weapon case | Padded Stock, Wolfpack, weapons |
↖ Tested Loot
| Run | Best Finds |
|---|---|
| 1 | Wolfpack, Muzzle Brake 3, Osprey 2, Padded Stock |
| 2 | El Toro, Wolfpack, Ferrel 2, backpack mats |
↖ Execution Tip
Do not quit if the first weapon case whiffs. The route has enough backup containers to recover value.
↖ 3. Spaceport Tower Between Arrival and Departure
Most players rush Arrival or Departure. That leaves the middle tower and breachable room open.
↖ Loot Layout
| Spot | Check | Loot Potential |
|---|---|---|
| Tower | Security locker | Level 2 weapons, rare mats |
| Tower desk | Weapon case | Guns, gun parts |
| Breachable room | Up to 2 security lockers | Bobcat, Anvil, rare weapons |
| Breachable room | Grenade tube | Wolfpack, seeker grenade |
↖ Tested Loot
| Run | Best Finds |
|---|---|
| 1 | Wolfpack, Anvil 2, rare materials |
| 2 | Bobcat 1, rare trinket, explosives |
↖ Execution Tip
If players move toward Departure, let them. Your target is the ignored middle room. Less fighting. More loot.
↖ 4. East Plains Warehouses
Edge-of-map route. Very quiet. Good for materials, trinkets, and backpacks.
↖ Loot Checks
| Area | Check | Best Finds |
|---|---|---|
| Main warehouse | Green containers / breachables | Trinkets, gun parts |
| Shipping container area | Green containers | Shoes, springs, mats |
| Second floor | Lockers / tables | Seeds, batteries, filters |
| Rooftop | Backpack | Heavy gun parts, accelerators |
| Nearby buildings | Lockers / drawers | Magnetic accelerators |
| Raider camp | Backpack / Raider cache | Blueprints, grenades |
↖ Tested Loot
| Run | Best Finds |
|---|---|
| 1 | Epic trinket, rare trinket, uncommon trinket, rare mats |
| 2 | 2 magnetic accelerators, heavy fuse grenade, Raider cache, colorful shoes |
↖ Execution Tip
If the warehouse floor looks empty, go upstairs and hit the side buildings. This route often pays late.
↖ 5. Blue Gate Maintenance Bunker + Extraction Building
One of the best fast-profit routes in ARC Raiders. Short. Safe. Extraction is right there.
↖ Route
| Step | Location | Check |
|---|---|---|
| 1 | Maintenance Bunker | Security locker |
| 2 | Same room | Lockers / drawers |
| 3 | Exit path | Breachable container |
| 4 | Between bunker and extract | Raider cache chance |
| 5 | Extraction building | Containers / trinkets |
| 6 | Upper level | Ammo box |
↖ Tested Loot
| Run | Best Finds |
|---|---|
| 1 | 2 Wolfpacks, Ventor 2, colorful shoes, film reel |
| 2 | Anvil 2, Padded Stock 2, colorful shoes, Turion trinket |
↖ Why It Is So Good
You can spawn nearby, loot a security locker, sweep the extraction building, and leave in minutes.
That is elite time-to-profit.
↖ Execution Tip
Hit the extraction button first. Then loot nearby containers while waiting.
↖ 6. Blue Gate Highway Collapse Route
A slower edge route, but very safe. Strong for backpacks, trinkets, and blueprint chances.
↖ Route Checks
| Location | Check | Loot |
|---|---|---|
| First bus | Weapon case | Auto shotgun, attachments |
| Cars / buses | Loose items / breachables | Tools, heat sinks |
| Under highway | Backpack / med bag | Mats, meds |
| Barrel area | Backpack | Seeds, components, blueprints |
| Highway top | Suitcases | Trinkets |
| Hidden ledge camp | Grenade tube / med bag / container | Elephant Obelisk, grenades |
| Broken highway platform | Backpack | Magnets, mats |
| Tree trunk | Backpack | Crafting mats |
| Ruin near extract | Ammo box / drawers | Ammo, small loot |
↖ Tested Loot
| Run | Best Finds |
|---|---|
| 1 | Elephant Obelisk, Auto 1, grenade mats |
| 2 | Heavy gun part blueprint, backpack materials |
↖ Required Gear
Bring one:
- Crash mat
- Snap hook
- Zipline
The hidden ledge can hurt. A crash mat makes it clean.
↖ 7. Robotic Sandbox A Storage Room
Highest ceiling on the list. More setup. More danger. Better rewards.
You need 3 power banks to open the storage room.
↖ Key Loot
| Area | Check | Loot Potential |
|---|---|---|
| Sandbox center | Weapon case | Bobcat, Osprey |
| Under tables | Grenade tube | Heavy fuse, explosives |
| Side wall | Backpack | Materials |
| Medical room | Medical containers | Shield rechargers, crash mats |
| Storage room | Security locker | Osprey 2, Wolfpack |
| Storage room | Lockers / containers | Blueprints, sensors, processors |
↖ Tested Loot
| Run | Best Finds |
|---|---|
| 1 | Bobcat, Osprey 2, colorful shoes, equatorial sundial |
| 2 | Aelion blueprint, blue light stick blueprint, 2 El Toros |
↖ Execution Tip
Clear Shredders before carrying power banks. Use walls and door frames to break line of sight. Do not fight them in the open.
If the security locker does not spawn, still loot the room. The regular lockers can drop blueprints and weapons.
↖ 8. Stella Montis Western Tunnel
Easy to miss. Very worth checking.
Two security lockers can spawn in quiet tunnel rooms near extraction routes.
↖ Loot Checks
| Location | Check | Loot |
|---|---|---|
| First tunnel room | Security locker | Renegade 2, Osprey 2, grenades |
| Corner | Backpack | Batteries, mechanical parts |
| Second tunnel room | Security locker | Wolfpack, Level 2 weapons |
| Table | Loose trinket | Colorful shoes, legendary trinket |
| Nearby room | Med bag | Bandages, shield rechargers |
↖ Tested Loot
| Run | Best Finds |
|---|---|
| 1 | Renegade 2, Arpeggio 2, colorful shoes |
| 2 | Osprey 2, Wolfpack, legendary trinket |
↖ Execution Tip
If you pass Western Tunnel, check both side rooms. Even one spawned locker justifies the detour.
↖ 9. Tennis Court to Dried Riverbed Route
Quiet route. Great for trinkets, backpacks, seeds, and surprise blueprints.
↖ Route
| Step | Location | Check |
|---|---|---|
| 1 | Tennis Court | Containers, bins, lockers |
| 2 | Chair tower | Backpack |
| 3 | Nearby cars | Seats / containers |
| 4 | First house | Drawers, cupboards |
| 5 | Bridge | Backpack |
| 6 | Second house | Containers |
| 7 | Pipe / Raider camp | Backpack chances |
| 8 | Trolley | Backpack |
| 9 | Final house | Backpack / cupboards |
↖ Tested Loot
| Run | Best Finds |
|---|---|
| 1 | Betina blueprint, magnetic accelerator, Silencer 2, advanced mechanical parts |
| 2 | Flag blueprint, Ferrel 1, many seeds, trinkets |
↖ Execution Tip
Check car seats. Seriously. We found high-value trinkets and attachments sitting in places most players sprint past.
If you need seeds, loot the tennis court lockers. One run produced 30+ seeds.
↖ Best Routes by Loot Goal
| Goal | Best Spot |
|---|---|
| Fast profit | Maintenance Bunker + Extraction Building |
| Blueprints | Robotic Sandbox A, Highway Collapse, Tennis Court |
| Wolfpacks | Maintenance Bunker, Western Tunnel, Corso Da Vinci |
| Rare weapons | Robotic Sandbox A, Western Tunnel, Spaceport middle |
| Trinkets | Tennis Court, East Plains, Maintenance extract building |
| Crafting materials | East Plains, Floodgates, Highway Collapse |
| Safest solo farming | East Plains or Tennis Court route |
↖ Loot Priority: What to Keep First
When the bag gets full, stop being sentimental. Keep value.
| Keep First | Keep If Space | Drop First |
|---|---|---|
| Blueprints | Seeds | Common food |
| Wolfpacks | Shield rechargers | Common ammo overflow |
| Rare weapons | Basic trinkets | Low-tier cloth |
| Rare attachments | Sensors | Junk consumables |
| Magnetic accelerators | Processors | Duplicate low-value items |
| Advanced components | Gun parts | Basic wire, unless needed |
Rule: If you find a blueprint, Wolfpack, or rare weapon early, extract sooner. Greed kills profit.
↖ FAQ
↖ What is the safest low-risk loot spot in ARC Raiders?
East Plains Warehouses and the Tennis Court route are the safest. Both have low player traffic, light ARC pressure, and multiple loot checks. For fast extraction, Maintenance Bunker is the best.
↖ Which route is best for blueprints?
Use Robotic Sandbox A, Highway Collapse, and Tennis Court to Dried Riverbed. These routes have backpacks, lockers, breachables, and containers that can produce blueprint drops.
↖ Which spot gives the best weapons?
For weapons, prioritize:
- Robotic Sandbox A
- Western Tunnel
- Spaceport tower/breachable room
- Corso Da Vinci rooftops
These areas have security lockers and weapon cases, which are your best weapon sources.
↖ Are these routes good for solo players?
Yes. These are built for solo survival. Low traffic# ARC Raiders Loot Guide: 9 Low-Risk PvE Spots That Beat High-Tier Zones
SEO Description:
Farm safer and smarter in ARC Raiders with 9 low-risk PvE loot spots that can rival high-tier zones. Find weapon cases, security lockers, Raider caches, blueprints, Wolfpacks, rare trinkets, and fast extraction routes.
High-tier zones look attractive, but they cost time, ammo, meds, and sometimes your whole kit. These low-risk PvE loot routes are better for consistent profit because they stack valuable container checks without forcing PvP.
The goal is simple: hit premium spawns, grab high-value loot, leave clean.
↖ Best Low-Risk PvE Loot Spots in ARC Raiders
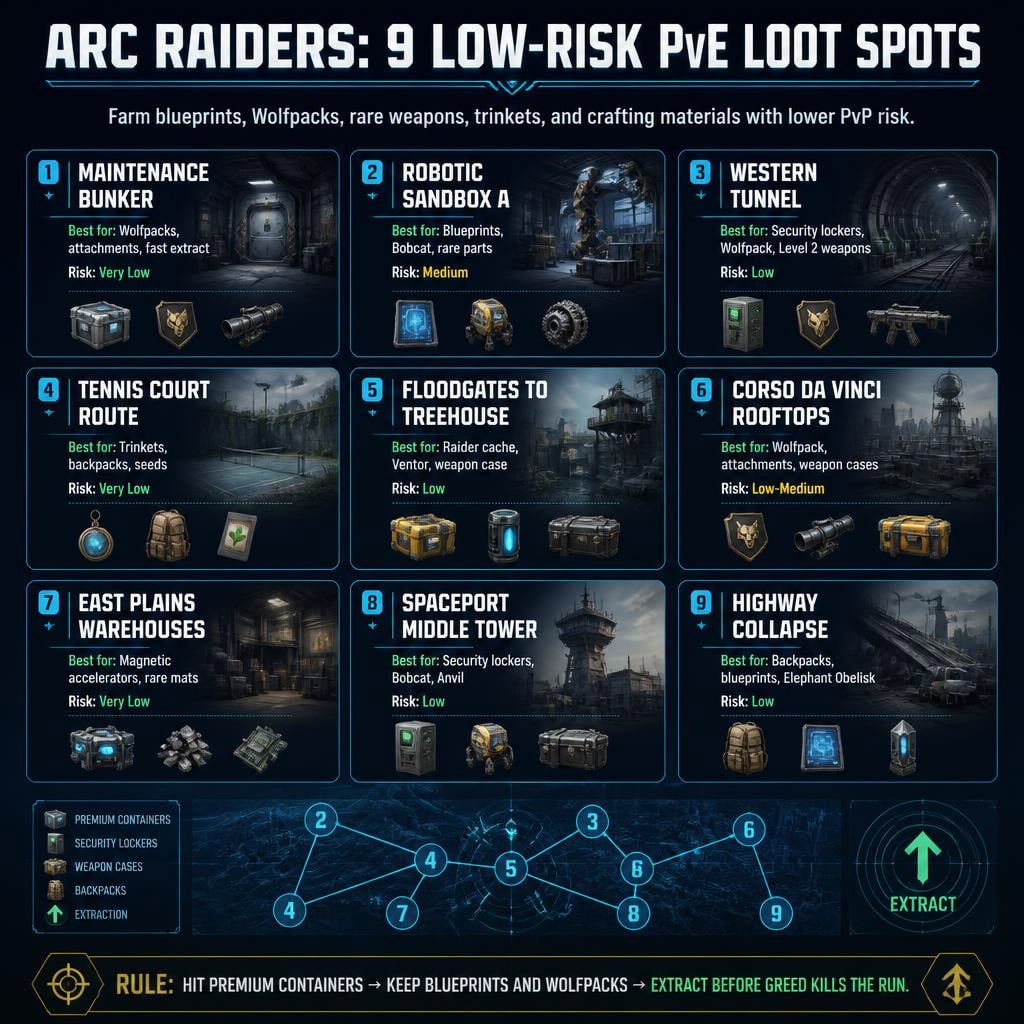
| Rank | Loot Spot | Best For | Risk |
|---|---|---|---|
| 1 | Maintenance Bunker + Extraction Building | Wolfpacks, attachments, fast value | Very Low |
| 2 | Robotic Sandbox A Storage Room | Blueprints, weapons, rare parts | Medium |
| 3 | Western Tunnel Security Lockers | Security lockers, Wolfpacks, weapons | Low |
| 4 | Tennis Court to Dried Riverbed | Trinkets, backpacks, seeds, blueprints | Very Low |
| 5 | Floodgates to Treehouse | Raider caches, weapon cases, blueprints | Low |
| 6 | Corso Da Vinci Rooftop Cluster | Attachments, backpacks, Wolfpacks | Low-Medium |
| 7 | East Plains Warehouses | Rare materials, trinkets, quiet farming | Very Low |
| 8 | Spaceport Tower + Breachable Room | Security lockers, Bobcat, Wolfpack | Low |
| 9 | Highway Collapse Route | Backpacks, hidden loot, blueprints | Low |
↖ 1. Floodgates to Treehouse Route
This is a strong early route on Dam. It is quiet, fast, and has several premium spawn checks close together.
↖ Key Loot Checks
| Location | Check For | Best Drops Seen |
|---|---|---|
| Top of Floodgates | Backpack | Advanced mechanical components, complex gun parts |
| Route to Treehouse | Raider cache | Blueprints, shields, heavy fuse grenades |
| Treehouse | Weapon case / grenade tube | Rare guns, grenades |
| Small wall nearby | Weapon case | Ventor, Osprey blueprint |
| Broken field depot | Drawers / computer | Trinkets, small valuables |
↖ Route
Start at Floodgates. Check the backpack. Zip down. Move straight toward the Treehouse.
At the Treehouse, climb the slanted car. Check for the weapon case and grenade tube. Then move to the small wall nearby for another weapon case spawn.
If you hear a Raider cache in the grass, stop and listen. Rain can hide the audio cue.
↖ Why It Works
In two test runs, this route produced:
- Back-to-back Ventors
- Osprey blueprint
- Medium shield
- Heavy fuse grenades
- Complex gun parts
That is high-tier value from a low-pressure route.
↖ 2. Corso Da Vinci Highway Rooftop Cluster
This is not one loot room. It is a compact rooftop circuit with multiple container types. That makes it consistent.
↖ Key Loot Checks
| Spot | Container | Possible Loot |
|---|---|---|
| Highway truck | Weapon case | El Toro, gun parts |
| Room below highway | Weapon case / drawers | Trinkets, mod parts |
| Small tower ledge | Backpack | Fuel, cloth, gun parts |
| Rooftop hatch | Security locker / weapon case | Wolfpack, Osprey, lenses |
| Blue container room | Blue containers | Attachments, augments |
| Chimney roof | Backpack | Complex gun parts |
| Final zip room | Drawers / grenade tube / weapon case | Attachments, Wolfpack |
↖ Route
Start at the truck on the highway. Loot the weapon case. Drop down into the room below. Cross rooftops into the hatch room. Drop to the blue container room. Return to the roof. Check the chimney backpack. Zip into the final room.
↖ Best Finds
| Run | Notable Loot |
|---|---|
| Run 1 | Wolfpack, Muzzle Brake 3, Osprey 2, Padded Stock |
| Run 2 | El Toro, Wolfpack, Ferrel 2 |
If the security locker misses, keep going. The final zip room can still save the run.
↖ 3. Spaceport Tower and Breachable Room
This spot sits between Arrival Building and Departure Building. Most players rush those named zones. We loot the middle and leave richer.
↖ Key Loot Checks
| Location | Container | Best Drops |
|---|---|---|
| Tower | Security locker chance | Level 2 guns, rare parts |
| Tower desk | Weapon case chance | Weapons |
| Breachable room | Up to 2 security lockers | Bobcat, Anvil 2 |
| Breachable room | Grenade tube | Wolfpack, seeker grenade |
↖ Why It Is Good
The breachable room can spawn two security lockers side by side. That is premium loot in an unmarked area.
Test results:
- Wolfpack
- Anvil 2
- Bobcat 1
- Rare trinkets
- Explosives
Even a bad run here can still produce a Bobcat. That is why this spot stays on the list.
↖ 4. East Plains Warehouses
This is pure low-risk PvE farming. Quiet edge-of-map location. Low traffic. Lots of small containers.
↖ Key Loot Checks
| Area | Check For | Best Loot |
|---|---|---|
| Main warehouse | Green containers, breachables | Trinkets, gun parts |
| Shipping containers | Green containers | Colorful shoes, springs |
| Second floor | Lockers, red lockers | Seeds, batteries |
| Rooftop | Backpack | Magnetic accelerator, heavy gun parts |
| Nearby buildings | Lockers / drawers | Filters, explosives |
| Raider camp | Backpack / Raider cache | Blueprints, grenades |
↖ Best Finds
- Two magnetic accelerators
- Heavy fuse grenade
- Raider cache
- Colorful shoes
- Rare trinkets
- Heavy gun parts
↖ Route Tip
If the main floor looks empty, do not leave. Check upstairs and the nearby buildings. That is where this route often pays out.
↖ 5. Maintenance Bunker + Extraction Building
This is one of the best fast-profit routes in ARC Raiders. The loot is close to extraction, and the risk is tiny.
↖ Key Loot Checks
| Location | Container | Best Drops |
|---|---|---|
| Maintenance Bunker | Security locker | Wolfpacks, Level 2 weapons |
| Bunker room | Lockers / drawers | Seeds, gun parts |
| Path to extraction | Raider cache chance | Blueprints, shields |
| Extraction building | Multiple containers | Colorful shoes, trinkets, attachments |
| Upper level | Ammo box | Ammo, blueprint chance |
↖ Test Results
| Run | Best Loot |
|---|---|
| Run 1 | 2 Wolfpacks, Ventor 2, colorful shoes, film reel |
| Run 2 | Anvil 2, Padded Stock 2, Turion trinket, complex gun parts |
↖ Why We Run It
This route is fast. If you spawn nearby, you can loot the bunker, sweep the extraction building, and leave before the map gets messy.
If you find Wolfpack, blueprint, or rare attachment early, extract. Do not greed.
↖ 6. Highway Collapse Route
This is a quiet edge route on Blue Gate. It has many backpack checks and a hidden ledge camp.
↖ Key Loot Checks
| Location | Container | Best Drops |
|---|---|---|
| Bus | Weapon case | Auto shotgun, attachments |
| Under highway | Backpack / med bag | Materials, meds |
| Barrel area | Backpack | Blueprints, components |
| Highway top | Suitcases / breachables | Trinkets |
| Hidden ledge | Grenade tube, med bag, container | Elephant Obelisk, grenades |
| Broken platform | Backpack | Magnets, materials |
| Tree trunk | Backpack | Crafting parts |
↖ Required Gear
Bring one of these:
- Crash mat
- Snap hook
- Zipline
The hidden ledge can cause fall damage. A crash mat makes it painless.
↖ Best Finds
- Elephant Obelisk
- Heavy gun part blueprint
- Auto shotgun
- Grenade materials
- Multiple backpack materials
This route is slower than Maintenance Bunker, but safer than most named zones.
↖ 7. Robotic Sandbox A Storage Room
This is the highest-ceiling route in the guide. It is not the safest because Shredders and turrets can spawn, but the loot is excellent.
↖ Key Loot Checks
| Location | Container | Best Drops |
|---|---|---|
| Sandbox center | Weapon case | Bobcat, Osprey |
| Under tables | Grenade tube | Heavy fuse, trigger grenade |
| Side wall | Backpack chance | Components |
| Medical side room | Medical containers | Crash mats, shield rechargers |
| Storage room | Security locker | Osprey 2, Wolfpack |
| Storage room | Lockers / containers | Blueprints, trinkets, processors |
↖ How to Open the Storage Room
Find and insert 3 power banks. They usually spawn around the sandbox floor, door area, and nearby equipment.
Once opened, check everything:
- Security locker
- Weapon case spot
- Lockers
- Med bag
- Ammo box
- Breachable tech containers
↖ Best Finds
| Run | Notable Loot |
|---|---|
| Run 1 | Bobcat, Osprey 2, colorful shoes, equatorial sundial |
| Run 2 | Aelion blueprint, blue light stick blueprint, 2 El Toros |
↖ Combat Tip
Fight Shredders from doorways or walls. Never stand in the open. Clear enemies before carrying power banks.
↖ 8. Western Tunnel Security Lockers
This spot is criminally overlooked. Two security lockers can spawn in the tunnel rooms, plus extra backpack and trinket checks.
↖ Key Loot Checks
| Location | Container | Best Drops |
|---|---|---|
| First tunnel room | Security locker | Renegade 2, Osprey 2 |
| Corner area | Backpack | Batteries, mechanical parts |
| Second tunnel room | Security locker | Wolfpack, Level 2 guns |
| Table area | Loose trinket | Legendary trinket, colorful shoes |
| Nearby room | Med bag | Herbs, shield rechargers |
↖ Best Finds
- Osprey 2
- Renegade 2
- Arpeggio 2
- Wolfpack
- Legendary trinket
- Colorful shoes
↖ Why It Works
Most players run past it. We stop, check both rooms, and often walk out with security locker loot for almost no risk.
↖ 9. Tennis Court to Dried Riverbed Route
This is one of the best calm routes for solo players. Low ARC pressure. Low PvP traffic. Lots of small value.
↖ Key Loot Checks
| Location | Check For | Best Drops |
|---|---|---|
| Tennis Court | Containers, trash cans, lockers | Silencer 2, trinkets, seeds |
| Chair tower | Backpack | Wires, rare parts |
| Nearby cars | Seats / containers | Turion, sundials, attachments |
| First house | Drawers / cupboards | Trinkets, grenades |
| Bridge | Backpack | Rare materials |
| Pipe camp | Backpack chances | Blueprints, components |
| Trolley area | Backpack | Magnets, durable cloth |
| Final house | Backpack / cupboards | Betina blueprint, magnetic accelerator |
↖ Best Finds
| Run | Best Loot |
|---|---|
| Run 1 | Betina blueprint, magnetic accelerator, Silencer 2, advanced mechanical parts |
| Run 2 | Flag blueprint, Ferrel 1, many seeds, trinkets |
↖ Route Tip
Check car seats. Seriously. High-value trinkets and attachments can sit in plain sight.
If you need seeds, loot the tennis court lockers. One run produced 30+ seeds.
↖ Best ARC Raiders PvE Routes by Goal
| Goal | Best Spot | Reason |
|---|---|---|
| Fast profit | Maintenance Bunker | Security locker + extraction nearby |
| Blueprints | Robotic Sandbox A, Highway Collapse, Tennis Court | Many backpack and container checks |
| Wolfpacks | Maintenance Bunker, Western Tunnel, Corso Da Vinci | Security lockers and grenade tubes |
| Weapons | Robotic Sandbox A, Western Tunnel, Spaceport Tower | Weapon cases and security lockers |
| Trinkets | Tennis Court, East Plains, Maintenance Extraction Building | Dense small-container routes |
| Rare materials | East Plains Warehouses, Floodgates, Highway Collapse | Backpacks, lockers, green containers |
| Safest solo route | East Plains or Tennis Court | Very low traffic |
↖ Loot Priority: What to Keep and What to Drop
| Priority | Items |
|---|---|
| High | Blueprints, Wolfpacks, rare weapons, rare attachments |
| High | Magnetic accelerators, advanced components, legendary trinkets |
| Medium | Complex gun parts, sensors, processors, shield rechargers |
| Medium | Seeds, grenades, batteries, heavy gun parts |
| Low | Common food, common ammo overflow, low-value cloth, junk tools |
If your bag is full, drop common consumables first. Never drop a blueprint for basic materials.
↖ FAQ
↖ What is the safest loot spot in ARC Raiders?
East Plains Warehouses and Tennis Court to Dried Riverbed are the safest. Both have low player traffic, light ARC pressure, and many small loot checks.
For fast safe profit, Maintenance Bunker is the best if you spawn nearby.
↖ Which low-risk route is best for blueprints?
The best blueprint routes are:
- Robotic Sandbox A
- Highway Collapse
- Tennis Court to Dried Riverbed
- Floodgates to Treehouse
These routes include backpacks, Raider caches, breachable containers, and special loot containers.
↖ Which spot gives the best weapons?
Run these for weapons:
- Robotic Sandbox A
- Western Tunnel
- Spaceport Tower + Breachable Room
- Corso Da Vinci Rooftop Cluster
They have the best mix of weapon cases and security lockers.
↖ Do premium containers always spawn?
No. Weapon cases, security lockers, backpacks, Raider caches, and grenade tubes are spawn chances.
That is why good routes stack several checks close together. If one container misses, the next one can still save the run.
↖ When should I extract?
Extract early if you find:
- Blueprint
- Wolfpack
- Rare weapon
- Rare attachment
- Legendary trinket
- Magnetic accelerator
The biggest mistake is turning a won run into a death screen.
↖ Summary
The best ARC Raiders loot routes are not always inside high-tier zones. The strongest low-risk spots give us multiple premium checks, low player traffic, and clean extraction paths.
Run these first:
1. Maintenance Bunker + Extraction Building
2. Robotic Sandbox A Storage Room
3. Western Tunnel Security Lockers
4. Tennis Court to Dried Riverbed
5. Floodgates to Treehouse
The rule is simple: check premium containers, take the win, extract before greed kills the run.

Most Popular Posts
- ARC Raiders Riven Tides Key Room Guide: Best Hotel Keys, Loot Routes, Secure & Crane Storage
- ARC Raiders Damage Fireflies Trial Guide: Best Farm Method on Buried City Night Raid
- ARC Raiders Riven Tides Update: New Map & Items, ARC Turbine, Rewards, and Best Early Strategy
- ARC Raiders Bettina Guide: Best Build, Buffs, and How to Use It Against ARC
- Arc Raiders Season 4 Riven Tides Update, Rewards, Safe Skins, and Release Timeline
- ARC Raiders Best Weapons Guide (2026): Best Weapons for PvP, PvE, Solo, and Budget Loadouts
Popular Category Lists
- Grow a Garden / (286)
- ARC Raiders / (266)
- CoD: Black Ops 7 / (166)
- Monopoly Go / (146)
- MLB 26 / (145)
- Star Citizen / (119)
- Steal a Brainrot / (89)
- ARK Survival Ascended / (75)
- Sailor Piece / (68)
- Forza Horizon 6 / (64)
- Diablo IV / (61)
- Blox Fruits / (60)
- CoD: BLACK OPS 6 / (55)
- Adopt Me / (54)
- Path of Exile 2 / (48)
- Monster Hunter Wilds / (46)
- Grow a Garden 2 / (45)
- Windrose / (44)
- Path of Exile / (40)
- Bee Swarm Simulator / (36)


