


 0
0ARC Raiders: The Completed New Player Guide (2026)
- KIVRI
- Share
- ARC Raiders
- 01/10/26
- 3701

ARC Raiders is the kind of extraction shooter that rewards calm decision-making more than flashy aim. When I started, the hardest part wasn't killing robots or winning duels—it was knowing what fights to take, what loot actually matters, and when to leave. This guide is built around that reality.
- 1) The Core Loop
- What this means for you
- 2) Free Loadout vs Custom Loadout
- A small but real efficiency trick
- 3) Should You Be Friendly?
- 3.1 Behavior → Lobby Feel (The Practical Take)
- 3.2 A simple decision framework
- 3.3 How I signal friendly without getting deleted
- 4) Fighting the ARC
- 4.1 Threat tier cheat sheet
- 4.2 Enemy-by-enemy notes (the what to do version)
- 4.3 My ARC fight rule
- 5) Audio Is Not Flavor—It's a Radar
- 5.1 Two sound cues you must internalize
- 5.2 Noise discipline (simple rules)
- 6) What to Keep / Sell / Recycle
- 6.1 A practical sorting rule that prevents regret
- 6.2 Stash upgrades: the least exciting, most profitable spend
- 7) Best Weapons
- 7.1 Quick weapon purpose table
- 7.2 My upgrade philosophy (saves resources)
- 8) Loot Locations & Map Events
- 8.1 How I choose a loot route
- 8.2 Event targeting (the big three approach)
- FAQ
- 1) If I'm broke, how do I rebuild fast without tilting?
- 2) If I keep dying while looting bodies, what's the fix?
- 3) Should I shoot Snitches on sight?
- 4) What items are safe to sell?
- 5) When should I attempt high-threat ARC or boss events?
- 6) Is being friendly actually worth it?
- Closing
We'll walk you through the game loop, how being friendly can change your match experience, how to fight every ARC tier without donating your kit, and how to make your stash and economy grow instead of collapsing. Here's how it works in practice.
↖ 1) The Core Loop
Your job topside is simple: enter → loot → survive → extract. Everything else (weapons, crafting, upgrades, matchmaking vibes) exists to support that loop.
↖ What this means for you
- Loot is only valuable if it makes it home. A bag full of gold that you drop on the floor is just a charity donation.
- Time is a resource. The longer you stay, the more you hear/attract, and the more likely you collide with both ARC and Raiders.
- Your loadout choice sets your risk ceiling. Free kits lower stress; custom kits increase control and upside.
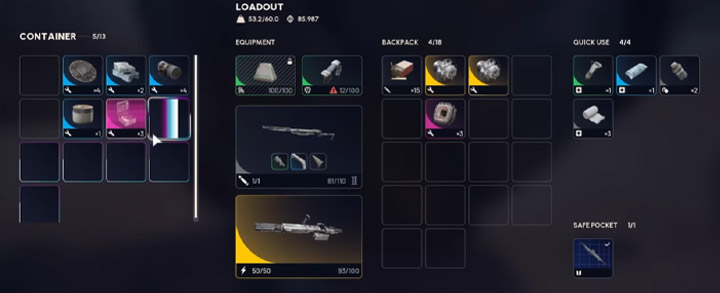
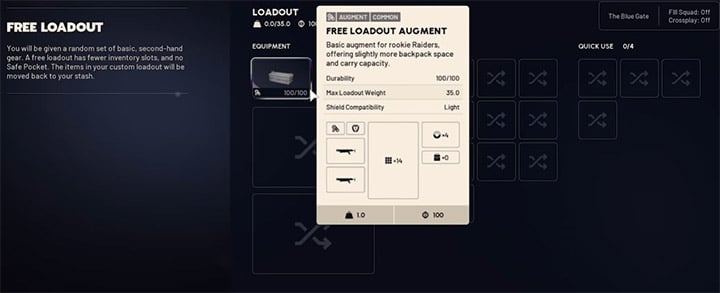
↖ 2) Free Loadout vs Custom Loadout
When I was learning, I alternated: free kit to explore and learn routes, custom kit when I had a specific goal (upgrade materials, event hunting, boss attempts).
| Choice | Best for | Main upside | Main downside | My rule of thumb |
|---|---|---|---|---|
| Free Loadout | Learning maps, broke runs, no fear scouting | Costs nothing; you play looser and learn faster | Lower weapon quality; fewer tools; no protected slot | Use it when you're unfamiliar, tilted, or testing a new route |
| Custom Loadout | Target farming, event runs, PvP confidence | Full control; better tools; safe pocket access | You risk your own stash value | Use it when you know your extract plan before you deploy |
↖ A small but real efficiency trick
If you're running custom kits, I treat the safe pocket as profit insurance:
- If you find a high-value trinket / key item / rare crafting piece, pocket it immediately.
- If you find mid-tier materials, keep them in the normal bag until you're sure you can extract.
↖ 3) Should You Be Friendly?
Killing players can be profitable, but it's not always smart. In my experience, the best approach is situational: your gear, your objective, your lobby mood, and whether you can safely secure the loot afterward.
↖ 3.1 Behavior → Lobby Feel (The Practical Take)
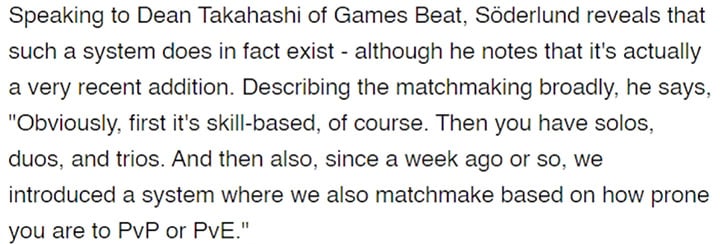
ARC Raiders matchmaking can trend based on how you behave. If you routinely shoot first, you'll more often end up in lobbies where others do the same.
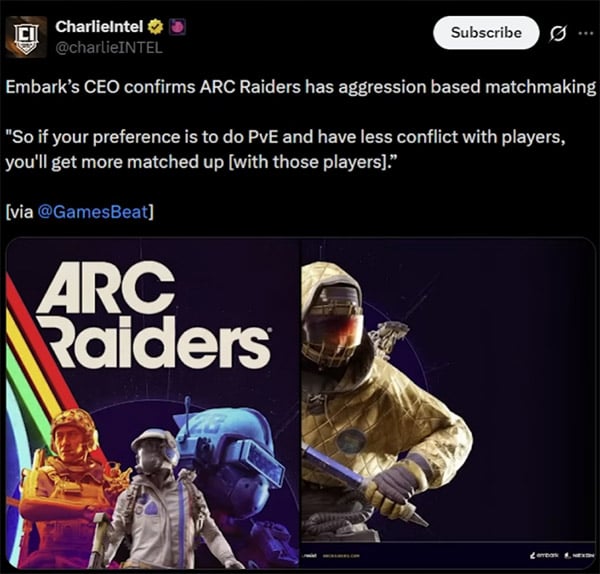
This matters because:
- Hostile lobbies increase your average damage taken per raid.
- Higher combat frequency means more third-parties, more noise, and fewer clean extracts.
↖ 3.2 A simple decision framework
| Situation | If you do this… | Likely outcome |
|---|---|---|
| You're solo, light gear, loot-focused | Avoid fights; announce friendly early | More extracts, steadier economy growth |
| You're duo | Play polite but ready: talk first, hold angles | You can de-escalate or win if forced |
| You're trio | Assume PvP pressure | Plan for contact; move like you'll be pushed |
| You hear heavy fighting nearby | Rotate wide, arrive late | You pick up leftovers with less risk |
| You down someone | Don't tunnel loot instantly | Most deaths happen while looting bodies |
↖ 3.3 How I signal friendly without getting deleted
- If you enter an area where you suspect players, I speak before I see them: Friendly—just passing through.
- If you can't/won't use mic, use the don't shoot style emote early.
- If you hear silence after your callout, assume nothing. If you push anyway, you're choosing risk.
↖ 4) Fighting the ARC
New players underestimate ARC because early bots look small. That's a mistake: even low-tier enemies punish panic movement and sloppy audio discipline.
↖ 4.1 Threat tier cheat sheet
| Threat tier | Enemies (examples) | What usually kills new players | My reliable counter-play |
|---|---|---|---|
| Low | Tick, Wasp, Hornet, Snitch, Pop, Fireball, Surveyor | Overcommitting in the open; ignoring call-ins; standing in fire | Prioritize callers first; break rotors; shoot weak points; reposition after explosions |
| Medium | Turret, Sentinel, Leaper | Peeking too long; re-peeking same angle; fighting Leaper in open space | Cover-peek rhythm; doorway abuse vs Leaper; chip safely |
| High | Shredder, Rocketeer, Bastion, Bombardier (+ spotters), Queen/Matriarch | Staying outdoors; fighting without cover plan; trying to DPS race | Hard cover first, damage second; disengage early; bring proper tools |

↖ 4.2 Enemy-by-enemy notes (the what to do version)
- Tick: If you find ceiling ambush zones, aim up before entering. If it attaches, break it fast (melee tool works).
- Wasp / Hornet: Rotors are your win condition. If you keep spraying center mass, you burn ammo and time.
- Snitch: Treat it like an alarm. If you can't kill it quickly, leave—staying is inviting reinforcements.
- Pop: Backpedal plus controlled fire. If you panic-roll into corners, you'll eat the blast.
- Fireball: The punish is the flame + death zone on the floor. If you see plates open, that's your damage window—then move.
- Turret / Sentinel: Don't ego peek. I alternate: peek-shoot → full cover → reposition.
- Leaper: If you discover a Leaper and you're outside, then you should immediately rotate to a doorway/threshold. Doorframes turn a scary fight into cheap chip damage.
- Shredder (Stella Montis): If it's close, you're already late. Create distance first; don't try to out-DPS at blast radius.
- Rocketeer: Cover is life. If you're in the open when it acquires you, then your first objective is not damage—it's breaking line of sight.
- Bastion vs Bombardier: Bombardier's spotters are the tell. If you get painted/pressured, go indoors and reset.
- Queen/Matriarch: Boss-style endurance fights. If you're new, treat them as optional content until you can consistently extract with mid-tier kits.
↖ 4.3 My ARC fight rule
If you can't explain where you will stand for the next 10 seconds, don't start the fight.
Position first, then bullets.
↖ 5) Audio Is Not Flavor—It's a Radar
In ARC Raiders, sound is actionable intel. I play with the assumption that every noise is a signal: for ARC aggro, for players rotating, and for third parties choosing to join.
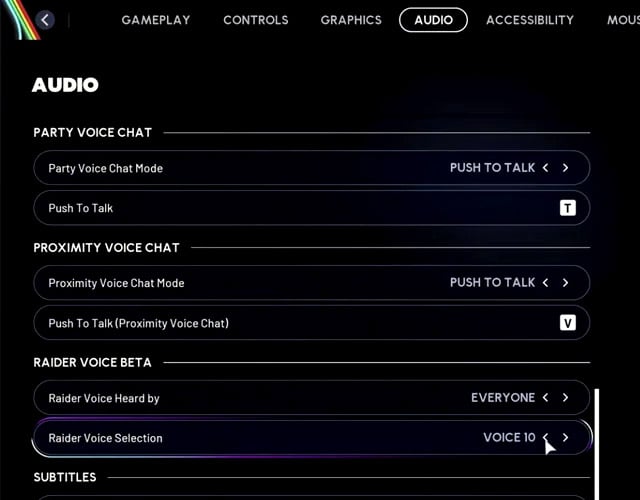
↖ 5.1 Two sound cues you must internalize
| Sound cue | What it usually means | What I do immediately |
|---|---|---|
| Raider down flare (audio + usually visible flare) | A fight ended or is escalating nearby | Stop sprinting; pick a covered angle; decide: rotate in late or rotate out |
| Shield regenerator sound | A player just reset behind cover | I widen my peek, change angle, or push hard before they fully stabilize |
↖ 5.2 Noise discipline (simple rules)
- If you trigger loud environmental devices (cameras, alarms), assume ARC will investigate.
- If you hear sustained gunfire, expect a third party within ~30–60 seconds depending on map flow.
- If you're indoors and hear a flare, don't ignore it. That's the game telling you: someone is now vulnerable… and someone is now greedy.
↖ 6) What to Keep / Sell / Recycle
I used to hoard everything because I feared selling the wrong thing. The truth: almost everything is re-farmable. Your bigger long-term limiter is usually stash space, not access to one specific item.
↖ 6.1 A practical sorting rule that prevents regret
| Item type | Keep | Sell | Recycle | Why |
|---|---|---|---|---|
| High-value trinkets (often marked like pure value) | Rarely | Yes | No | These exist to convert to currency |
| Crafting components used in benches/upgrades | Yes (until upgrades done) | Only duplicates | Sometimes, if crafting chain demands it | Bench progress is your power curve |
| Weapons/armor you don't use | 1–2 backups | If you need cash | If it feeds your preferred upgrades | Dead gear is just clutter |
| Meds and utilities | Maintain a baseline | Sell surplus | Rarely | Stability wins more raids than greed |
↖ 6.2 Stash upgrades: the least exciting, most profitable spend
Prioritize stash expansion early. In my first week, every time I delayed stash upgrades, I ended up selling under pressure after a good raid—usually the wrong stuff.
A good operating target:
- Keep 2–3 raids worth of meds and core ammo.
- Keep one panic kit you can run if you're on a losing streak.
- Convert pure-value trinkets into currency quickly so your stash doesn't clog.
↖ 7) Best Weapons
There's no single best gun. There are best tools for the job you're actually doing. Early on, I care about:
- reliability (consistent recoil),
- ammo efficiency,
- and whether it wins the most common fights (low-tier ARC + sudden Raider encounters).
↖ 7.1 Quick weapon purpose table
| Goal | Strong picks | Why they work | New player mistake |
|---|---|---|---|
| Early PvE vs low-tier ARC | Pharaoh, Anvil | Efficient, forgiving, good time-to-kill on common bots | Overfighting ARC instead of route-planning |
| High-threat ARC hunting | Hullcracker; Equalizer (legendary) | High output where it matters; strips armor effectively | Attempting high-threat without cover plan/tools |
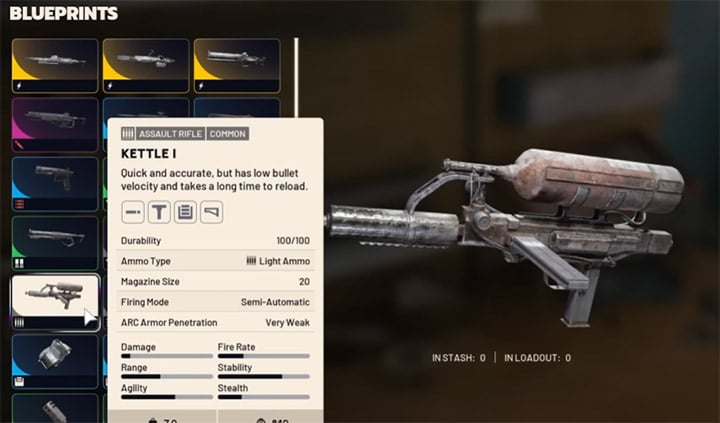
| PvP on a budget | Stitcher, Kettle | Common, scalable with upgrades/attachments | Leaving them at low level and calling them bad |
| Close-range PvP | Il Toro; Bobcat; Volcano | Burst lethality in tight spaces | Taking shotgun duels at mid-range |
| Mid-long range PvP | Renegade | Works outdoors and punishes bad positioning | Standing still while trading |
| I want them gone now | Torrent (LMG) | Very fast kill potential | Carrying it without planning mobility/cover |
↖ 7.2 My upgrade philosophy (saves resources)
If you find yourself repeatedly using Stitcher/Kettle from free kits, then upgrading them is not wasting mats—it's committing to consistency. A well-upgraded common weapon beats a fancy gun you're afraid to lose.
↖ 8) Loot Locations & Map Events
The map highlights (yellow/red) are helpful, but not the full story. Over time you'll learn that certain buildings/areas are disproportionately valuable due to container density and specific loot tables.
↖ 8.1 How I choose a loot route
If you're new, don't route by best loot. Route by best extract probability.
1. Pick a primary loot area.
2. Pick a secondary pivot area nearby.
3. Choose an extract plan that doesn't require crossing the hottest sightlines.
If you find heavy fighting near your primary, then you pivot immediately—no stubborn hero runs.
.jpg)
↖ 8.2 Event targeting (the big three approach)
| Event | What changes | Reward potential | Risk profile | How I play it |
|---|---|---|---|---|
| Cold Snap | Exposure drains health outdoors | Higher-value opportunities | Positioning tax (indoor resets) | Route building-to-building; minimize outdoor downtime |
| Electromagnetic Storm | No hatch-style quick extracts; lightning hazard | Strong for targeted farming | Forced longer pathing; surprise deaths | Plan safer extraction earlier; respect open areas |
| Night Raid | Fewer extracts, more ARC, darker visibility | Often the best raw loot density | High engagement + PvE pressure | Bring meds/utilities; play slower, avoid open rotations |
Other events (locked gates, hidden bunkers) are worth doing for progression and puzzle loot, but I recommend treating them as learning content first and farm content later.
↖ FAQ
↖ 1) If I'm broke, how do I rebuild fast without tilting?
Run free loadouts and play for two clean extracts, not one jackpot. If you discover you're taking fights out of frustration, then your rebuild will stall—avoid PvP unless it blocks your route.
↖ 2) If I keep dying while looting bodies, what's the fix?
Loot is a trap. If you down someone, then you should:
1) relocate 10–20 meters,
2) listen for footsteps/ARC,
3) loot fast with a priority list (ammo/meds/keys/high value),
4) leave before you get third-partied.
↖ 3) Should I shoot Snitches on sight?
If you can kill it quickly and safely, yes. If you're exposed or already low on resources, then disengage. The worst outcome is half-fighting it and getting extra ARC plus Raiders.
↖ 4) What items are safe to sell?
Pure trinket/value items are typically safe to convert into currency. If you're unsure, my rule is: keep one stack early, sell duplicates, and don't let stash pressure force panic decisions.
↖ 5) When should I attempt high-threat ARC or boss events?
When you can reliably extract with mid-tier kits and you've built the habit of fighting from cover. If you still die to medium threats due to positioning, then high-threat will feel like a brick wall.
↖ 6) Is being friendly actually worth it?
Often, yes—especially solo. If your goal is progression, then reducing needless fights increases your average extract rate, which increases your upgrade speed. When you're rich and hunting PvP, that calculus changes.
↖ Closing
If you treat ARC Raiders like a discipline game—positioning, audio, and extraction planning—you'll progress faster than the player who wins fights but loses kits. Build your economy with free kits, invest early in stash space, learn which sounds matter, and only take fights that pay you back with either loot or a safer route.
The funny part is that once you play this way, you'll start winning more PvP too—because you're choosing battles on your terms, not the game's.

Most Popular Posts
- ARC Raiders Riven Tides Key Room Guide: Best Hotel Keys, Loot Routes, Secure & Crane Storage
- ARC Raiders Damage Fireflies Trial Guide: Best Farm Method on Buried City Night Raid
- ARC Raiders Riven Tides Update: New Map & Items, ARC Turbine, Rewards, and Best Early Strategy
- ARC Raiders Bettina Guide: Best Build, Buffs, and How to Use It Against ARC
- ARC Raiders Solo Search Supply Drops Guide: Best Buried City Route, Beacon Locations
- Arc Raiders Season 4 Riven Tides Update, Rewards, Safe Skins, and Release Timeline
Popular Category Lists
- Grow a Garden / (286)
- ARC Raiders / (266)
- CoD: Black Ops 7 / (166)
- Monopoly Go / (146)
- MLB 26 / (145)
- Star Citizen / (116)
- Steal a Brainrot / (89)
- ARK Survival Ascended / (74)
- Sailor Piece / (68)
- Forza Horizon 6 / (63)
- Diablo IV / (61)
- Blox Fruits / (60)
- CoD: BLACK OPS 6 / (55)
- Adopt Me / (53)
- Path of Exile 2 / (48)
- Monster Hunter Wilds / (46)
- Windrose / (44)
- Grow a Garden 2 / (42)
- Path of Exile / (40)
- Bee Swarm Simulator / (36)


