


 0
0MH Wilds Insect Glaive Builds: New Sets, Weapons and Strategies | UT1
- Samuel
- Share
- Monster Hunter Wilds
- 04/12/25
- 2585
Greetings, hunters. Today, we explore new Insect Glaive sets added in Title Update 1. New armor pieces and weapons allowed us to create two distinct sets and their variants. Furthermore, we will discuss overview META builds, the best available weapons, and strategies for optimizing one's performance in endgame content.
- Best Insect Glaives
- Meta Insect Glaive Build
- Meta Earplug Variation
- Comfort Insect Glaive Build
- Zoh Shia IG Build
- Best Kinsects
↖ Best Insect Glaives
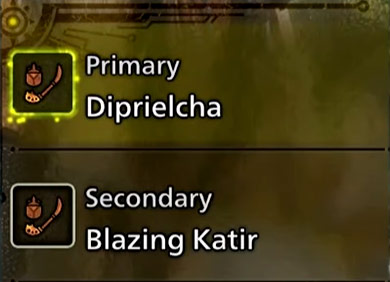
Among the available options, The Artian weapons still stands as the most powerful choice. Its best configuration contains 3 attack relics, 4 attack reinforcements, and 1 sharpness reinforcement. Guardians for all 14 weapon types are exceptionally hard to achieve, and for those who pursue a balanced approach with greater critical hits over attack, should not be trying to optimize speed runs.
| Ideal Artian IG | Good Enough Artian IG |
|---|---|
3x Attack Relics 4x Attack Reinforce 1x Sharpness | 3x Attack Relics 1-3x Attack Reinforce 1-2x Affinity Reinforce 1-2x Sharpness |
Out of the new craftables, the Zotia Insect Glaive, Blazing Cartier is a top-tier option. Artian weapon deals great damage, but advancing the for best consideration means outshining it in best for harder fights —expecially for weaker dragon situations— which even outshines it's new skill White Flame Torrent, meaning it's best in class. Ultimately, weapon selection is subjective; however, we prefer the Artian Insect Glaive over the Zosia for its slot efficiency and blast damage.
↖ Meta Insect Glaive Build
Equipment Setup:
- Head: Numinous Crown Beta
- Chest: Numinous Shroud Beta
- Arms: Gore Vambraces Beta
- Waist: Numinous Waist Beta
- Legs: Gore Greaves Beta
- Charm: Counter Charm 3
Decorations:
- Weapon: Flight/Handicraft Jewel (or Attack)
- Head: Tenderizer Jewel, Earplugs Jewel, Shockproof Jewel (optional)
- Chest: Tenderizer Jewel
- Arms & Waist: Mighty Jewels (x3)
- Legs: Chain Jewel, Sane Jewels (x2)
Skills:
- Critical Boost Level 5: Enhances critical damage to 134%.
- Handicraft Level 1: Provides additional sharpness.
- Airborne: Grants +10% attack on aerial attacks.
- Agitator Level 5: Offers +20 raw attack and +15% affinity when monsters are enraged.
- Counter-strike Level 3: Adds +25 raw attack for 45 seconds after being knocked back.
- Maximum Might Level 3: Provides +30% affinity when stamina is full.
- Antivirus Level 3: Grants +10% affinity upon clearing frenzy.
- Weakness Exploit Level 2: Offers +10% affinity on weak spots.
- Constitution Level 1: Reduces stamina consumption during rolls.
- Burst Level 1: Increases raw attack by +8 upon hitting a monster consecutively.
- Evade Window and Recovery Speed: Included with armor.
- Coalescence Level 1: Boosts element or status upon clearing frenzy.
- Earplugs Level 1: Provides sufficient protection against most monster roars.
Set Bonuses:
- Zosia's Pulse (2 pieces): Super Recovery I allows health recovery beyond red health bar levels.
- Gormagala's Tyranny: Black Eclipse I inflicts frenzy upon engaging large monsters, with Antivirus aiding in faster recovery and providing a +25% affinity bonus.
This build emphasizes critical hits, agility, and adaptability in various combat scenarios. Adjustments can be made based on personal preferences or specific fight requirements.
↖ Meta Earplug Variation
In regard to encounters where ear protection is necessary, the META Earplug Variation is specially crafted for these instances. For example, when fighting Zosia, three levels of earplugs are required. For this, swap the counter charm with the Earplugs Charm 2 and replace the head adornment with Counterstrike level one for the earplug decoration.
While white extract is active, this configuration grants 3 levels of earplugs which ensures that monsters; roars can only be heard through Zosia's weaker level 3 plugs. This variation lets you keep most of the setup to make simple changes on charms and decorations.
↖ Comfort Insect Glaive Build
This Comfort Insect Glaive Build configuration features heightened healing properties, thus granting a more improved and less intense hunting experience. The weapons and decorations stay the same as the last build. Instead, this build adds the Guardian Arkfeld Helm Beta and Chest Beta alongside Fulgar Vambraces Beta for the waist and legs while adding Challenger Charm 2.
Decorations Required:
- Two Mighty Jewels
- Counter Jewel
- Chain Jewel
- Earplug Jewel
This build still features exploits, having two levels of Weakness Exploit which could instead be one Agitator and Adrenaline Rush if one chooses. Even though the set is primarily comfort, it adds effective damage skills without too much extension on time needed to complete the quest.
Notable Skills:
- Flare Level 2: Accelerates wound creation with specific attacks.
- Blight Resistance 2: Provides protection against dragon or fire blight.
- Heartbreaker Level 1: Facilitates faster breaking of Zosia's wing arms.
- Elemental Absorption: Offers minimal benefits for status glaives.
- Earplugs Level 1: Sufficient for most monsters when paired with white extract.
Set Bonuses:
- Guardian Arcfeld's Vitality: Grants health recovery upon wounding monsters.
- Zosia's Pulse: Accelerates red health recovery post-hit.
You may choose to replace both levels of Weakness Exploit with a single Agitator and Adrenaline Rush. While this set offers comfort, it does not sacrifice damage or greatly increase the time needed to complete quests.
↖ Zoh Shia IG Build
Includes Zoh Shia. Slaying Zoh Shia with this build will take under 11:30 minutes with even mediocre play. That means you can farm Zoh Shia without specific armor pieces.
Armor and Equipment
The Zoh Shia IG Build is specifically designed for tackling Zoh Shia encounters.
- Head: Gorehelm Beta (Slot: Throttle Jewel, Shock Roof Jewel)
- Chest: Arc Vulcan Chest Beta (Slots: 2 Mighty Jewels)
- Arms: Jiwoo Arms Beta (Slots: Mighty Jewel, Earplug Jewel, Sane Jewel)
- Waist: Ark Vulcan Coil Beta (Slots: Sane Jewel, Fire Resistance Jewel)
- Legs: Gore Greaves Beta (Slots: Chain Jewel, 2 Fire Resistance Jewels)
- Charm: Exploiter Charm 2
Skill Considerations
Lastly, ensuring that fire resistance stays at 20 or higher is still critical. This allows bypassing fire blight damage during Zoh Shia encounters. Sustaining health while fighting is possible due to set bonuses from 2 pieces of Ark Vulcan Armor which provide Hasten Recovery.
Notes:
- Weapon Slots: Use Razor Sharp/Handicraft Jewel instead of Crit Boost 5 if white sharpness is difficult to maintain.
- Customization: The three slots on the headgear can be freely personalized to an individual's liking.
↖ Best Kinsects
Have Arkmaiden Kinsect equipped for its fast charge time and Harvest Extract Boost. With these Ark Maiden can collect three extracts in one deployment. Arkmaiden's blunt damage also allows for some free knockouts during the hunts.
Kinsects:
- #1 - Arkmaiden
- #2 - Foebeetle
- #3 - Gullshad
While the Evasion Mantle is regarded as one of the best due to its buff, users of Insect Glaive may prefer to use different mantles because of their play style:
- Mending Mantle: Best for healing yourself over time while fighting.
- Rock Steady Mantle: Helpful at the beginning of fights to collect extracts without being attacked.
Through this guide, we hope to provide all players with the knowledge they need to succeed in MH Wilds with the Insect Glaive. Recommended builds and strategies can improve a player's efficiency, effectiveness in battle, and overall hunting performance. Continue to watch for more updates and builds as we explore Monster Hunter together.
Most Popular Posts
- MH Wilds Artian Weapons Guide: Materials, Craft and Upgrades
- Monster Hunter Wilds Bow Builds: Mastering the Dragon Piercer Build Guides
- MH Wilds: All Weapons Tier List & Ranking | Speedrun Clear Time
- MH Wilds New Endgame Builds: Zoh Shia Armor Set
- How to Obtain Rare Monster Hunter Wilds Commission Tickets?
- Monster Hunter Wilds Best Endgame Angelbein Bow Build Guides
Popular Category Lists
- Grow a Garden / (286)
- ARC Raiders / (262)
- CoD: Black Ops 7 / (166)
- Monopoly Go / (146)
- MLB 26 / (144)
- Star Citizen / (111)
- Steal a Brainrot / (89)
- Sailor Piece / (68)
- ARK Survival Ascended / (66)
- Diablo IV / (61)
- Forza Horizon 6 / (60)
- Blox Fruits / (60)
- CoD: BLACK OPS 6 / (55)
- Adopt Me / (53)
- Path of Exile 2 / (48)
- Monster Hunter Wilds / (46)
- Windrose / (44)
- Path of Exile / (40)
- Grow a Garden 2 / (38)
- Bee Swarm Simulator / (36)


