


 0
0Monster Hunter Wilds Best Dps Maximum Burst Boost Build Guides
- Samuel
- Share
- Monster Hunter Wilds
- 03/15/25
- 2718
In case you want to optimize your damage in Monster Hunter Wilds, we have designed an ultimate guide to make an overpowered (OP) gear set DPS build. This build works on the skill Burst Boost, which is considered the best mechanic for damage multiplication in the game. Although the gear parts may seem lackluster due to their Rarity 6 and sub 50 defense, this set up is not midgame at all. It is an cannon build endgame glass build meant to deal massive damage. So let us get into the details.
- Core of the Build: Burst Boost
- Recommended Gear Configuration
- Key Gear Pieces
- Complementary Gear
- Skill Optimization
- Weapon and Elemental Considerations
- Farming Requirements
- Playstyle Tips
- Final Thoughts
↖ Core of the Build: Burst Boost
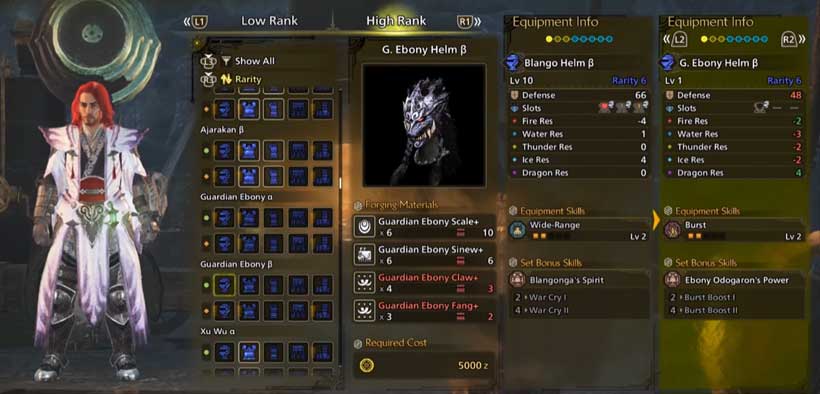
The centerpiece of this build relies on the set bonus Burst Boost, which increases skill duration and raw damage dealt. This is how the bonus scales:
Equipped 2 Pieces: +3 Attack alongside an additional second to burst timer, bringing it to five seconds.
Equipped 4 Pieces: +10 Attack while with a total of six seconds on the burst timer.
Such level of flexibility helps you make your set based on the objectives you wish to achieve. For example, you can choose to create a two-piece set for added tankier gear or synergistic bonuses, or go all in with a four-piece set for maximum burst damage.
Build Link: Click Here
↖ Recommended Gear Configuration
For best results, we suggest a combination of Alpha and Beta versions, file names that have become synonymous with uncoordinated jumps in skill slots and defense. Below is a configuration that we recommend.
↖ Key Gear Pieces
- Headgear: Beta version: for extra slots for decoration.
- Braces: Alpha version: for added utility from Burst Boost.
- Chest Piece: Burst Boost jewel level 3 decoration slot chest piece.
- Coil: Beta version: for the change of skill slot configuration.
- Greaves: Beta version: depend on your playstle and skill set you wish to have.
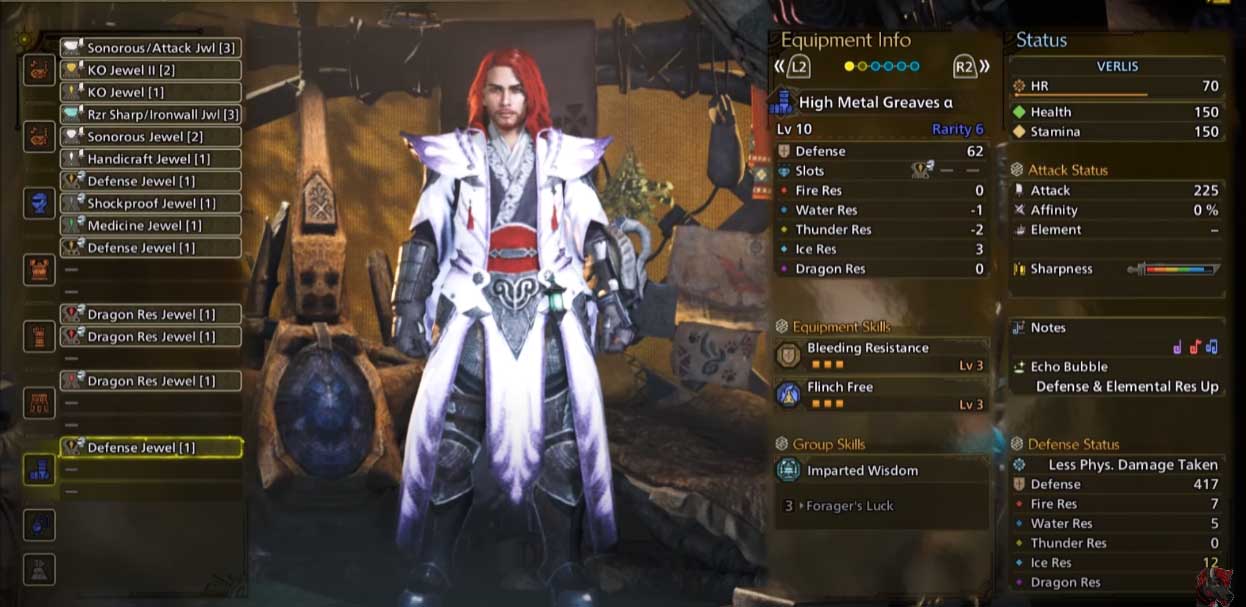
↖ Complementary Gear
Notable piece to add to this would be the Suja Sash for:
Level 2 slot with two level 1's alongside Divine Blessing becomes maxed.
This sash serves to cover any resistance shortcomings offered by the Ebony set while improving survivability.
↖ Skill Optimization
For this build to work out efficiently, the following skills and decorations will be helpful.
- Burst (Level 4): Shift focus towards this skill because it is the center of your damage output.
- Defense Charm: Shift focus towards survivability by equipping a charm that gives up to four levels of defense.
- Divine Blessing: Use decorations to further mitigate damage by enhancing this skill.
- Counterstrike (Level 2): Grants +25 raw attack for 45 seconds after being hit. This synergizes excellently with a high-risk playstyle.
- Peak Performance (Optional): Attack during full health.
- Weakness Exploit: Increase affinity while targeting weak points, necessary for crit-centric builds.
↖ Weapon and Elemental Considerations
This build can use any weapon due to its versatile nature. Adjust your weapon selection to the elemental weaknesses of the foes you plan to engage.
For example:
Equip a water-based relic weapon with elemental damage decorations for enemies weak to water.
For those who prefer a more supportive playstyle, a Hunting Horn with healing and defensive melodies provides damage potential along with utility.
↖ Farming Requirements
In order to craft this gear set, you'll have to get from certain monsters, especially those associated with the Ebony variants. Here's what you'll require:
- Ebony Claw: Used to craft several pieces.
- Ebony Fang Gem: Probably two for Alpha and Beta piece flexibility.
- Guardian Blood: Used for crafting the high-tier gear.
Initially, farm the non-tempered versions of these monsters, as they are far more manageable. After that, work on tempered hunts to maximize rewards.
↖ Playstyle Tips
Preparation: Equip Dragon Resistance Jewels and other defensive decorations to mitigate elemental damage coming from dragon foes.
Mantles: Equip the Rock Steady Mantle to allow for setups during chaotic fight without getting interrupted. Remember its cooldown limits.
Strategy for Combat: Start each encounter with buffs from Defense Up, Sonic Barrier, Attack Up if playing with Hunting Horn. With damage amplification, don't forget to maintain self-improvement buffs and maximizing burst damage uptime.
↖ Final Thoughts
This DPS build offers a well-rounded approach to dealing damage while still considering survivability. Pair Burst Boost with skills like Divine Blessing and Counterstrike, and you are bound to perform well in endgame content. Don't forget to swap your gear and jewel slots depending on the fight and your preferred playstyle.
Most Popular Posts
- MH Wilds Artian Weapons Guide: Materials, Craft and Upgrades
- Monster Hunter Wilds Bow Builds: Mastering the Dragon Piercer Build Guides
- MH Wilds: All Weapons Tier List & Ranking | Speedrun Clear Time
- MH Wilds New Endgame Builds: Zoh Shia Armor Set
- How to Obtain Rare Monster Hunter Wilds Commission Tickets?
- Monster Hunter Wilds Best Endgame Angelbein Bow Build Guides
Popular Category Lists
- Grow a Garden / (283)
- ARC Raiders / (252)
- CoD: Black Ops 7 / (164)
- Monopoly Go / (145)
- MLB 26 / (134)
- Star Citizen / (101)
- Steal a Brainrot / (88)
- Sailor Piece / (67)
- CoD: BLACK OPS 6 / (55)
- Forza Horizon 6 / (55)
- Blox Fruits / (55)
- ARK Survival Ascended / (51)
- Path of Exile 2 / (48)
- Adopt Me / (48)
- Diablo IV / (47)
- Monster Hunter Wilds / (46)
- Windrose / (43)
- Path of Exile / (40)
- Battlefield 6 / (34)
- Bee Swarm Simulator / (33)


