


 0
0Windrose Blackbeard Treasure Guide: Brethren Brig Build, Treasure Rewards, and Combat Tips
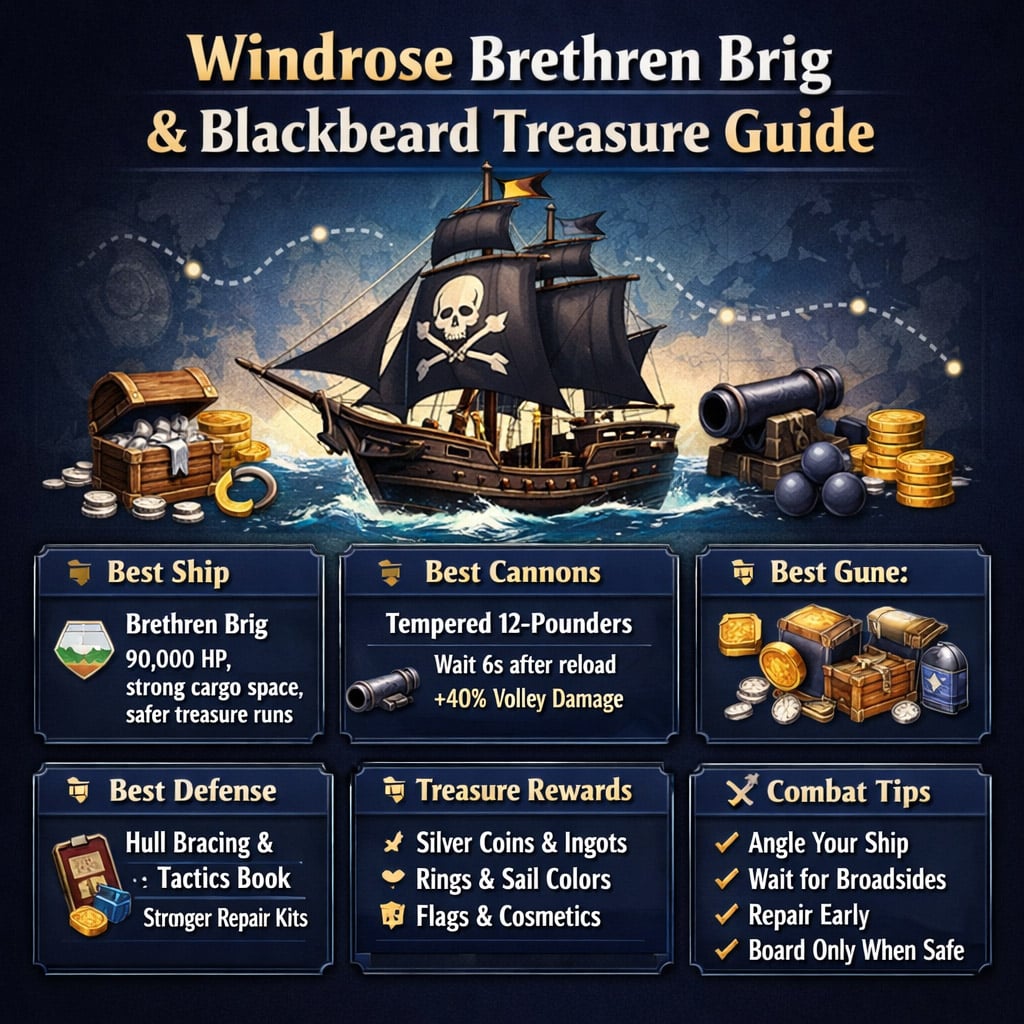
Blackbeard's treasure maps are a great time to upgrade from the starter ship and start playing Windrose like a proper sea menace. For this run, we focus on the Brethren Brig, a tougher Brig variant with high hit points, strong cargo space, and enough firepower to make level 5 ships feel much less scary.
build a better ship, fit it with smart upgrades, clear Blackbeard's treasure spots, and use the rewards to push our gear forward. If your current ship feels too fragile or you are constantly limping home after fights, this upgrade path is worth doing early.
- Best Ship Choice: Why the Brethren Brig Works
- Recommended Brethren Brig Build
- Best Cannons: Tempered 12-pounders
- Best Hull Bracing: Support Your Repairs
- What to Buy Before Treasure Hunting
- Blackbeard Treasure Map Rewards
- Jewelry Worth Keeping
- Treasure Hunting Route Tips
- Naval Combat Tips for the Brethren Brig
- Boarding Party Upgrades
- Ship Customization
- FAQ
- What is the best ship for Blackbeard treasure maps in Windrose?
- Are Tempered 12-pounders worth buying?
- Should I choose the Brethren Brig or Blackbeard Brig?
- What should I upgrade first on the Brethren Brig?
- Are Blackbeard treasure maps worth doing?
- What jewelry is best for melee builds?
- Should I board enemy ships or sink them?
- Final Notes
↖ Best Ship Choice: Why the Brethren Brig Works
The Brethren Brig is not the fastest option, but it is one of the safest and most practical upgrades at this stage. We trade a little speed for a lot more durability, and that matters once fights start pulling in multiple enemy ships.
| Ship | HP | Best For | Main Drawback |
|---|---|---|---|
| Starter Ship / Catch | 50,000 | Early sailing | Low durability |
| Standard Brig | 70,000 | Basic upgrade | Less tanky |
| Brethren Brig | 90,000 | Combat, cargo, treasure runs | Slightly slower |
| Blackbeard Brig | Lower than Brethren Brig | Speed-focused play | Less cargo and HP |
The Brethren Brig is the best pick if you want a forgiving ship that can take hits while you learn bigger naval fights. In practice, it still moves well enough for treasure hunting, usually sitting around 18 knots, which is fine considering the huge jump in survivability.
If you prefer raw speed, the Blackbeard Brig has appeal. If you want fewer repair panics and more room for loot, take the Brethren Brig.
↖ Recommended Brethren Brig Build
Once the ship is built, do not just throw your old parts onto it and sail away. The Brethren Brig becomes much stronger when paired with better cannons, repair-focused hull bracing, and a useful naval tactics book.
| Slot | Recommended Setup | Why It's Good |
|---|---|---|
| Ship | Brethren Brig | High HP and cargo space |
| Cannons | Tempered 12-pounders | Strong burst damage |
| Hull Bracing | Repair-friendly hull bracing | Makes repair kits more reliable |
| Naval Tactics | Consumable duration book | Boosts repair kits and grog |
| Crew Gear | Upgraded boarding gear | Helps crew clear ships faster |
↖ Best Cannons: Tempered 12-pounders
The Tempered 12-pounders are the star of this build. Their perk boosts your next volley if you wait a few seconds after reloading.
| Cannon | Effect | Player Tip |
|---|---|---|
| Tempered 12-pounders | Waiting 6 seconds after reload increases volley damage by 40% | Fire after turning into a clean broadside |
This works well because ship combat naturally has downtime. We turn, line up the shot, adjust the angle, and then fire. That delay often triggers the damage bonus without forcing us to play awkwardly.
If you are used to spamming cannons the second they reload, slow down a little. With these cannons, patience hits harder.
↖ Best Hull Bracing: Support Your Repairs
A good hull bracing choice should make your repair kits stronger or more consistent. One especially useful effect is preventing incoming damage from shortening repair kit duration.
That matters because repair kits are what keep the Brethren Brig alive during messy fights. When combined with a tactics book that increases repair duration, each kit gives much better value.
| Upgrade | Why It Matters |
|---|---|
| High HP ship | Gives more time to recover |
| Repair-focused hull bracing | Keeps healing steady |
| Repair duration tactics book | Makes each repair kit last longer |
| Master repair kits | Great for emergency recovery |
If you are taking damage from three ships at once, this setup can be the difference between we're sinking and keep firing, we're fine.
↖ What to Buy Before Treasure Hunting
Before chasing Blackbeard's treasure, stop by major vendors and stock up. Tortuga and faction camps are especially useful for ship upgrades.
| Item | Priority | Reason |
|---|---|---|
| Tempered 12-pounders | High | Major damage boost |
| Repair-focused hull bracing | High | Better survival |
| Naval tactics book | High | Improves consumables |
| Shipwright tools | Medium | Needed for upgrades |
| Repair kits | High | Always bring extras |
| Grog | Medium | Stronger with tactics book |
A small reputation grind may be needed before some vendors sell the better items. Turn in reputation items carefully and only push to the level you need. Wasting reputation early can slow down later purchases.
↖ Blackbeard Treasure Map Rewards
Blackbeard treasure maps are worth clearing because the rewards are practical, not just cosmetic. We can get silver, ship designs, and jewelry that directly improves combat or stamina use.
| Reward Type | Examples | Why It's Useful |
|---|---|---|
| Silver Coins | Currency | Vendor purchases |
| Silver Ingots | Crafting material | Jewelry ascension |
| Rings | Damage or stamina bonuses | Build upgrades |
| Ship Cosmetics | Sails, flags, hull colors | Customization |
| Repair Items | Kits and supplies | Longer sea trips |
The best part is the silver. If you are trying to ascend jewelry, these treasure chests are a very solid source of silver ingots.
↖ Jewelry Worth Keeping
Not every ring is equal. Some are better for gathering, while others are clearly better for combat.
| Jewelry | Effect | Best Use |
|---|---|---|
| Ranged damage ring | More ranged damage | Gun-focused builds |
| Attack stamina ring | Attacks cost less stamina | Melee builds |
| Agility necklace | More agility | Long sword / agility scaling |
| Gathering stamina ring | Less stamina used while gathering | Resource farming |
For melee players, an attack stamina reduction ring is excellent. It lets us swing longer, dodge more often, and stay active in fights. If you are using an agility weapon, an upgraded agility necklace is also worth investing in.
↖ Treasure Hunting Route Tips
The treasure locations themselves are usually simple. Sail to the marked island, land safely, find the dirt mound, dig it up, and collect the chest.
The real trick is making the route efficient.
| Step | What to Do | Why |
|---|---|---|
| 1 | Empty cargo before leaving | More room for loot |
| 2 | Bring repair kits | Random fights happen |
| 3 | Fast travel near the marker | Saves sailing time |
| 4 | Collect floating loot | Easy wood and supplies |
| 5 | Dig treasure, check gear | Some jewelry is instantly useful |
| 6 | Continue to next map | Keeps the run efficient |
If you see glowing loot in the water, grab it. White loot piles often give wood, and gold loot piles can contain better supplies. Since ship upgrades eat through planks quickly, floating loot can save a lot of tree chopping.
↖ Naval Combat Tips for the Brethren Brig
The Brethren Brig feels strongest when you stop trying to sail it like a tiny starter boat. It is heavier, wider, and slower to turn, but it can bully smaller ships once positioned correctly.
| Situation | Best Move |
|---|---|
| Enemy ship approaching | Angle slightly, avoid taking a full broadside |
| Cannons reloaded | Wait for the tempered cannon bonus if safe |
| Multiple ships nearby | Keep turning and fire controlled broadsides |
| Health dropping | Use repair kits early, not at the last second |
| Enemy disabled | Board if safe, sink if surrounded |
The biggest mistake is panic-firing. With Tempered 12-pounders, we want clean volleys. Turn the ship, wait out the bonus timer, and fire when the enemy's side is exposed.
In testing, this setup can hit level 5 ships extremely hard. A delayed broadside can chunk a ship badly, and critical hits become much more noticeable once the cannons are upgraded.
↖ Boarding Party Upgrades
Upgrading crew gear is not flashy, but it saves time. Once the boarding party is stronger, they can handle many enemy crews without us needing to jump over and clean up every fight ourselves.
| Crew Gear Level | What It Feels Like |
|---|---|
| Low | Crew needs help often |
| Mid | Crew can handle weaker ships |
| High | Crew clears most basic boardings |
| Material-gated | Further upgrades need later biome resources |
If your crew keeps losing boarding fights, upgrade their gear before pushing into harder waters. A good ship gets enemies disabled; a good crew turns those disabled ships into loot.
↖ Ship Customization
Blackbeard treasure maps can also unlock new sails, flags, and hull colors. These do not improve stats, but they make the ship feel earned.
| Cosmetic | Where to Use It | Why It's Nice |
|---|---|---|
| Sail colors | Ship customization | Changes the ship's look |
| Flag designs | Flag slot | Adds personality |
| Hull colors | Hull customization | Completes the theme |
After clearing a few maps, head back to the wharf and apply the new designs. The Brethren Brig already fights like a beast; it may as well look good doing it.
↖ FAQ
↖ What is the best ship for Blackbeard treasure maps in Windrose?
The Brethren Brig is the best practical choice for this stage. It has 90,000 HP, strong cargo space, and enough durability to survive messy naval fights.
↖ Are Tempered 12-pounders worth buying?
Yes. Their delayed-shot bonus gives a major damage boost, especially because ship combat naturally involves turning and lining up broadsides.
↖ Should I choose the Brethren Brig or Blackbeard Brig?
Choose the Brethren Brig if you want durability and cargo space. Choose the Blackbeard Brig if you care more about speed and style than survivability.
↖ What should I upgrade first on the Brethren Brig?
Start with cannons and hull bracing. Cannons improve your kill speed, while hull bracing and repair bonuses keep you alive during longer fights.
↖ Are Blackbeard treasure maps worth doing?
Yes. They provide silver coins, silver ingots, jewelry, and ship cosmetics. The silver ingots are especially useful for jewelry upgrades.
↖ What jewelry is best for melee builds?
Use jewelry that improves agility or reduces attack stamina cost. These bonuses make melee combat smoother and help you stay aggressive longer.
↖ Should I board enemy ships or sink them?
Board when the area is safe and you want more loot. Sink ships quickly if several enemies are still attacking you.
↖ Final Notes
The Brethren Brig is one of the best upgrades for players who want safer naval combat and smoother treasure runs in Windrose. Pair it with Tempered 12-pounders, repair-focused hull bracing, and a good naval tactics book, and it becomes a reliable floating fortress.
Blackbeard's treasure maps are also worth clearing early. We get silver for upgrades, useful jewelry for our build, and cosmetics that make the new ship feel properly ours. If your current ship feels fragile, this is the point where the game starts to open up: better ship, better fights, better loot, and far fewer why is my hull gone? moments.

Most Popular Posts
- Windrose Best Weapons Tier List, Traits, and Build Picks
- Windrose Completion Guide: Max Comfort, Weapons, Armor, Quests and Missable Items
- Windrose Best Rings, OP Necklaces, Blackbeard Maps & Upgrade Tips
- Windrose Best Starter Build Guide: OP Rapier + Pistol Setup for Early to Mid Game
- Windrose Agility Build Guide: Best Stats, Weapons, Talents, Food and Boss Setup
- Windrose OP Guide: Combat, Skills, Gear, Food, Jewelry, and Armor Sets
Popular Category Lists
- Grow a Garden / (286)
- ARC Raiders / (266)
- CoD: Black Ops 7 / (166)
- Monopoly Go / (146)
- MLB 26 / (145)
- Star Citizen / (118)
- Steal a Brainrot / (89)
- ARK Survival Ascended / (75)
- Sailor Piece / (68)
- Forza Horizon 6 / (63)
- Diablo IV / (61)
- Blox Fruits / (60)
- CoD: BLACK OPS 6 / (55)
- Adopt Me / (53)
- Path of Exile 2 / (48)
- Monster Hunter Wilds / (46)
- Windrose / (44)
- Grow a Garden 2 / (44)
- Path of Exile / (40)
- Bee Swarm Simulator / (36)


