0
0ARC Raiders Fast Farm Augment Blueprints Best New Location
- KIVRI
- Share
- ARC Raiders
- 03/22/26
- 585
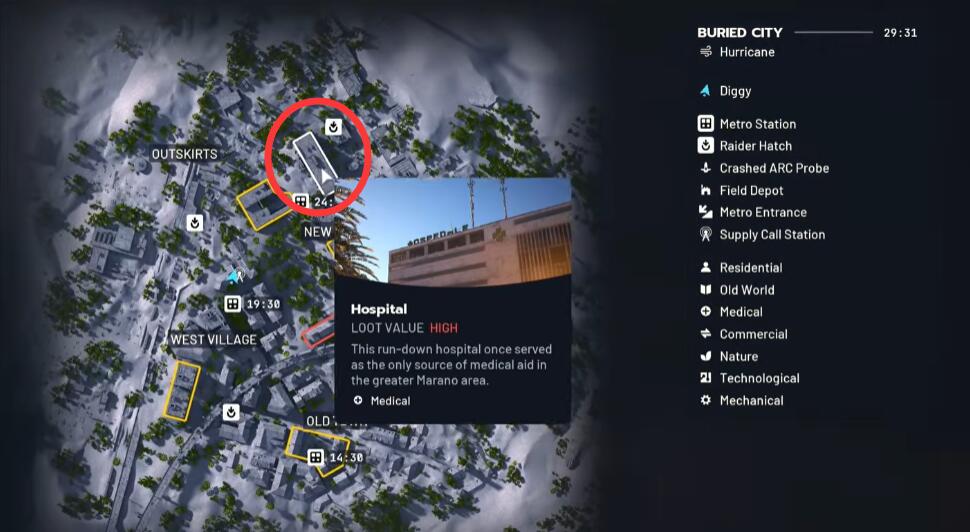
If you want a fast and reliable Augment Blueprint farm in ARC Raiders after the wipe, the best route right now is Bird City Hospital during the Hurricane raid. After testing older spots like Blue Gate, Stella Montis, and Dam Battlegrounds, this location stands out for one reason: it gives us consistent blueprint chances without forcing a risky or slow setup.

In practical terms, that means we can get in, clear quickly, and often leave through a nearby extract before the raid gets messy. That combination is exactly what makes a farming route worth repeating.
- Best Location for Augment Blueprints
- Why This Route Is So Strong
- Key strengths
- Best Loot Route Inside the Hospital
- Recommended path
- What Blueprints Can Drop Here
- Rooftop Bonus Loot
- Possible rooftop value
- Why It Beats Older Locations
- Practical Tips for Better Results
- FAQ
- Is Bird City Hospital really the best blueprint farm after the wipe?
- Do we need a close spawn?
- Is the rooftop required?
- What makes this route safer than others?
- Should we always full-clear the building?
- Final Thoughts
↖ Best Location for Augment Blueprints
The core route is simple: queue Bird City, wait for the Hurricane event, and head straight to the Hospital building.
| Category | Best Option | Why It Works |
|---|---|---|
| Map | Bird City | Easy route flow and strong loot density |
| Raid Type | Hurricane | Best current consistency for blueprint farming |
| Main POI | Hospital | High container count and fast clears |
| Bonus Area | Rooftop | Extra breach and loot chance |
| Exit | Bottom-floor extract | Safer and faster resets |
From experience, this route still works even if we spawn 250m to 500m away. That matters because a good farm should not depend on a perfect start every time.
↖ Why This Route Is So Strong
What makes the Hospital better than many older blueprint spots is not just the loot itself. It is the efficiency.
↖ Key strengths
- Lots of containers in one building
- Fast clear time, usually around 2 to 2.5 minutes
- Good chance of multiple blueprint rolls in one run
- Bottom-floor extraction often lets us leave fast
- Good side value from materials, keys, and sellable loot
This is important because a route becomes truly profitable when it gives us both progression and safe extractions.
↖ Best Loot Route Inside the Hospital
The cleanest way to run this building is to start low and move up.
↖ Recommended path
1. Enter the lower floor first
2. Prioritize the left side and rear red containers
3. Sweep nearby rooms in one loop
4. Move to the second floor
5. Check the lower extract-side containers on the way out
6. Go rooftop only if the area is quiet and you have mobility
| Step | Area | Priority |
|---|---|---|
| 1 | Lower floor | Very high |
| 2 | Left/rear red containers | Very high |
| 3 | Side rooms | High |
| 4 | Second floor | High |
| 5 | Extract-side lower containers | Medium |
| 6 | Rooftop | Situational |
If you find an Augment early, that usually means the run is already a success. In that case, staying longer only increases risk.
↖ What Blueprints Can Drop Here
Based on repeated runs, the Hospital can produce several strong blueprint types, including Augments and useful support items.
| Possible Drops | Type |
|---|---|
| Safekeeper | Augment |
| Luton MK3 | Augment |
| Defib | Utility blueprint |
| Vita Spray | Utility blueprint |
| Shotgun Silencer | Weapon attachment |
| Extended Barrel | Weapon attachment |
| Muzzle Brake 2 | Weapon attachment |
The exact drop pattern will vary, of course. But from a practical farming perspective, the important point is that this building regularly produces blueprint value across multiple runs, not just one lucky raid.
↖ Rooftop Bonus Loot
If we bring a zipline or snap hook, the roof is worth checking.
↖ Possible rooftop value
- Security breach
- Backpack spawn
- Weapon crate chance
| Rooftop Check | Worth It When... |
|---|---|
| Security breach | The building is already clear |
| Weapon crate chance | You have inventory space |
| Full rooftop detour | The lobby sounds quiet |
If you already have an Augment in your bag and the extract is open, the smarter play is usually to leave. Greed is fun right up until it becomes someone else's loot.
↖ Why It Beats Older Locations
Older spots are still viable, but this route is easier to repeat efficiently.
| Location | Strength | Current Verdict |
|---|---|---|
| Bird City Hospital | Fast, reliable, extract-friendly | Best overall right now |
| Blue Gate | Good loot potential | Less consistent access |
| Stella Montis | Still useful | Slower farming pace |
| Dam Battlegrounds | Can pay off | More situational |
That is the real advantage here: reliability per run. Not every farming route needs the highest ceiling. The best ones give us steady returns with less wasted time.
↖ Practical Tips for Better Results
A few habits make this route noticeably stronger:
- Run a lightweight loadout so we can reach the Hospital fast
- Learn the container order so we are not backtracking
- Bring mobility if we want rooftop value
- Leave early if we already hit a valuable Augment
- Treat keys as bonus value, not a reason to overextend
This is especially useful after a wipe, when every clean extract helps accelerate crafting and unlock progression.
↖ FAQ
↖ Is Bird City Hospital really the best blueprint farm after the wipe?
Right now, it is one of the most reliable options for fast Augment Blueprint farming, especially during the Hurricane raid.
↖ Do we need a close spawn?
No. Even with a 500m spawn, the route can still be worth running because the building clears quickly and often pays out well.
↖ Is the rooftop required?
No. It is a bonus layer. The main building alone is already strong enough for blueprint farming.
↖ What makes this route safer than others?
The biggest advantage is the nearby bottom-floor extract, which helps us secure loot before late-raid pressure builds up.
↖ Should we always full-clear the building?
Not always. If you find a rare Augment early and the path out is open, extracting immediately is often the better long-term play.
↖ Final Thoughts
For players trying to farm Augment Blueprints quickly and consistently in ARC Raiders after the wipe, Bird City Hospital on the Hurricane raid is the best new route to focus on right now.
It is fast, practical, and repeatable. More importantly, it gives us something every good farming route should have: a realistic chance to leave with value on almost every run. That is what turns a strong location into a real progression strategy.

Most Popular Posts
- ARC Raiders Riven Tides Key Room Guide: Best Hotel Keys, Loot Routes, Secure & Crane Storage
- ARC Raiders Riven Tides Update: New Map & Items, ARC Turbine, Rewards, and Best Early Strategy
- ARC Raiders Bettina Guide: Best Build, Buffs, and How to Use It Against ARC
- Arc Raiders Season 4 Riven Tides Update, Rewards, Safe Skins, and Release Timeline
- Best ARC Raiders Attachments for Every Weapon: Complete Weapon Mod Guide
- ARC Raiders Turbine Boss Guide: Spawn Time, Weak Points, Best Weapons, and Loot
Popular Category Lists
- Grow a Garden / (286)
- ARC Raiders / (272)
- CoD: Black Ops 7 / (166)
- Monopoly Go / (148)
- MLB 26 / (148)
- Star Citizen / (126)
- Steal a Brainrot / (90)
- ARK Survival Ascended / (81)
- Sailor Piece / (68)
- Forza Horizon 6 / (66)
- Diablo IV / (62)
- Blox Fruits / (61)
- Adopt Me / (56)
- CoD: BLACK OPS 6 / (55)
- Grow a Garden 2 / (51)
- Path of Exile 2 / (48)
- Monster Hunter Wilds / (46)
- Windrose / (44)
- Path of Exile / (40)
- Bee Swarm Simulator / (37)