


 0
0ARC Raiders Fast Route to 3-Star Weekly Trials in Cold Snap
- KIVRI
- Share
- ARC Raiders
- 12/24/25
- 2039
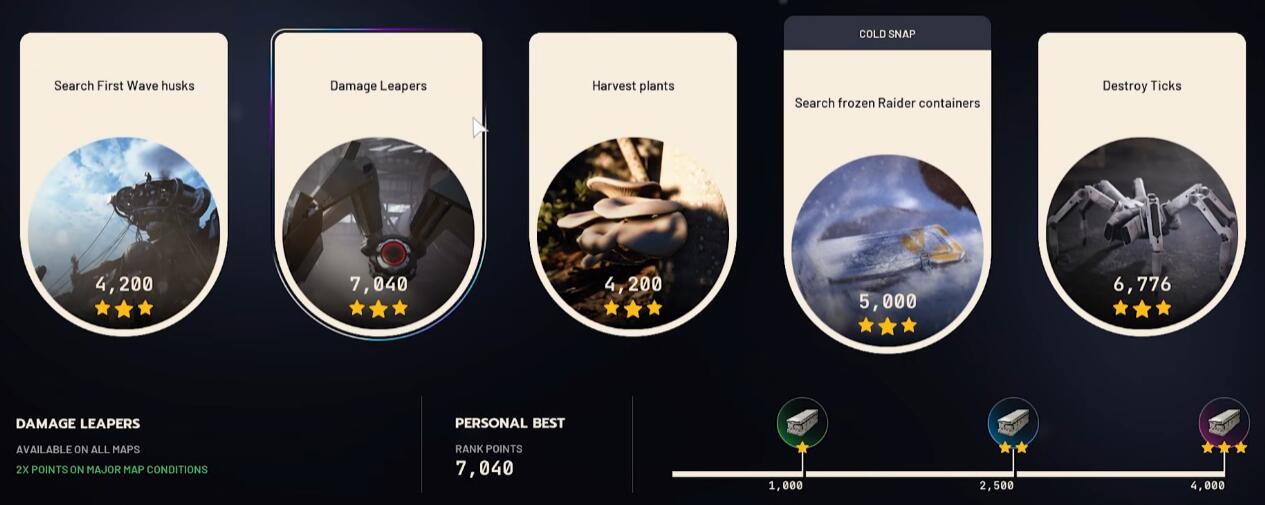
We keep seeing people try to brute-force every Cold Snap Trial in one match and then lose the run to one thing they can't control: frozen breachable containers not spawning.
- Core Idea: One Loop That Covers All Bases
- Loadout & Prep (What I Bring and Why)
- The Dam Route: Step-by-Step Loop (Hydroponics-Centered)
- Step 1 — Sprint to Hydroponics First (Why you rush)
- Step 2 — Kill Leaper #1 Immediately (Start the 8-minute clock)
- Step 3 — Harvest Plants Immediately (Non-respawning = priority)
- Step 4 — First-Wave Husks (Fast points, low variance)
- Step 5 — Farm Ticks in Predictable Rooms (Buildings, not snowfields)
- Step 6 — Return for Leaper #2 (The checkpoint that completes the run)
- The Big Trap: Frozen Breachable Containers (How I Handle RNG)
- Why containers break one-match perfection
- My rule: Split containers into a dedicated run
- Practical Timeline (How I Budget a 25-Minute Match)
- Trial-by-Trial Checklist (What to Do When)
- FAQ
- 1) Can this be done on other maps, or only Dam?
- 2) Why do you insist on killing the Leaper first?
- 3) I'm always short on ticks. What's the fastest fix?
- 4) Should I still open containers during the main run if I see one?
- 5) What's the minimum number of matches to 3-star everything?
- Summary (Actionable Takeaways)
So I built a route that covers every requirement reliably, with a clear rule: do the deterministic Trials first (Leaper, plants, first-wave husks, ticks), then farm containers in a separate match if RNG is stingy. Here's the exact loop I run on Dam, and why it works.
↖ Core Idea: One Loop That Covers All Bases
This route is designed around two facts that matter more than perfect aim:
1. Leaper has a single reliable spawn on Cold Snap (Hydroponics) and a respawn timer (~8 minutes).
That means your whole match should revolve around killing it early, then being back on time for kill #2.
2. Plants don't respawn and can be looted by other players.
If you delay plant harvesting, you risk walking into an already-picked route and losing progress.
Everything else—ticks, first-wave husks—can be cleaned up with smart building checks and a quick rotation.
↖ Loadout & Prep (What I Bring and Why)
I'm not trying to look stylish; I'm trying to finish Trials fast.
| Item | Why it matters | Cheap alternative |
|---|---|---|
| A bursty damage option (grenade/device) | Helps delete Leaper safely and quickly | Any high-DPS primary + cover play |
| Bandages (a stack) | Cold chip damage adds up while rotating outdoors | Any fast-heal consumable |
| A scouting tool (drone/scan equivalent) | Faster tick checks inside buildings | Careful audio + room-by-room sweep |
| One breach-ready plan | Containers are time-sensitive in the cold | Skip (do in dedicated run) |
Practical tip: I play this route assuming a 25-minute clock and schedule around the Leaper's ~8-minute respawn. That timer discipline is the difference between two runs and five runs.
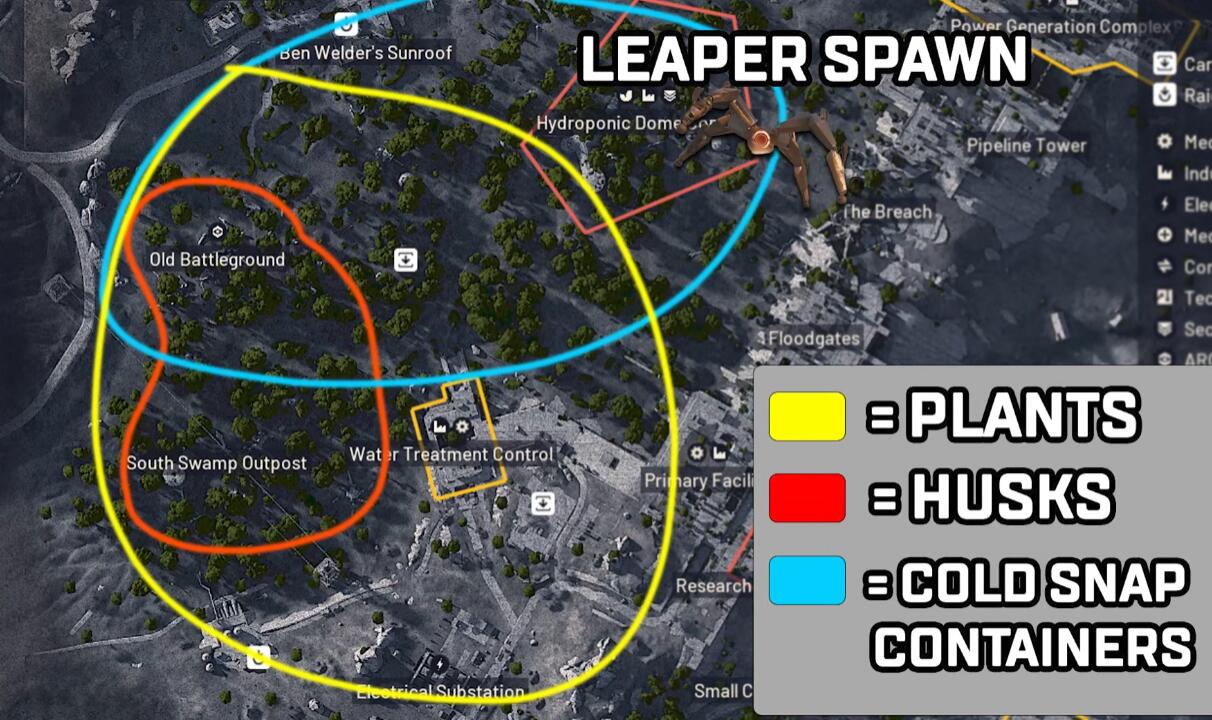
↖ The Dam Route: Step-by-Step Loop (Hydroponics-Centered)
↖ Step 1 — Sprint to Hydroponics First (Why you rush)
You're racing other players to the only Leaper pipeline.
- Do: Beeline to Hydroponic Dome Complex as soon as you spawn.
- While running: pass through any buildings you naturally cross and listen for cache audio.
Why? Ticks love interior spaces, and incidental kills save you a dedicated detour later.

If you hear raider cache audio early: note it mentally, but don't derail your Leaper timing.
↖ Step 2 — Kill Leaper #1 Immediately (Start the 8-minute clock)
Once you reach Hydroponics:
- Kill the Leaper as soon as possible.
- Mark the time. If you arrive with ~25:00 left, expect it back at ~17:00; if you arrive at ~23:00, expect it back around ~15:00.
(The exact minute will vary, but the ~8-minute window is the key.)
This means you now have a clear mid-match checkpoint: be back at Hydroponics when the respawn window hits.
↖ Step 3 — Harvest Plants Immediately (Non-respawning = priority)
Right after Leaper #1, I pivot to plants around Hydroponics and nearby streams.
- Do: sweep the nearby dome edges, logs, lake shoreline, and streambeds.
- Target count: I typically plan for 12–13 plant pickups to comfortably hit the 3-star threshold.
Why I do plants now:
- Because plants do not respawn.
- Because other players can delete your progress just by passing through earlier.
If you notice plant spawns are thin (already looted): extend your sweep along the outskirts streams. On Cold Snap, outskirts routes tend to be more consistent than cutting through the middle.
↖ Step 4 — First-Wave Husks (Fast points, low variance)
Once plants are mostly secured, I rotate toward an area where first-wave husks are easy to spot.
- Do: grab first-wave husks when you naturally pass them in open terrain or known spawn pockets.
- Why this works: even if someone else interacts with them, they're still visually obvious and don't require perfect timing like the Leaper.
↖ Step 5 — Farm Ticks in Predictable Rooms (Buildings, not snowfields)
Ticks are the Trial that punishes aimless wandering. I treat them like a checklist:
- Water Treatment Control: a room that frequently spawns ~3 ticks (if not already cleared).
- Control Tower / key-room floors: repeatable interior checks.
- Research & Administration paths: good density.
If you enter a building and it's quiet: don't overcommit. Exit and hit the next structure.
Ticks are a volume game—rooms per minute beats search perfection.
↖ Step 6 — Return for Leaper #2 (The checkpoint that completes the run)
When the respawn window is close:
- Return to Hydroponics.
- Kill Leaper #2.
This is the moment most runs fail, not because it's hard, but because people lose track of time while chasing containers.
↖ The Big Trap: Frozen Breachable Containers (How I Handle RNG)
↖ Why containers break one-match perfection
Frozen breachable containers (Cold Snap containers) do not spawn as reliably as standard cache events, even though they share similar locations.
So if you insist on forcing them during your main loop, you'll often:
- miss Leaper #2 timing,
- lose ticks density time,
- and walk out with almost 3-star progress.
↖ My rule: Split containers into a dedicated run
- Main run goal: Leaper (2 kills), plants, first-wave husks, ticks.
- Second run goal: containers only, hugging outskirts and known cache lanes.
That's not giving up—it's controlling variance.
↖ Practical Timeline (How I Budget a 25-Minute Match)
Use this as a mental metronome; adjust for spawn distance.
| Match time window | My focus | Success condition |
|---|---|---|
| 25:00 → ~22:00 | Sprint to Hydroponics | Leaper #1 dead ASAP |
| ~22:00 → ~16:00 | Plants sweep + incidental ticks + husks | Plants mostly complete (12–13) |
| ~16:00 → ~14:00 | Return to Hydroponics | Leaper #2 dead |
| ~14:00 → exit | Tick cleanup in dense buildings | Tick score/kill requirement finished |
If I'm behind at ~16:00: I cut all nice-to-haves and go straight back for Leaper #2.
Leaper timing is the one thing you can't farm efficiently later.
↖ Trial-by-Trial Checklist (What to Do When)
Here's the no overthinking version.
| Trial | What I do | Why it's efficient | If it goes wrong… |
|---|---|---|---|
| Leaper | Kill at Hydroponics, come back after ~8 mins for #2 | Single spawn, timer-based | If another team camps it, rotate buildings for ticks and return later—don't chase containers |
| Plants | Harvest immediately after Leaper #1 along domes/streams/logs | Non-respawn + can be looted by others | If looted, extend to outskirts waterways |
| First-wave husks | Grab while rotating between objectives | Easy to spot, low variance | If you're short, sweep open outskirts before extraction |
| Ticks | Prioritize interior rooms (Water Treatment, Control Tower, Research/Admin) | High density per minute | If cleared by others, hit the next building cluster—don't wait |
| Frozen breachable containers | Separate run focusing only on spawn lanes | RNG-heavy; don't sabotage Leaper timing | If none spawn, reset match faster than forcing it |
↖ FAQ
↖ 1) Can this be done on other maps, or only Dam?
I use Dam because Hydroponics routing is clean, but the underlying logic works anywhere: run the outskirts for plants and cache lanes, and anchor your loop around the Leaper's single reliable spawn (wherever it is on that week's Cold Snap layout).
↖ 2) Why do you insist on killing the Leaper first?
Because it's the only objective with a hard respawn timer and a single contested spawn.
Plants can be gathered in many places (until looted), ticks can be farmed in multiple buildings, husks are visible—Leaper is the bottleneck.
↖ 3) I'm always short on ticks. What's the fastest fix?
Stop checking snowfields and start checking rooms. My fastest gains come from:
- Water Treatment Control rooms,
- Control Tower interior sweeps (especially higher floors / key areas),
- Research/Admin corridors.
If you enter three buildings quickly, you usually outpace a 10-minute random roam.
↖ 4) Should I still open containers during the main run if I see one?
Yes—if it's on your line and costs you under ~30 seconds.
If you find yourself detouring, climbing, warming up, and fighting wasps just to maybe get one box, that's the moment to cut it and protect Leaper #2 timing.
↖ 5) What's the minimum number of matches to 3-star everything?
In my experience, 2 matches is common, 3 matches is guaranteed-feeling, and 1 match only happens when container RNG cooperates and you don't get heavy contest at Hydroponics.
↖ Summary (Actionable Takeaways)
I run Cold Snap Trials like a controlled loop, not a scavenger hunt: Hydroponics Leaper first, plants immediately, ticks in dense buildings, husks on rotation, and containers only when convenient—or in a dedicated follow-up match.
When you treat the Leaper as the timer anchor and treat containers as RNG, your progress stops feeling random—and starts finishing on schedule.

Most Popular Posts
- ARC Raiders Riven Tides Key Room Guide: Best Hotel Keys, Loot Routes, Secure & Crane Storage
- ARC Raiders Damage Fireflies Trial Guide: Best Farm Method on Buried City Night Raid
- ARC Raiders Riven Tides Update: New Map & Items, ARC Turbine, Rewards, and Best Early Strategy
- ARC Raiders Bettina Guide: Best Build, Buffs, and How to Use It Against ARC
- Arc Raiders Season 4 Riven Tides Update, Rewards, Safe Skins, and Release Timeline
- ARC Raiders Solo Search Supply Drops Guide: Best Buried City Route, Beacon Locations
Popular Category Lists
- Grow a Garden / (286)
- ARC Raiders / (262)
- CoD: Black Ops 7 / (166)
- Monopoly Go / (146)
- MLB 26 / (145)
- Star Citizen / (112)
- Steal a Brainrot / (89)
- Sailor Piece / (68)
- ARK Survival Ascended / (67)
- Diablo IV / (61)
- Forza Horizon 6 / (60)
- Blox Fruits / (60)
- CoD: BLACK OPS 6 / (55)
- Adopt Me / (53)
- Path of Exile 2 / (48)
- Monster Hunter Wilds / (46)
- Windrose / (44)
- Path of Exile / (40)
- Grow a Garden 2 / (40)
- Bee Swarm Simulator / (36)


