0
0ARC Raiders Weekly Trials Guide: Fast 3-Star Routes, Farming Spots, and Loadouts
- KIVR
- Share
- ARC Raiders
- 06/10/26
- 152
This week's ARC Raiders trials are mostly easy if you stop wasting time on bad targets. The fastest clears come from Bastions, Salamantis Shredders, clean Heavy Fuse Grenade placement, and smart event timing for ARC Probes and Snitches.
The goal is simple: hit the highest-value targets, avoid contested farms, and leave bad map conditions immediately.

- ARC Raiders Weekly Trials Quick Chart
- Heavy Fuse Grenade Trial: Best 3-Star Method
- Best Heavy Fuse Grenade Targets
- Key Rule
- Best Execution
- ARC Probe Trial: Fastest Way to 3-Star
- ARC Probe Scoring
- Best Probe Routes
- Important Warning
- Snitch Trial: Best Farming Spots and Loadout
- Best Snitch Map Conditions
- Best Snitch Weapons
- Best Hidden Bunker Spot
- Snitch Rule
- Salamantis Ground ARC Trial: Farm Shredders
- Salamantis Point Values
- Best Execution
- Bastion Trial: Fastest Damage Route
- Best Bastion Method
- Best Bastion Farming Route
- Best Bastion Loadout
- Best Weekly Trial Priority
- Common Mistakes to Avoid
- FAQ
- What is the fastest weekly trial to 3-star in ARC Raiders?
- How many Snitches do you need for 3-star?
- Do Heavy Fuse Grenades stack damage?
- How many ARC Probes are needed for 3-star?
- What is the best target for Salamantis ground ARC damage?
- Summary
↖ ARC Raiders Weekly Trials Quick Chart
| Trial | Fastest 3-Star Method | Key Numbers | Best Gear |
|---|---|---|---|
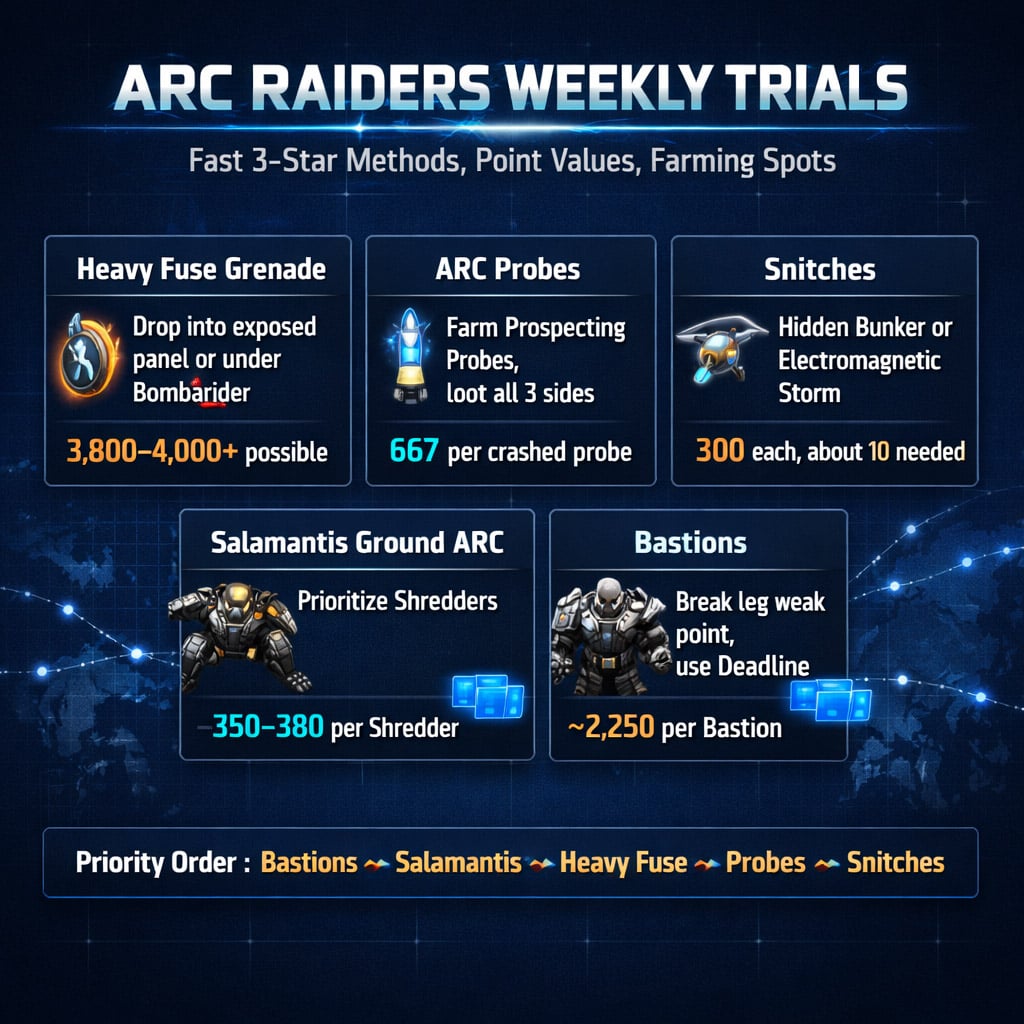
| Heavy Fuse Grenade damage | Drop grenade into exposed panel or under Bombardier | 3,800–4,000+ possible | Heavy Fuse Grenade |
| Open ARC Probes | Farm Prospecting Probes or crashed probes | 667 per crashed probe | Mobility, heals |
| Damage Snitches | Farm Hidden Bunker / Electromagnetic Storm | 300 per Snitch | Jupiter / Osprey, Seeker Grenades |
| Salamantis ground ARC | Kill Shredders first | 350–380 per Shredder | Strong primary, explosives |
| Damage Bastions | Break leg weak point, use Deadline | ~2,250 per Bastion | Deadline |
↖ Heavy Fuse Grenade Trial: Best 3-Star Method
The mistake is throwing Heavy Fuse Grenades at armor. Don't do that.
You want the grenade trapped near weak areas.
↖ Best Heavy Fuse Grenade Targets
| Target | Throw Location | Result |
|---|---|---|
| Queen / large ARC | Break top panel, drop grenade inside | 4,000+ possible |
| Bombardier | Throw underneath body | ~3,800 possible |
| Armored body shots | Random impact | Bad, inconsistent |
In our runs, one grenade landed under 3,000, while another broke 4,000 from better placement. Same tool. Different result. Placement is everything.
↖ Key Rule
Heavy Fuse Grenade damage does not stack.
Throwing multiple grenades at the same ARC does not combine the score. Each grenade is a separate attempt.
If the first throw is bad, the second can still clear it. But more grenades will not fix poor placement.
↖ Best Execution
- If you find a Queen or large ARC event, get above it.
- Break the top panel.
- Drop the Heavy Fuse Grenade inside.
- If no event is active, use a Bombardier and throw underneath it.
- Aim to hit the legs and rear weak point.
Result: easy 3-star without needing perfect setup.
↖ ARC Probe Trial: Fastest Way to 3-Star
ARC Probes are simple once you know the scoring.
Crashed probes are safe. Landed Prospecting Probes are faster.
↖ ARC Probe Scoring
| Probe Type | Value | Use |
|---|---|---|
| Crashed ARC Probe | 667 points | Safe progress |
| Landed Prospecting Probe | Multiple loot sides | Fastest clear |
| Already-breached Probe | Depends on remaining panels | Check if nearby |
A crashed probe gives 667 points, so five crashed probes can finish the trial.
But during Prospecting Probe events, landed probes are better. Each one has three lootable sides after breach.
↖ Best Probe Routes
| Route | Requirement | Result |
|---|---|---|
| Fast event route | 2 landed probes | Usually enough for 3-star |
| Mixed route | 1 landed probe + 2 crashed probes | Reliable |
| No-event route | 5 crashed probes | Slower but safe |
↖ Important Warning
When you breach a landed probe, it can call in ARC. Sometimes twice.
It also pulls nearby ARC until the breach finishes. This can snowball fast.
If you find a landed probe:
- Clear an escape path first.
- Start breach.
- Loot all three sides.
- Leave if ARC pressure gets ugly.
These probes are also great for ARC circuitry and Advanced Electrical Components, so loot them properly.
↖ Snitch Trial: Best Farming Spots and Loadout
This is the slowest trial if you pick the wrong map.
Each Snitch gives only 300 points. You need about 10 Snitches for 3-star.
That means contested spawns ruin the run.
↖ Best Snitch Map Conditions
| Condition / Area | Rating | Why |
|---|---|---|
| Hidden Bunker | Best | Strong roof angles, multiple spawns |
| Electromagnetic Storm | Great | High visibility, many Snitches |
| Riptide | OK | Works with good positioning |
| Blue Gate | Poor | Inconsistent and often contested |
In our testing, Snitches felt close to a 4-minute respawn in some spots. If nothing appears, rotate. Do not sit there hoping.
↖ Best Snitch Weapons
| Weapon / Tool | Use |
|---|---|
| Jupiter | Best for quick one-shot tags |
| Osprey | Best precision option |
| Renegade | Solid backup |
| Bettina | Usable, not ideal |
| Seeker Grenades | Strong for contested tags |
If other Raiders are shooting the same Snitch, Seeker Grenades help secure credit while it bounces around.
↖ Best Hidden Bunker Spot
Use the roof of the departure building.
From there, we can watch around four Snitch spawns consistently.
But this spot gets contested. Bring:
- Jupiter or Osprey
- Seeker Grenades
- Zipline or safe mobility tool
The roof is strong, but getting down can be awful if a Vaporizer or Watcher pressures you. Do not risk the whole trial on a bad drop.
↖ Snitch Rule
If Hidden Bunker is active and quiet, farm it.
If it is crowded, switch to Electromagnetic Storm or do another trial first.
↖ Salamantis Ground ARC Trial: Farm Shredders
This one is easy. Do not overthink it.
Kill Shredders. Ignore low-value trash unless it is already in your path.
↖ Salamantis Point Values
| Enemy | Observed Points | Priority |
|---|---|---|
| Shredder | 350–380 | High |
| Fireball / Pop Tart | 20–30 | Low |
| Tick | 10 | Very low |
You need around 8–9 Shredders for 3-star, with small enemies adding extra progress along the way.
↖ Best Execution
- Prioritize Shredders immediately.
- Kill Fireballs if nearby.
- Do not chase Ticks.
- Rotate if other Raiders are clearing the same area.
- Use explosives when ARC groups stack up.
The only real threat is competition. If another squad is farming with heavy explosives, move. Empty ground is wasted time.
↖ Bastion Trial: Fastest Damage Route
Bastions are one of the cleanest 3-star trials this week.
One Bastion gives around 2,250 points with proper damage. You usually need one kill plus partial damage on a second.
↖ Best Bastion Method
Do this every time:
1. Shoot the leg weak point.
2. Move behind the Bastion.
3. Place Deadline on the exposed weak point.
4. Finish damage or rotate to the next Bastion.
Simple. Fast. Reliable.
↖ Best Bastion Farming Route
| Condition / Route | Value | Notes |
|---|---|---|
| Battlegrounds | Best | Reliable Bastion farming |
| Electromagnetic Storm | Great | Good visibility and ARC density |
| Power Generation Complex ↔ Dome Complex | Best route | Short rotation |
| Hidden Bunker | Good but crowded | Expect competition |
| Hurricane | Backup | Use only if needed |
The Power Generation Complex to Dome Complex loop is efficient because the locations are close and Bastions appear to work around a 5-minute respawn.
↖ Best Bastion Loadout
| Gear | Reason |
|---|---|
| Deadline | Core damage tool |
| Lure Grenade | Optional positioning help |
| Reliable primary | Clears small ARC |
| Mobility tool | Safer rotations |
If the area is contested, rotate. Fighting over one Bastion is slower than finding the next one.
↖ Best Weekly Trial Priority
Do the reliable damage trials first. Save spawn-dependent trials for good conditions.
| Priority | Trial | Reason |
|---|---|---|
| 1 | Bastions | Fast, high points |
| 2 | Salamantis ground ARC | Easy Shredder farming |
| 3 | Heavy Fuse Grenade | Quick with correct target |
| 4 | ARC Probes | Best during Prospecting Probe event |
| 5 | Snitches | Spawn and competition dependent |
If Hidden Bunker is active and quiet, bump Snitches up. If not, don't force it.
↖ Common Mistakes to Avoid
| Mistake | Why It Fails | Do This Instead |
|---|---|---|
| Throwing Fuse Grenades at armor | Low, inconsistent score | Trap grenade near weak points |
| Expecting grenade damage to stack | It does not | Treat each throw separately |
| Looting one probe side | Wasted progress | Loot all three sides |
| Camping dead Snitch spawns | Slow respawn | Rotate after downtime |
| Chasing Ticks | Bad point value | Farm Shredders |
| Fighting Bastions from front | Slower and riskier | Break leg, use Deadline |
↖ FAQ
↖ What is the fastest weekly trial to 3-star in ARC Raiders?
Bastion damage is the fastest for most players. One Bastion gives around 2,250 points, and a second partial damage cycle is usually enough for 3-star.
↖ How many Snitches do you need for 3-star?
You need about 10 Snitches. Each gives 300 points. Farm Hidden Bunker if active, or use Electromagnetic Storm as the safer backup.
↖ Do Heavy Fuse Grenades stack damage?
No. Heavy Fuse Grenade damage does not stack. Each grenade is scored separately, so placement matters more than quantity.
↖ How many ARC Probes are needed for 3-star?
You need five crashed probes at 667 points each, or usually two landed Prospecting Probes if you loot all three sides after breach.
↖ What is the best target for Salamantis ground ARC damage?
Shredders. They give around 350–380 points each. Fireballs and Ticks are only bonus progress and are not worth chasing.
↖ Summary
This week's ARC Raiders weekly trials are quick if you farm the right targets.
Start with Bastions using Deadline on the leg weak point. Then clear Salamantis ground ARC by farming Shredders. Use Heavy Fuse Grenades only on trapped weak-point setups, not armor.
For ARC Probes, wait for Prospecting Probe events when possible and loot all three sides. For Snitches, use Hidden Bunker or Electromagnetic Storm, bring Jupiter/Osprey, and rotate if spawns are contested.
The clean route is simple: high-value damage first, event-based objectives second, contested farms last.

Most Popular Posts
- ARC Raiders Riven Tides Key Room Guide: Best Hotel Keys, Loot Routes, Secure & Crane Storage
- ARC Raiders Riven Tides Update: New Map & Items, ARC Turbine, Rewards, and Best Early Strategy
- ARC Raiders Bettina Guide: Best Build, Buffs, and How to Use It Against ARC
- Arc Raiders Season 4 Riven Tides Update, Rewards, Safe Skins, and Release Timeline
- Best ARC Raiders Attachments for Every Weapon: Complete Weapon Mod Guide
- ARC Raiders Turbine Boss Guide: Spawn Time, Weak Points, Best Weapons, and Loot
Popular Category Lists
- Grow a Garden / (286)
- ARC Raiders / (271)
- CoD: Black Ops 7 / (166)
- Monopoly Go / (148)
- MLB 26 / (148)
- Star Citizen / (125)
- Steal a Brainrot / (89)
- ARK Survival Ascended / (81)
- Sailor Piece / (68)
- Forza Horizon 6 / (65)
- Diablo IV / (61)
- Blox Fruits / (61)
- Adopt Me / (56)
- CoD: BLACK OPS 6 / (55)
- Grow a Garden 2 / (51)
- Path of Exile 2 / (48)
- Monster Hunter Wilds / (46)
- Windrose / (44)
- Path of Exile / (40)
- Bee Swarm Simulator / (36)