


 0
0Monster Hunter Wilds Capturing Monsters Guides
- Layla
- Share
- Monster Hunter Wilds
- 04/11/25
- 1138
Players get the opportunity to partake in both hunting and capturing the terrifying beasts in the regions beyond Monster Hunter Wilds. This guide will discuss the benefits of capturing monsters, how to increase your chances of a successful capture, as well as additional tips that would enhance your gameplay in the Wilds.
- Benefits of Capturing Monsters
- Preparation: Important Equipment and Preparation
- The Hunt: Strategy and Execution
- Plan Your Weaken Strategy and Wait for Correct Timing
- Challenges and Considerations
- Capturing vs. Killing: Weighing the Options
- The Nuances of the Trap System
- How to Capture Monsters Successfully
- Gather Essential Items
- Crafting Materials Needed
- Deploying Traps and Tranquilizers
- Other considerations
- Capturing the Pregnant Mudfish: A Special Mission
- - Fishing Spots Recommend
- - Fishing Instructions
- Making Strategies Using The Monster Field Guide
- Sharpening The Techniques To Gain Maximum Rewards
- Tracking For Resource Farming
↖ Benefits of Capturing Monsters
The primary focus of capturing monsters instead of slaying them, is the aid they bring during expeditions. Most importantly expeditions will reward players with a greater value of materials, even rare ones. Also, capturing monsters tends to be less time-consuming as they only have to be weakened instead of completely defeated. On the other hand, some hut objectives will require a specific type of strategic approach in order to capture certain rare MH Wilds items.
↖ Preparation: Important Equipment and Preparation
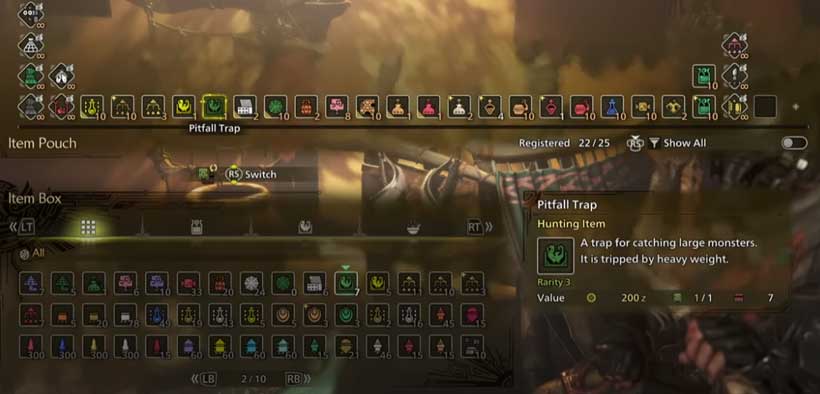
To ensure that you're able to effectively capture monsters, it's best to prepare ahead. Your inventory should significantly prioritize Traps, particulary the Shock Trap and Pitfall Trap. It is wise to carry both as some monsters will resist one of the traps. These can be assembled around your base camp; however, some materials are harder to get. To craft the traps, you will need a trap tool which can be bought from provisions vendors.
For effective resource gathering, make use of the map's filter option at the lower left corner to identify specific crafting resources. This is particularly useful when sourcing materials for Tranq Bombs, which are required for capturing monsters. The ingredients to craft Tranq Bombs are sleep herbs and parach mushrooms. Prior to hunting, ensure you have stockpiled as many Tranq Bombs as possible.
↖ The Hunt: Strategy and Execution
Execute the fight as you normally would to initiate the hunt by engaging with the monster. Your primary focus is to exploit the creature's weak points to inflict damage and gather useful resources for the battle. Your goal is to deal sufficient damage to either force the monster to retreat or injure it visibly. A monster visibly weakened will be accompanied by visual cues along with audio indicators from your companion such as, It's looking weak, and Almost there.
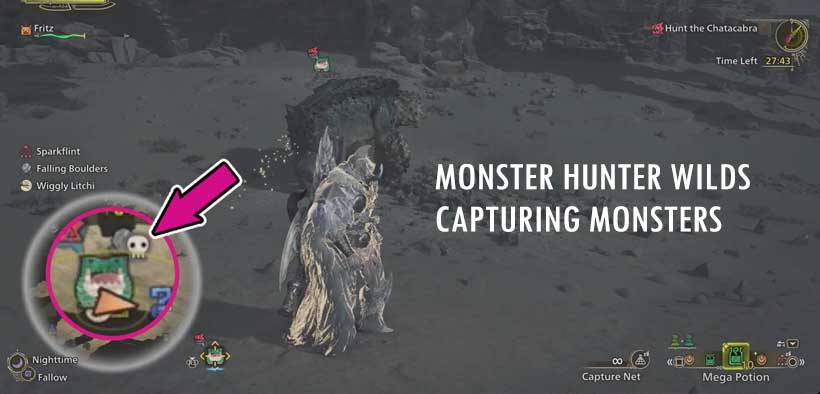
The most definitive sign that a monster is ready for capture is indicated by a flashing skull icon on the mini-map at the lower left corner of your screen. At this point, it is time to set up the trap. Select the shock trap to use and place it along the path that the monster will be crossing to ensnare it. After the monster is immobilized, use two or three Tranq Bombs to successfully capture the creature.
↖ Plan Your Weaken Strategy and Wait for Correct Timing
Don't forget to fight to weaken a monster. A skull icon in the minimap indicates your cue.
Other cues are the verbal clues provided by your Palico or other hunters as well as observing the monster retreating to its nest, oftentimes limping and looking beaten.
↖ Challenges and Considerations
Though this strategy is useful for most of the major monsters in the game, shock traps do not work for certain species. In that case, resort to using pitfall traps. Stockpiling and farming Tranq Bombs is a wise move, especially when dealing with rare monsters or ones that you need specific parts from to upgrade your equipment.
↖ Capturing vs. Killing: Weighing the Options
Capturing a monster requires bringing it down to low health, usually less than 20 percent, verified by an audio cue from your Palico or a flashing skull on the mini map. Capturing not only ends the fight but makes sure that all carvable item rewards are obtainable without delay.
In an attempt to accelerate resource farming, capturing is done most frequently. This is especially great when advancing through the main game or for chores. Nevertheless, knowing which parts drop from and how to get them is necessary.
↖ The Nuances of the Trap System
First-time players in Monster Hunter Wilds need to grasp the understanding of the Trap system. For this purpose, the game has two sets of traps: The Shock Trap and The Pitfall Trap. Making these traps requires the following components: nets, trap tools, thunderbug capacitors, and trap tools. Bringing both types of traps is highly encouraged, along with extra trap tools, nets, and capacitors, so more traps can be crafted on-the-go during the hunts.
Adding traps to your radial menu improves the interface accessibility. If capturing is your purpose, subduing targets with Tranq Bombs is vital for keeping them within a trap at low health. An interesting aspect of monster hunter wilds is the ability to reclaim unused traps which return to your inventory when a monster escapes to a different zone.
Apart from capturing monsters, traps can also serve many utilitarian functions. They can be used for subduing monsters during battles too. When enraged or especially difficult, traps can immobilize monsters allowing hunters to deal big damage. This is excellent for hindering specific body parts which otherwise would be hard to hit as part recovery.
↖ How to Capture Monsters Successfully
For effective and non-lethal monster capturing, attention to detail is essential. Follow the tips and steps below carefully:
↖ Gather Essential Items
Not all traps work on every monster. For example shock traps do not work on Rey Dau and Jin Dahaad cannot be captured at all. There is no foolproof approach, so thought needs to be put into trap selection depending on the target monster.
Make sure you pack the following essentials:
A Shock or Pitfall Trap
Tranquilizer Bombs, blades, or ammo for ranged combat users
Can be gathered throughout different areas.
Don't forget to bring 200 Zennys for purchase of the trap tools needed to craft traps.
↖ Crafting Materials Needed
- Pitfall Trap: Net and trap tool
- Shock Trap: Thunderbug Conserver and trap tool
- Tranquilizer Bombs: Parashroom and sleep herb
- Tranquilizer Blades: Tribombs and throwing knives
Be sure to pack these items as well. Organizing them in the radial menu will grant speedy access and save time which is crucial once a monster is captured.
↖ Deploying Traps and Tranquilizers
When you are prepared to capture, set a trap and lure the monster into it. In general, standing behind the trap is good enough because aggressive monsters tend to charge to where you are standing.
If the monster retreats to its nest and sleeps, take this opportunity to set your trap.
After the monster is trapped, use tranquilizers. Usually two of any type will get the job done.
Make sure the trap is accurate because for precise hits, calmness is a must.
You must have ease with your traps to succeed in the capture.
Whenever a monster is captured, its hunt concludes with a summary screen detailing the materials obtained and a shortened 20 second end timer.
↖ Other considerations
Dealing with Floating or Flying Monsters
Airborne creatures prove difficult when using ground traps.
Use flash pods to bring them down over the trap or wait until they land before setting it.
↖ Capturing the Pregnant Mudfish: A Special Mission
An NPC in Monster Hunter Wilds gives you the quest of capturing a Pregnant Mudfish, for which you had undertaken the quest Fishing for Aroma, which is given to you at the base camp by Kanya your fishing partner where she frequently sets up shop.
Finding and Catching the Pregnant Mudfish
Location and Time of Catching the Fish
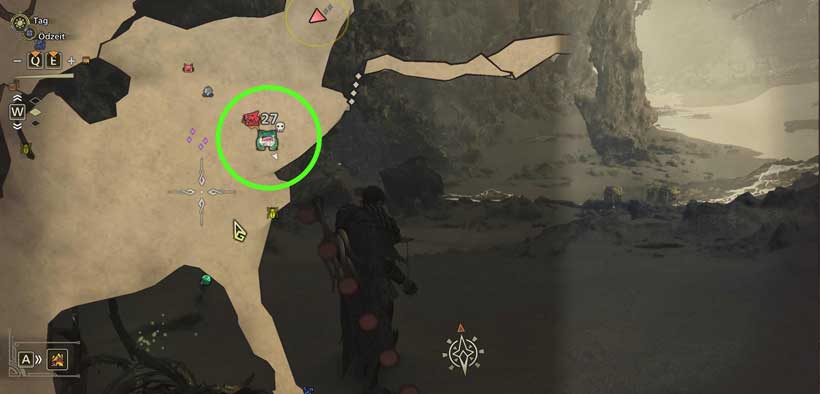
In all biomes, this fish can be found in plenty as it appears only during high times of dawn or during night.
In your tent, use Rest to change time to these settings for the price of 300 points.
Look for the Pregnant Mudfish which is marked by orange color and barbs around its mouth that set it apart from green counterpart. All pregnant mudfish have two barbels around their mouths. .
↖ - Fishing Spots Recommend
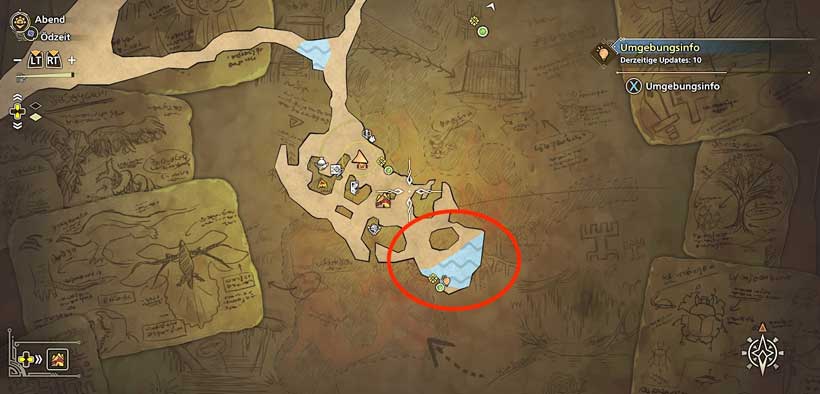
Wind Plains in Area 13 close to the oasis
Karminwald Base Camp where Kanya puts on her fishing shows

↖ - Fishing Instructions
Claim the Emerald Zapper Bait from Karina's quests and equip it.
Cast your bait where the fish will pass and slowly wind it in, then when you have caught one, use the rod to bring it up slowly.
Recalls as necessary.
Only captures through the fishing rod will count towards completing the quest.
↖ Making Strategies Using The Monster Field Guide
Every hunter, old or new, will find unrivaled value in the Monster Field Guide. Every monster is accompanied with some amount of detailed information such as breakable parts, elemental weaknesses, and even how effective traps will be. Focusing on the severable and breakable parts guarantees greater rewards for the hunters. For example, extra resources are often granted when wings are broken or tails are severed.
Rewards for carving are automatically granted when trapping is done. However, some rare items can only be claimed as rewards when specific wounds are inflicted. Therefore, a balance has to be made between speed and efficiency while capturing and inflicting wounds.
↖ Sharpening The Techniques To Gain Maximum Rewards
In order to enhance resource acquirement, hunters need to pay attention to skills such as Partbreaker and Flare. The ease in inflicting wounds is enhanced by Flare, which also adds extra non-elemental damage. The skill increases part damage by 30 percent. Using both ensures that skeletons take the maximum damage early in the fight so that they become easier to deal with later which makes trapping the hunters more effective as the battle goes on.
↖ Tracking For Resource Farming
As previously mentioned, monitoring investigations and active events on the map, is essential when resource farming. Certain events or monsters can be logged depending on how the tent is used to rest, certain times can be switched be altered as well which aids in resource farming maximizing the amount gained for each hunt.
To summarize, Monster Hunter Wilds puts an emphasis on meticulous execution and planning when it comes to setting up traps and hunting. With the right focus, resource optimizing, skill usage and monster behavior understanding, hunters are able to gather and craft resources more efficiently. Both capture and kill methods have their advantages and disadvantages, ultimately which you choose depends on your goals and gameplay preferences.
Most Popular Posts
- MH Wilds Artian Weapons Guide: Materials, Craft and Upgrades
- Monster Hunter Wilds Bow Builds: Mastering the Dragon Piercer Build Guides
- MH Wilds: All Weapons Tier List & Ranking | Speedrun Clear Time
- MH Wilds New Endgame Builds: Zoh Shia Armor Set
- How to Obtain Rare Monster Hunter Wilds Commission Tickets?
- Monster Hunter Wilds Best Endgame Angelbein Bow Build Guides
Popular Category Lists
- Grow a Garden / (286)
- ARC Raiders / (262)
- CoD: Black Ops 7 / (166)
- Monopoly Go / (146)
- MLB 26 / (145)
- Star Citizen / (112)
- Steal a Brainrot / (89)
- Sailor Piece / (68)
- ARK Survival Ascended / (67)
- Diablo IV / (61)
- Forza Horizon 6 / (60)
- Blox Fruits / (60)
- CoD: BLACK OPS 6 / (55)
- Adopt Me / (53)
- Path of Exile 2 / (48)
- Monster Hunter Wilds / (46)
- Windrose / (44)
- Path of Exile / (40)
- Grow a Garden 2 / (40)
- Bee Swarm Simulator / (36)


