


 0
0ARC Raiders Sentinel Firing Core: Best Locations, Safe Routes, and Fast Loops
- KIVRI
- Share
- ARC Raiders
- 11/05/25
- 37055
ARC Raiders Rare mats punish two things: randomness and wasted minutes. Sentinel Firing Cores are scarce and spawns are picky—but you can bend the odds by running short, repeatable loops where ARCs are sparse and Sentinel spawns sit close together. Dam Battlegrounds is built for this. Start at Research & Administration, pocket two close Sentinels fast, then roll north along green-marked spawns. Here's a practical, no-fluff playbook that trades luck for attempts per hour and keeps you alive long enough to cash the drops.
- Core Principle: Attempts × Safety Beats Low Drop Rates
- Best Locations and Route: South Start, North Push
- Execution Loop: Scout → Eliminate → Reset
- Loadout for Short, Safe Loops
- KPIs to Keep You Honest
- Risk Management: People and Bots
- What Works and What Trips You Up
- FAQ
- Summary
↖ Core Principle: Attempts × Safety Beats Low Drop Rates
Sentinel Firing Cores aren't guaranteed. That means your win condition is more tries with fewer losses.
Why this works:
Lower ARC density on Dam Battlegrounds reduces interruptions; tight spawn spacing compresses travel time.
How to judge success
- Loop Time: 3–7 minutes per circuit (toward 7 min if you clear two Sentinels).
- SR (Survival Rate): ≥70%; if you dip below, shorten loops and avoid indoor brawls.
- Kills/hour: Solo 6–10 Sentinels; squad 10–14, depending on spawns and pathing.
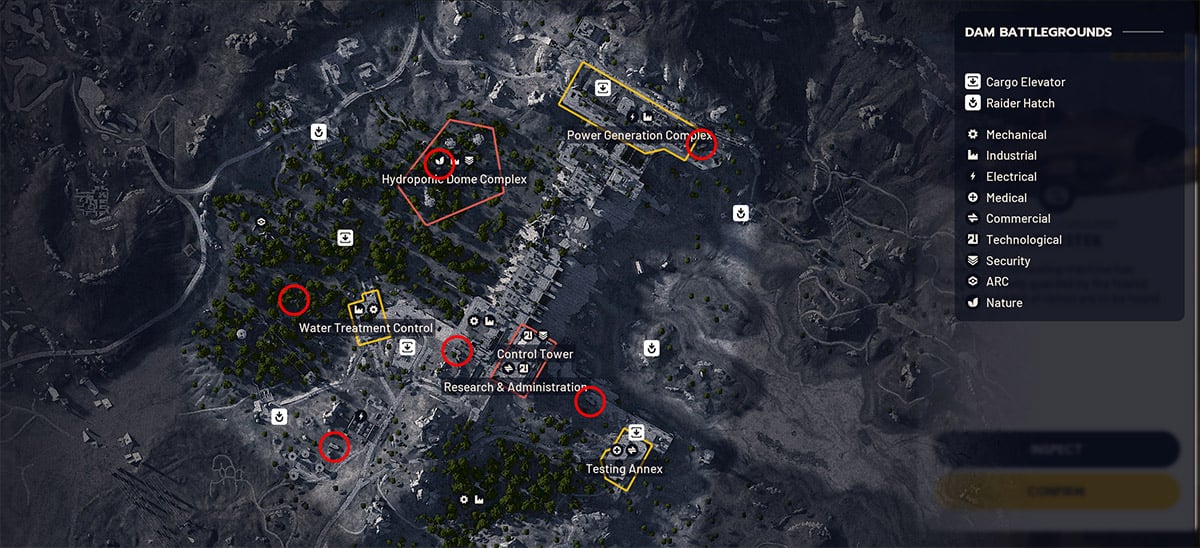
↖ Best Locations and Route: South Start, North Push
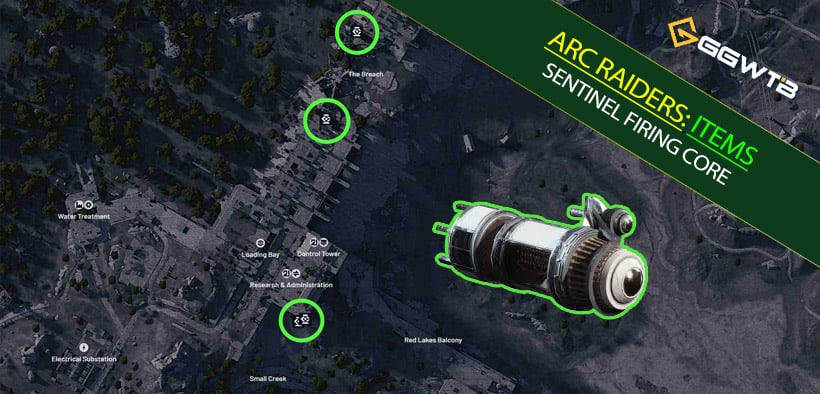
Priority Start: Research & Administration (R&A)
Why start here:
It's the southernmost Sentinel spawn and the map's only area with two Sentinels in close proximity—two roll chances with minimal reposition.
Practical notes
- Roof target: One Sentinel often perches on a roof near the stairs; a DMR/accurate AR lets you delete it from safety.
- Ground target: The second patrols nearby at lower elevation; plot your cover line, decide fight or bypass fast.
The Northbound Chain: Green Spawn Band
- Recommended flow: R&A double → midline two spots → northern cleanup → nearest extract.
- Route advantage: Short distances between points mean you can string engagements along hard cover, avoiding flanks and backfills.
If you find the south cleared, immediately swap to the next northern node; don't loiter more than 30 seconds on an empty point.
↖ Execution Loop: Scout → Eliminate → Reset
1) Scout (15–30s)
- Long visual check: Confirm if the roof Sentinel is present; if not, use audio cues/markers to track ground patrols.
- Player presence: Frequent gunfire or scattered loot hints at competition—accelerate or offset to the next node.
2) Eliminate (30–90s)
- Roof priority: Use magnification and AP ammo; short, controlled bursts at head/upper torso during peek windows.
- Ground priority: Run a straight cover line; break shield with sustained fire, then strafe to finish. If >3 adds converge, thin them with a nade/EMP first.
- Don't stall: Post-kill, avoid looting in place for >10s. If the core doesn't drop, tag the site mentally and keep moving north.
3) Reset (10–20s)
- Rejoin the main cover route; avoid building-to-building detours that warp your path.
- Hard timer: If the loop exceeds 7 minutes, extract. Attempts per hour beat one more check.
↖ Loadout for Short, Safe Loops
Primary:
Mid-long precision (DMR/accurate AR) for roof Sentinels—precision > raw DPS here.
Secondary:
Close-range emergency (SMG/fast pistol) for surprise players or small ARCs.
Utilities
- Adrenaline: Treat as movement tech to break contact, not a luxury. Popping it early often saves a run.
- Throwables: 1–2 HE or EMP depending on Sentinel shield and add density.
- Ammo/Heals: Pack for 7–10 minutes. Overpacking consumables is anti-loot.
Carry discipline:
Keep ≥3 free slots for priority drops; if you catch yourself looting clutter for >30s, walk away.
↖ KPIs to Keep You Honest
Loop Time: 3–7 minutes per circuit.
SR (Survival Rate): ≥70%; if lower, trim fights and skip indoor clears.
Kills/hour: Solo 6–10, squad 10–14.
Decision lines
- Two empty nodes in a row → half-loop extract and reset instance.
- No drop after 3 full loops → tighten scouting priority to Roof → Ground → Secondary nodes or rotate band.
↖ Risk Management: People and Bots
- Player density: R&A is the textbook start, so expect traffic. Create a 15-second offset by flanking before committing; or slip in midline first, then backfill south.
- ARC clusters: If non-Sentinel adds >3 and forming a fan-angle, reset distance before committing. Forced trades balloon loop time.
- Exfil discipline: Use the nearest low-profile exit. If your bag holds other high-value loot, cut the loop short—half-loops still progress the goal.
↖ What Works and What Trips You Up
Working patterns
- Roof peeks cycle quickly—short bursts beat long sprays for consistent knockdowns.
- If the double spawns only one, don't camp. Next node attempts are worth more than waiting.
- In squads, call firing order and angles to avoid crossing lines; desync loses fights you should win.
Common mistakes and fixes
- Clearing all adds before engaging the Sentinel → Fix: snipe priority target first to compress fight time.
- Full loot sweep after each kill → Fix: grab the core if it drops, otherwise move; return next loop if needed.
- Overtime chasing just one more → Fix: timer goes off, you go out. Opportunity cost beats hypothetical drops.
↖ FAQ
I keep whiffing drops—am I doing something wrong?
Probably not. This is an attempts game. Keep loops to 3–7 minutes and SR ≥70%; your hourly expected drops rise sharply.
Solo or squad?
Solo extracts faster with flexible routing; squads handle density and contested nodes better. If solo SR <60%, squad up until you learn the line.
Do I have to start at R&A?
Not mandatory, just optimal when available because it's the only close double spawn. If you spawn mid-map, plug into the nearest green-band node.
Can't see the roof Sentinel—what now?
Sweep with optics, use audio, and if still nothing after two passes, treat it as empty and rotate. Waiting tanks your attempts/hour.
What if I run into other Raiders mid-loop?
Prioritize the objective. If you've already killed a Sentinel and the timer is near your cap, disengage and extract rather than turning the loop into a protracted PvP.
↖ Summary
Treat Sentinel Firing Cores like a probability problem, not a boss grind. Dam Battlegrounds gives you low ARC density and tight spawns; open at Research & Administration for the two quick rolls, then move north along the band. Keep loops short, fights clean, and extracts disciplined. If you stick to roof pick first, empty node moves, timer rules the run, rare cores stop feeling like luck and start feeling like throughput.

Most Popular Posts
- ARC Raiders Riven Tides Key Room Guide: Best Hotel Keys, Loot Routes, Secure & Crane Storage
- ARC Raiders Damage Fireflies Trial Guide: Best Farm Method on Buried City Night Raid
- ARC Raiders Riven Tides Update: New Map & Items, ARC Turbine, Rewards, and Best Early Strategy
- ARC Raiders Bettina Guide: Best Build, Buffs, and How to Use It Against ARC
- ARC Raiders Solo Search Supply Drops Guide: Best Buried City Route, Beacon Locations
- Arc Raiders Season 4 Riven Tides Update, Rewards, Safe Skins, and Release Timeline
Popular Category Lists
- Grow a Garden / (286)
- ARC Raiders / (263)
- CoD: Black Ops 7 / (166)
- Monopoly Go / (146)
- MLB 26 / (145)
- Star Citizen / (114)
- Steal a Brainrot / (89)
- ARK Survival Ascended / (72)
- Sailor Piece / (68)
- Forza Horizon 6 / (62)
- Diablo IV / (61)
- Blox Fruits / (60)
- CoD: BLACK OPS 6 / (55)
- Adopt Me / (53)
- Path of Exile 2 / (48)
- Monster Hunter Wilds / (46)
- Windrose / (44)
- Grow a Garden 2 / (41)
- Path of Exile / (40)
- Bee Swarm Simulator / (36)


