


 0
0Fastest Ways to Make ARC Raiders Coins: Pro Routes, KPIs, and Safe Extract Tactics
- KIVRI
- Share
- ARC Raiders
- 11/05/25
- 1837
You want to stop bleeding ARC Raiders Coins and start scaling upgrades without anxiety. The fastest way isn't a mystery run—it's a repeatable system that treats the map like a cashflow network. Here's how it works: cap your time, maximize slot value, and route into low-contact, high-density containers that reliably roll blue/purple valuables. Below is a compact, boots-on-the-ground playbook with five fastest paths, exact KPIs, and the mid-run decisions that keep your CPM climbing.
- Red-Zone Sprint (High Risk, High Return)
- Probe & Raider Cache Ring (Steady, Low Contact)
- Commercial Drawer Farm (Mid Risk, High Density)
- Outer Rim In-and-Out (Baseline Cashflow)
- Blue Gate Village Sweep (Sleeper Rich Zone)
- Mid-Run Decisions: Make the Bag Smarter
- Team vs. Solo: Pick for the Fight, Not the Ego
- Tools, Keys, and Safety Net
- KPIs That Keep You Honest
- Map-Specific Snapshots
- Common Mistakes and Fixes
- FAQ
- Summary
↖ Red-Zone Sprint (High Risk, High Return)
Hit red high-value rooms; loot only drawers/cabinets/locked boxes. No propping doors, no sightseeing.
Why it wins:
These containers have the best roll rates for blue/purple trinkets and keys—your “second spike” for future runs.
How to run
- Night bias → stronger loot potential; bring Adrenaline to break ARK chases.
- Time cap 8–10 min; extract once bag value ≥30k or Slot Value (SV) ≥2,000/slot.
- Late-entry works; you'll vacuum the high shelves and drawers others skip.
Trade-offs:
Higher PvP/ARK density; requires discipline to leave on time.
Metrics:
Great run 8 min → 40–50k gross; typical 20–35k; night +15–25%.
Common pitfall:
Overfighting; if Survival Rate (SR) <70%, pivot to Route 2 or 4.
↖ Probe & Raider Cache Ring (Steady, Low Contact)
Follow outdoor lines to hit ARK Probes and Raider Caches via sound/map icons.
Why it wins:
Stable blue/green mats and mid-high utility items with near-zero combat cost.
How to run
- Do half a loop; if bag ≥15k or nearly full, extract—time beats greed.
- Keep minimap rolling; divert instantly when icons ping.
Trade-offs:
Lower spikes than red rooms, but much safer.
Metrics: 15–18 min → 12–25k, high SR.
Common pitfall:
Completing full rings after the bag is already efficient—wastes CPM.
↖ Commercial Drawer Farm (Mid Risk, High Density)
Focus on Commercial zones; sweep drawers/cabinets for trinkets.
Why it wins:
Single-slot 7–10k items + 3k stackables thrive with expanded trinket slots.
How to run
- Drawer-first routing; keep paths straight, stops short.
- If SV <1,000, put it back. Aim for SV ≥2,000 as your default.
Trade-offs:
Moderate PvP; more building time, less open-map exposure.
Metrics:
20–30 min → 25–40k; spikes with purple keys/rarities.
Common pitfall:
Carrying ammo/meds for 20+ minutes; pack for a hard 10-minute cap.
↖ Outer Rim In-and-Out (Baseline Cashflow)
Hit nearest outer POIs, fill to half, extract quickly, repeat small loops.
Why it wins:
You leave before convergence; profit via inventory turnover.
How to run
- Free kit → secure first Augment → rotate into Route 1 or 3 when stabilized.
- Pre-check nearest extract; plan your return angle from the start.
Trade-offs:
Lower ceiling; ultra-consistent floor.
Metrics:
6–8 min → 6–12k; excellent for raising SR and CPM stability.
Common pitfall:
Greed for one more room near extract; SR tanks.
↖ Blue Gate Village Sweep (Sleeper Rich Zone)
Field-tested hotspot once you unlock Blue Gate (~15–20 raids in).
Why it wins:
Low ARK pressure (mostly drones/rollers/face huggers), ample buildings, easy player avoidance; purple valuables appear surprisingly often.
How to run
- Route every building, shop, trash can; pick nearby fertilizer piles (stack to 5; ~1,000 each).
- Watch for the turret-building: breachable door inside yields dense loot and a guaranteed weapon crate; HOT PvP—clear fast or skip if SR dips.
- Bring a Raider Hatch key for low-profile extracts; supports back-to-back loops.
Trade-offs:
Occasional turret and player spikes; requires map confidence.
Metrics (team-tested):
30–60k per run with a looting party; solo often higher due to no splits.
Common pitfall:
Overstaying to chase a fourth building cluster; enforce the time cap.
↖ Mid-Run Decisions: Make the Bag Smarter
Fast heuristics
- Bag value is your hourly wage meter. If a new item barely moves total value, skip it.
- Slot targets: prioritize ≥2,000/slot; floor at 1,000/slot. Stackables compound value quickly.
Salvage vs. Recycle
- If you can carry it, prefer base Recycle for better yields.
- If near weight cap with rich containers ahead, Salvage minimally to free 2–3 slots.
Ammo/Heals packing
Pack for an 8–10 minute ceiling; excess consumables are anti-loot.
↖ Team vs. Solo: Pick for the Fight, Not the Ego
- Solo shines: Red-Zone Sprint, Commercial Drawer Farm—no splits, faster extracts.
- Team excels: Night key rooms, multi-room clears, turret-building breaches.
- Rule of thumb: Contesting hot rooms? Team up. Drawer/outer loops? Go solo.
If SR <70% across last five runs, downgrade to Route 2/4 until stabilized.
↖ Tools, Keys, and Safety Net
- Adrenaline: Low-cost escape button; treat it as movement tech, not luxury.
- Keys: Higher night ROI; use double safe slots to transport without stress.
- Two-picture bookkeeping: Pre/post-raid inventory screenshots prevent miscount disputes and sharpen learning.
↖ KPIs That Keep You Honest
- Coins per Minute (CPM): target ≥2,000; red-zone night peaks 4,000–6,000.
- Slot Value (SV): average ≥2,000/slot; anything <1,000 clogs growth.
- Survival Rate (SR): keep ≥70%; if not, switch to safer routes until SR recovers.
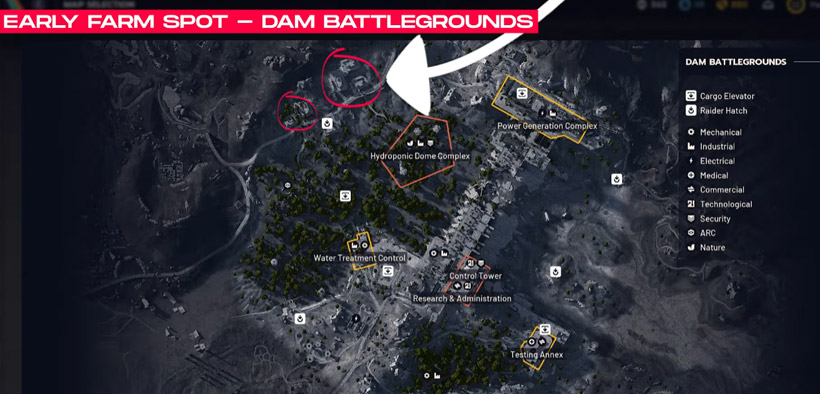
↖ Map-Specific Snapshots
Dam Battlegrounds – Control Tower (ground floor back area):
condensed blue/green lockers; quick in-and-out before crowds.
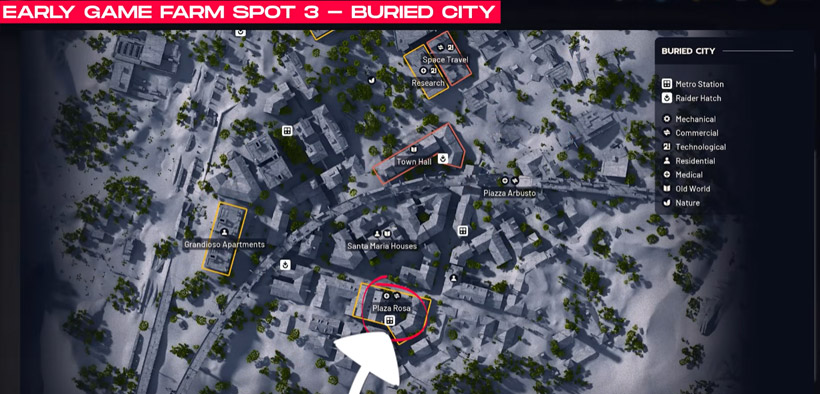
Buried City – Plaza Rosa + Bastion:
excellent but popular; plan for the ARK boss and heavier PvP.
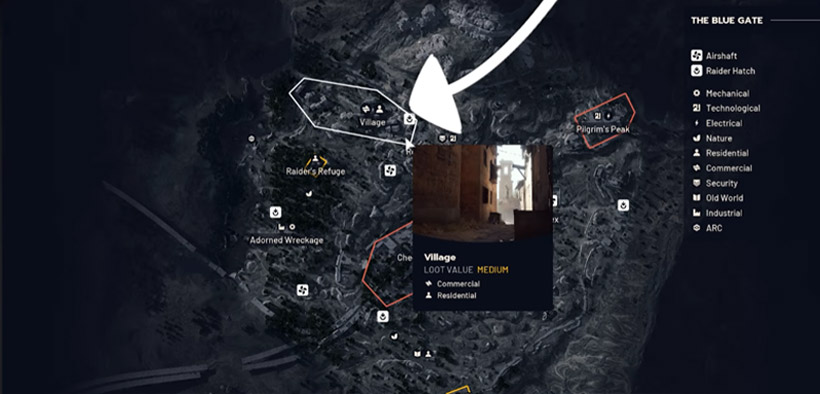
Blue Gate – Village:
wide building density, low ARK pressure, frequent purple valuables; leverage Raider Hatch for stealth extracts.
↖ Common Mistakes and Fixes
Staying past the 10-minute cap for one more room → Fix: bind extract timer; leave when SV target is hit.
Overpacking bullets/meds → Fix: stock for 8–10 minutes, not a dungeon crawl.
Ignoring extracts until the bag is full → Fix: pick an exit on spawn; route back as you fill.
Looting everything equally → Fix: draw a hard SV line and keep swapping up.
↖ FAQ
Q: I'm new and die a lot on Dam Battlegrounds—where do I start?
-A: Outer Rim In-and-Out loops. Build SR first, then pivot to Control Tower lockers or Commercial drawers.
Q: Does night always beat day for loot?
-A: Not always, but night correlates with stronger drops in high-value containers. ARKs hit harder—bring Adrenaline and a time cap.
Q: How do I hit 30–60k consistently?
-A: Run Blue Gate Village or Red-Zone Sprint with strict time caps, SV ≥2,000, and stealth extracts (Raider Hatch key). Team splits lower per-person yield; solo often nets more.
Q: Keys are scarce—worth saving?
-A: Yes. Keys unlock second spikes and reduce future time-to-value. Carry in safe slots.
Q: My CPM is stuck at ~1,200. What should I tweak first?
-A: Shorten runs to 8 minutes, enforce SV ≥2,000, and switch to low-contact routes (2/4) until SR ≥70%.
↖ Summary
Treat ARC Raiders like a cashflow machine: short runs, high SV, reliable extracts. Rotate among five routes—Red-Zone Sprint, Cache Ring, Commercial Drawers, Outer Rim loops, and the Blue Gate Village sweep—based on your gear and SR. If you keep the clock tight and the bag smart, 30–60k per run stops being an outlier and starts becoming your new normal.

Most Popular Posts
- ARC Raiders Riven Tides Key Room Guide: Best Hotel Keys, Loot Routes, Secure & Crane Storage
- ARC Raiders Damage Fireflies Trial Guide: Best Farm Method on Buried City Night Raid
- ARC Raiders Riven Tides Update: New Map & Items, ARC Turbine, Rewards, and Best Early Strategy
- ARC Raiders Bettina Guide: Best Build, Buffs, and How to Use It Against ARC
- ARC Raiders Solo Search Supply Drops Guide: Best Buried City Route, Beacon Locations
- Arc Raiders Season 4 Riven Tides Update, Rewards, Safe Skins, and Release Timeline
Popular Category Lists
- Grow a Garden / (286)
- ARC Raiders / (263)
- CoD: Black Ops 7 / (166)
- Monopoly Go / (146)
- MLB 26 / (145)
- Star Citizen / (114)
- Steal a Brainrot / (89)
- ARK Survival Ascended / (72)
- Sailor Piece / (68)
- Forza Horizon 6 / (62)
- Diablo IV / (61)
- Blox Fruits / (60)
- CoD: BLACK OPS 6 / (55)
- Adopt Me / (53)
- Path of Exile 2 / (48)
- Monster Hunter Wilds / (46)
- Windrose / (44)
- Grow a Garden 2 / (41)
- Path of Exile / (40)
- Bee Swarm Simulator / (36)


